

Most teams record a great product demo or webinar, post it once, and then let it sit in a folder forever. That one recording actually holds a week of content: the best quote, the clearest feature explanation, the customer story, the pricing answer. Videco AI exists to pull all of that out for you. Videco AI is an AI content studio and video hosting workspace that turns one long recording into branded short-form clips, personalized landing pages, and a full campaign — without you opening a video editor. It launched on Product Hunt on November 3, 2026, and reached number 5 Product of the Day with 123 upvotes, so it is brand new and very much a beginner-friendly tool to learn right now. This guide walks you through exactly how to use Videco AI, from your first upload to your first published campaign.
Step 1: Understand What Videco AI Actually Is
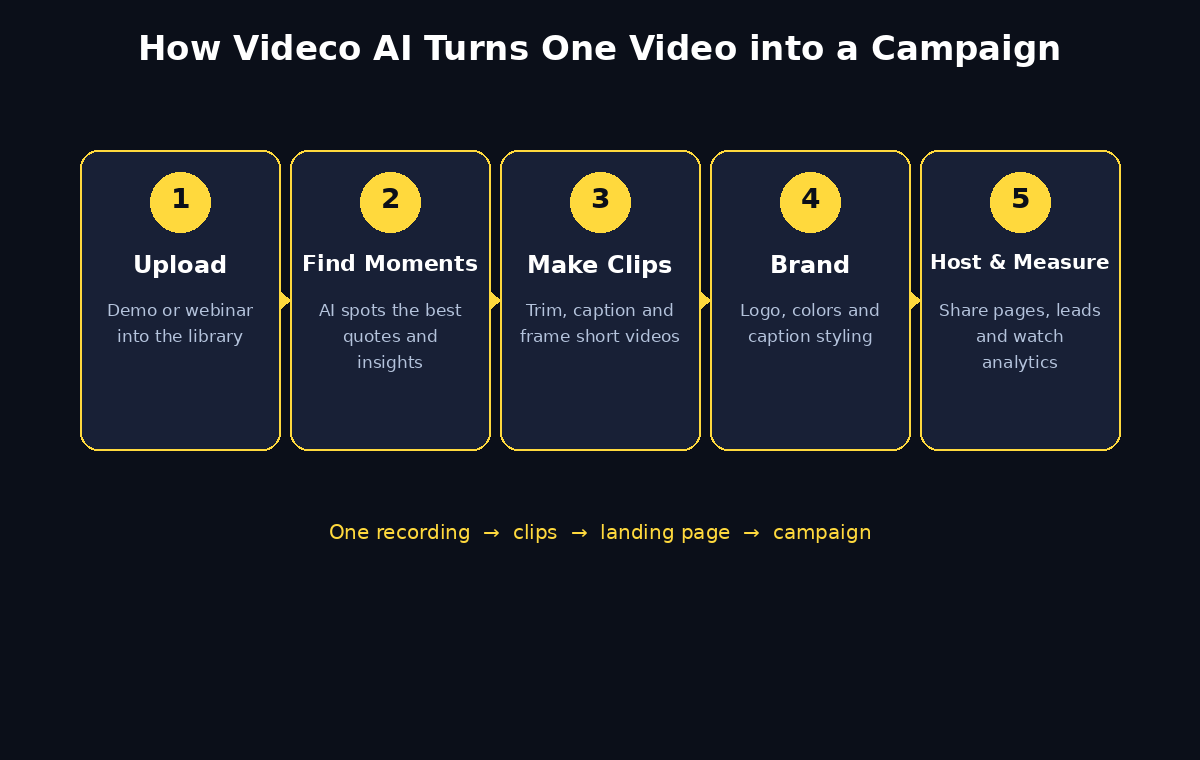
Videco AI is two tools in one workspace. The first half is the Content Studio: you upload a long recording — a product demo, a webinar, an interview, a team call — and the AI finds the moments worth sharing, then helps you turn them into short clips with captions and your branding. The second half is video hosting: Videco AI hosts your videos, gives you a branded player, watch pages, and an embed snippet, and measures who watched what. The workflow Videco AI itself describes is simple: Repurpose, Refine, Brand, Host, Share, Measure. You start with a video you already have, and you end with a campaign made from it.
Who is Videco AI for? Marketing teams and small businesses that already record demos and webinars but do not have a full-time video editor. If you are a solo creator, the same workflow works for you: one long recording becomes a week of short posts. If you work at a digital agency, Videco AI also fits client work, because you can send clients review links and branded landing pages without building anything from scratch. Keep your expectations honest, though: Videco AI is a repurposing tool, not a magic content machine. The quality of your clips still depends on the quality of the original recording, so a clear demo with good audio will always beat a noisy, rambling call.
Step 2: Create Your Videco AI Account
Start at videco.io and create your account. You will sign up with your email and a password, or with a connected Google account if that option is offered. Pick the workspace name carefully, because this is the name your team and your clients will see on watch pages and review links — your company or brand name is the right choice, not a personal nickname. After sign-up, Videco AI takes you to your workspace dashboard, where your video library lives. Spend two minutes looking around before you upload anything: find the library, the Content Studio, the brand settings, and the analytics tab. Knowing where those four areas live will save you hunting later.
One practical tip for beginners: use a work email address for the account, not a personal one. Campaigns, client review links, and lead notifications will all flow to that inbox, and you do not want them mixed with your personal mail. If your team will use Videco AI together, check whether your plan includes extra seats before you start inviting people — the Lite plan is built for individual creators, while team plans add more seats and storage.
Step 3: Upload Your First Video to Videco AI
Your first job in Videco AI is to get a recording into the library. Click upload and choose a video from your computer — a product demo, a webinar recording, or a customer interview are all good first choices. Pick a recording that is at least a few minutes long and has clear speech, because the AI finds moments by listening to what is said. A 30-minute webinar with one strong product explanation inside it is a better first test than a 90-second teaser with almost no talking.
While the upload processes, Videco AI prepares the video for the Content Studio: it transcribes the audio and indexes the content so the AI can search for moments. Give it a clear title while you wait, something like “Product Demo — November 2026” rather than “final_FINAL_v3.mp4”. A good title helps you find the video again in a month, and it shows up on watch pages if you share the hosted video. If you have several recordings, upload your best one first and learn the workflow on it before you bulk-upload the rest of your library.
Step 4: Let Videco AI Find the Best Moments
Open your uploaded video in the Content Studio and let Videco AI show you what it found. The AI scans the transcript for useful insights, product benefits, standout quotes, and clear explanations — the parts of a recording that can stand on their own as a short clip. You will see a list of suggested moments, each with a short description and a time range. This is the step that saves the most time: instead of rewatching a 45-minute webinar, you review a shortlist in a few minutes.
Do not accept every suggestion blindly. Listen to each suggested moment and ask one question: would this make sense to someone who never saw the full video? A moment that starts mid-sentence or depends on a slide from ten minutes earlier will confuse viewers. Keep the moments that are self-contained — a complete tip, a complete answer, a complete story — and skip the rest. You can also search the transcript yourself for a keyword, like your product name or a feature name, and jump straight to every place it was mentioned. That is the fastest way to find the moment you already know you want.
Step 5: Turn Moments into Short-Form Clips with Videco AI
Pick a moment and turn it into a clip. In the Content Studio you can trim the start and end, adjust the framing for vertical video, and preview the result before you export. Short clips work best when they are focused on one idea: one benefit, one answer, one story. Aim for 30 to 60 seconds per clip. That length fits TikTok, Instagram Reels, YouTube Shorts, and LinkedIn, and it is short enough that a viewer finishes it.
Captions matter more than most beginners expect. Most people watch short video with the sound off, so Videco AI adds captions to your clips automatically — check them before you export, because an AI transcript can mishear a product name or a number. Fix any wrong words in the caption editor. Then check the framing: if the speaker’s face is cut off in the vertical crop, adjust the framing before you export. A clip with clean captions and a well-framed speaker looks professional; a clip with wrong captions looks careless, even if the content is good. Export your first clip and watch it once on your phone before you make ten more — one careful check now prevents ten small fixes later.
Step 6: Brand Your Clips in Videco AI
Raw clips look generic. Branding is what makes them look like yours. In Videco AI, set up your brand kit first: your brand colors, your logo, your caption styling, and a motion template if one is available. Apply the brand kit to your clips so every export carries the same look — the same caption font, the same colors, the same logo position. Consistency is what makes a small team look like a serious brand on a social feed.
Keep the branding light. A small logo in a corner and clean caption styling is enough; a giant watermark across the middle of the frame distracts from the person speaking. If you are making clips for a client, set up a separate brand kit for that client so their colors and logo travel with their clips. And remember that branding is not only visual: the words in the clip matter too. A clip that opens with your product name in the first three seconds teaches viewers what they are watching before they scroll away. If you run AI automation services or an agency workflow, branded clips are also the easiest deliverable to hand to a client — one link, one consistent look, no editing software needed on their side.
Step 7: Build a Campaign Landing Page with Videco AI
Clips are only half of a campaign. Videco AI also lets you publish personalized landing pages for your videos, with lead capture built in. Instead of sending someone a bare video file, you send them a branded watch page where they can watch the video and leave their details. That turns a video view into a lead you can follow up with.
To build one, pick your best video — usually the full demo or the strongest clip — and create a watch page for it. Add a clear headline that says what the viewer will learn, keep the page focused on one video and one action, and add a simple lead form: name and email is enough for a first campaign. Do not ask for ten fields; every extra field loses you viewers. Test the page yourself before you share it: open it on your phone, watch the video, fill in the form, and confirm the submission works. A landing page with a broken form is worse than no landing page at all.
Step 8: Host, Embed, and Share Your Videco AI Videos
Videco AI hosts your videos, so you do not need a separate hosting service for them. Every video gets a watch page you can share as a link, and an embed snippet you can drop into your own website or blog. The player is branded, which means your logo and colors travel with the video wherever it is embedded. Sharing is straightforward: copy the watch-page link for email and social posts, or copy the embed snippet for your site.
Choose the right sharing method for each place. On social media, post the short clips you made in Step 5 — native short video performs better than a link to a watch page. In an email to a warm prospect, send the watch page for the full demo, because the lead form on the page captures their interest. On your website, embed the player on the relevant product page so visitors can watch without leaving your site. One video, three sharing methods, three different audiences — that is what “one video, more ways to tell your story” actually means in practice.
Step 9: Send Client Review Links in Videco AI
If you make videos for clients, Videco AI has a feature built for you: client review links. You can send a content pack for approval on a magic link, and the client can approve it or request changes without logging in. That removes the usual back-and-forth of email attachments and “can you resend the file?” messages.
Use review links for every client delivery, even small ones. Send the link, tell the client exactly what you need — “approve these three clips or leave a comment on any clip you want changed” — and wait for their reply in one place. When a client requests a change, fix it in the Content Studio, re-export, and the same link shows the updated version. Keep the review step short: a client who has to approve twenty clips at once will stall, so send clips in small batches of three to five. This one habit — small batches, one link, one clear ask — is the difference between a smooth client approval and a week of chasing.
Step 10: Measure What Worked with Videco AI Analytics
After your campaign is live, open the analytics tab in Videco AI and look at what actually happened. The basics to check are views, watch time, and where viewers dropped off. A clip with many views but a sharp drop-off in the first five seconds has a weak opening — fix the hook next time. A watch page with many views but no form submissions has a weak offer or a form that asks too much — simplify it. A video that people watch to the end is a video worth clipping again.
Do this review once a week, not once a day. Daily numbers jump around and tempt you to change things too fast; weekly numbers show real patterns. Write down the one lesson from each week — “openings under three seconds work”, “pricing answers get the most watch time”, “vertical clips beat square ones” — and use it in the next campaign. Videco AI gives you the numbers, but the improvement comes from the habit of reading them and changing one thing at a time. If you want a deeper comparison of clipping tools before you commit to one workflow, our guide on how to use OpusClip AI for beginners shows a different approach to the same job, and our how to use Descript for beginners guide covers text-based editing for longer videos.
Step 11: Understand Videco AI Pricing Before You Scale
Before you build your whole video workflow on Videco AI, check the current pricing on videco.io. The Product Hunt listing shows a free starting price, and older listings quote a Lite plan around 17 to 19 euros a month for individual creators (up to 10 videos a month and 1GB of hosting), a Growth plan around 71 to 79 euros a month for teams, and a lifetime option around 180 euros. Those numbers come from third-party listings and can change, especially in launch week, so treat the pricing page on videco.io as the source of truth — not this guide, and not an old comparison site.
Start small either way. Run one full campaign — one video, three clips, one landing page — before you pay for a bigger plan. That single test tells you whether Videco AI fits your workflow, whether the AI moments are good enough for your videos, and whether your audience actually watches the clips. If the test works, upgrade to the plan that matches your volume: count how many videos you will process per month, and pick the plan whose limits you will not hit. If the test does not work, you have spent an afternoon, not a subscription. Never buy the biggest plan on day one for a tool you have not tested on your own recordings.
Videco AI vs Other Clipping Tools
Videco AI is not the only tool that turns long videos into clips. The right choice depends on what else you need besides clipping. Here is a quick comparison for beginners.
| Tool | Best for | Hosting included | Branded landing pages | Starting price |
|---|---|---|---|---|
| Videco AI | Full campaigns from demos and webinars | Yes | Yes, with lead capture | Free start listed; paid plans from ~€17/mo |
| OpusClip | Fast viral-style short clips | No | No | Free plan; Starter $15/mo |
| Descript | Text-based editing of long videos | No | No | Free plan available |
| Manual editing | Full creative control | No | No | Your time only |
The pattern is clear: if you only need clips, a dedicated clipping tool is faster. If you need clips plus hosting, landing pages, lead capture, and client approvals in one place, Videco AI covers the whole campaign. Pick the tool that matches the job you actually do every week, not the tool with the longest feature list.
Frequently Asked Questions About Videco AI
Is Videco AI free to use?
Videco AI is listed with a free starting price on Product Hunt, and older listings show paid plans starting around 17 to 19 euros a month for the Lite plan. There is no widely advertised free-forever plan with full features, so check the pricing page on videco.io before you commit — launch-week pricing can change quickly, and the pricing page is the only reliable source.
What kind of videos work best with Videco AI?
Long recordings with clear speech work best: product demos, webinars, interviews, and team calls where someone explains something out loud. The AI finds moments by listening to the transcript, so videos with almost no talking, or with very noisy audio, give it little to work with. A 30-minute webinar with one strong explanation inside it is a better first test than a silent montage.
How long should my Videco AI clips be?
Aim for 30 to 60 seconds per clip, focused on one idea. That length fits TikTok, Instagram Reels, YouTube Shorts, and LinkedIn, and viewers are more likely to finish it. If a moment needs more time, let it run to 90 seconds — but if it needs three minutes, it is probably two clips, not one.
Can I use my own branding in Videco AI?
Yes. Videco AI lets you set your brand colors, logo, caption styling, and motion templates, and apply them to your clips so every export looks consistent. Keep the branding light — a small logo and clean captions — so it frames the content instead of covering it.
Does Videco AI host my videos, or do I need another service?
Videco AI hosts your videos itself. Every video gets a branded watch page and an embed snippet, and the platform measures playback. You do not need a separate hosting service for the videos you publish through Videco AI, though you will still export clips separately for social platforms.
Who should use Videco AI?
Marketing teams and small businesses that already record demos and webinars, agencies that deliver video to clients, and solo creators who want one recording to become a week of content. If you never record long videos, Videco AI has nothing to repurpose — start by recording one good demo, then let the tool do its job.
Final Thoughts
Videco AI solves a specific, boring problem: good recordings going to waste. You already did the hard work when you recorded the demo or the webinar. Videco AI turns that one recording into clips, a landing page, and a campaign you can measure — and it does it without asking you to learn video editing. Start with one recording, follow the steps in this guide, and publish your first three clips this week. Watch the numbers for a week, keep the lesson, and repeat. That loop — record once, repurpose, measure, repeat — is the whole skill. The tool is new, the launch is fresh, and the workflow is simple enough for a complete beginner. Your next campaign is already sitting in your recordings.
Explore More Free AI Tools
Want more beginner-friendly AI tools? Try our AI Title Generator, Meta Description Generator, AI Rewriter, and Keyword Density Checker — free tools on AIToolSteps that help you write better titles, descriptions, and content for every guide you publish.