

Most AI video tools make you choose: a pretty clip with no sound, or a long wait while the model thinks. Pika H3 Flex AI breaks that trade-off. Launched on October 29, 2026, it creates 5 to 15 second video clips with synchronised stereo sound — dialogue, music, sound effects and ambience — in as little as seven seconds of model compute. It does this in only 6 generation steps instead of the usual 50, and it arrives inside the main Pika creation app on November 2, 2026, which makes today the perfect day to learn it.
In this beginner guide, you will learn exactly how to use Pika H3 Flex AI from your first free generation to your first finished clip: how to claim the free daily generations, how to write a shot-by-shot prompt, how to direct camera moves, how to use your own photos and videos as references, and how to upscale a winning draft to 4K. No video editing experience is needed, and you can try it free — Pika is offering members 15 free generations per day for the first two weeks after launch, with all generations at 50 percent off during that window.
Step 1: Understand What Pika H3 Flex AI Actually Is
Pika H3 Flex is a video model built for fast, professional iteration. Pika post-trained it on MiniMax H3, a 33-billion-parameter video and audio model, and then distilled the generation process from 50 steps down to 6 steps. The result is a model that generates faster than real time: a 15-second clip at 768p takes as little as 7 seconds of transformer compute on Pika servers. The headline number measures model compute, not the full wait in your browser, but in practice a short clip still comes back in well under a minute through the hosted service.
What makes it different from earlier Pika models is control. You can direct camera moves such as orbits, dollies, cranes and whip pans. You can build multi-shot 15-second sequences with hard cuts between shots. You can feed the model up to 12 reference files — as many as 9 images, 3 videos and 3 audio clips — and edit a clip from those references, for example swapping an outfit or a setting while keeping the same performance. And the sound is not an afterthought: every clip ships with synchronised stereo audio, and the hosted service can split it into up to 5 separate audio stems.
It is also open. Pika released the model as open weights on day one, with the generator adapters on Hugging Face and the code on GitHub, so developers can run it locally or build on top of it. For beginners, though, the hosted route is the one that matters — and that is where this guide focuses.
Step 2: Create Your Free Pika Account and Claim the Free Generations
Start at the Pika website and sign up with an email address or a Google account. The free launch offer is the reason to start now: for the first two weeks after launch, Pika is giving members and subscribers 15 free generations per day, and all paid generations are half price. That window runs until around November 12, 2026, so the free daily generations are a genuine way to learn the tool without spending anything.
After you sign in, look for the H3 Flex model in the model picker. During the launch week it lives in the Pika API Club at pika.art/pika-h3-flex, and from November 2 it appears in the main Pika creation app, so if you do not see it on day one, check the API Club page first.
- Sign up free: email or Google sign-in, no card required for the free daily generations.
- Claim the launch offer: 15 free generations per day during the first two weeks.
- Check both places: API Club first, then the main Pika app from November 2.
- Save your best clips: download every keeper immediately, so a free generation is never wasted.
Step 3: Pick Your Route — App, API Club, or Open Weights
There are three ways to use Pika H3 Flex, and beginners should pick the first one. The Pika creation app is the simplest route: pick the model, type a prompt, add references, and generate. Everything runs on Pika servers, and the draft-to-finish workflow is built in.
The second route is the Pika API Club, which is where H3 Flex launched first. It is aimed at developers and creators who want API access, and it is the place to try the model before it lands in the main app. The third route is the open-weights release for people who want to run the model on their own hardware with ComfyUI or Diffusers. That route needs roughly 210 GB of base model files plus about 5.5 GB of adapters, so it is a project for experienced users, not a first step.
If you are a creator or a small business owner, the app route is enough to make real content. If you later want to automate clip production — for example, generating a fresh product clip every morning — that is the kind of workflow a digital agency can help you set up, and the API route is where that automation begins.
Step 4: Write Your First Shot-by-Shot Prompt
H3 Flex prompts can be up to 8,000 characters long, and the model rewards prompts written shot by shot. Instead of one vague sentence, describe each shot with its subject, action, camera move, timing and sound. Name the sound in every shot: the model generates dialogue, score, sound effects and ambience together with the picture, so a prompt that says “soft piano, rain on a window” will sound completely different from one that says “upbeat electronic beat, city traffic”.
Try this starter prompt and adapt it to your own idea:
“Shot 1 (0-5s): A young chef in a bright kitchen tosses vegetables in a pan, steam rising. Slow dolly-in. Sound: gentle sizzle, soft acoustic guitar. Shot 2 (5-10s): Close-up of the finished dish on a wooden table, camera orbits slowly. Sound: quiet restaurant ambience, a fork tapping a plate. Shot 3 (10-15s): The chef smiles and holds up the plate toward the camera. Sound: warm laughter, music swells slightly.”
- One idea per shot: keep each shot to a single clear action.
- Name the camera: orbit, dolly, crane, whip pan, or a simple static shot.
- Name the sound: dialogue, music, effects and ambience in every shot.
- Keep prompts in “original” mode for repeatability: prompt processing is set to “enhanced” by default, which rewrites your prompt. Switch it to “original” and fix a seed when you want the same prompt to give repeatable results.
Step 5: Add References — Your Photos, Videos and Audio
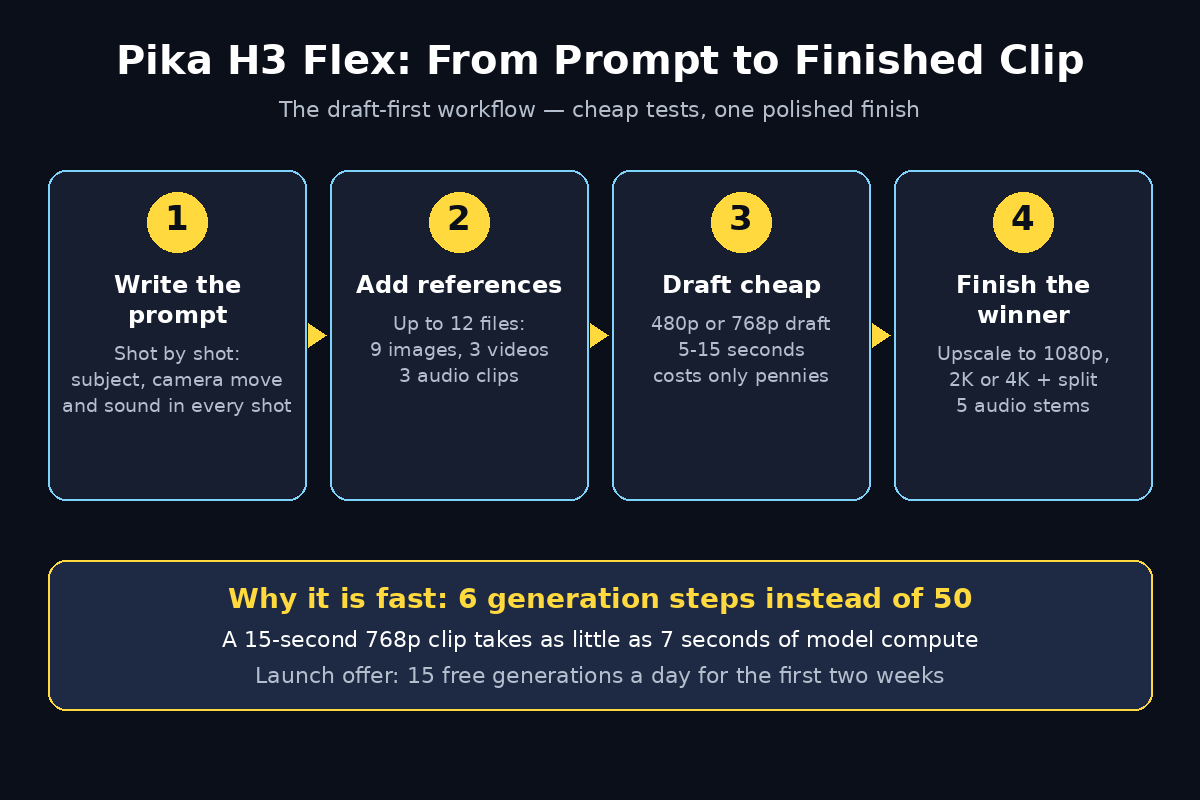
References are what turn a generic clip into your clip. H3 Flex accepts up to 12 reference files per generation: up to 9 images, 3 videos and 3 audio clips. Image and audio references carry no input charge, while video references are billed on their input seconds, so start with images.
Upload a product photo and the model will keep that exact product in every shot. Upload a photo of a person and it will keep the same face and outfit across a multi-shot sequence. Upload a short voice sample and the dialogue can match that voice. The rule is simple: explain in your prompt what each reference contributes, and never upload unrelated assets — extra references confuse the model instead of helping it.
Reference mode needs at least one image or video, so your very first reference test should be simple: one clear product or portrait photo, plus a two-shot prompt. Compare the result with a text-only generation of the same prompt, and you will see immediately how much consistency a reference adds.
Step 6: Generate a Cheap Draft First, Then Finish the Winner
The smartest habit in H3 Flex is the draft-to-finish workflow. Always make a cheap draft first at 480p or 768p, with a duration of up to 15 seconds. A 5-second test clip costs only a few cents at launch pricing — around 2.5 cents at 480p — so you can afford to test ten ideas and keep only the best one.
When a draft works, upscale it to 1080p, 2K or 4K. Pika charges only the difference between the draft price and the final price, so iterating cheaply and finishing once is far cheaper than generating every idea at full resolution. This is also why the free daily generations are so useful: use them for drafts, and save your paid credits for the finals.
- Draft at 480p or 768p: cheap, fast, and good enough to judge the idea.
- Test ten ideas, keep one: a 5-second draft costs pennies at launch prices.
- Upscale only the winner: pay just the price difference to reach 1080p, 2K or 4K.
- Fix a seed on the winner: small prompt changes then give you controlled variations instead of a whole new clip.
Step 7: Direct Camera Moves and Sound Like a Director
Camera direction is where H3 Flex earns its name. The model understands orbits, dollies, cranes and whip pans, and it handles hard cuts between shots inside a single 15-second clip. Write the move into the shot description, keep it to one move per shot, and let the cut do the work of changing the angle — the model is at its best when each shot has one clear motion.
Sound deserves the same attention. Because the audio is generated with the picture, you can ask for a voice line and the lip movement will match it, ask for a sound effect exactly when an action happens, or ask for five separate audio stems — dialogue, music, effects and ambience — that you can remix later in your editor. If a clip looks right but sounds wrong, regenerate with the same seed and only the sound description changed. That single-variable change is the fastest way to learn what the model hears in your words.
Teams that build content pipelines around tools like this often pair the model with agent workflows — the kind of automation thinking covered at Agentic Affairs — so one good prompt template can produce a week of clips instead of a single video.
Step 8: Edit a Clip With References Instead of Starting Over
H3 Flex is not only a generator; it is an editor. Reference-guided editing lets you change one thing in a clip while keeping everything else. Swap an outfit, change the setting from a kitchen to a rooftop, or replace a daytime sky with a sunset — and the performance, the framing and the timing stay the same.
To do it, generate your base clip first, then run a new generation with the original clip as a video reference plus your new image reference, and describe only the change. This is far faster than re-rolling a whole new clip and hoping the performance comes out the same, and it is the feature that makes the model genuinely useful for ads and product videos, where the product must look identical in every shot.
- Change one thing at a time: outfit, setting or lighting — not all three at once.
- Use the original clip as a video reference: it anchors the performance.
- Describe only the change: the model keeps everything you do not mention.
- Check the product first: in an ad, verify the product looks identical before you approve the edit.
Step 9: Upscale to 4K and Split the Audio Stems
When a draft is approved, finish it properly. The hosted service upscales drafts to 1080p, 2K or 4K, and the 4K upscaler is one of the capabilities that stays on the hosted service rather than in the open-weights release. Pick the resolution your platform needs: 1080p is plenty for social feeds, while 4K is worth it for a hero video on a landing page or a YouTube upload.
At the same time, ask for the audio stems. H3 Flex can export up to 5 separate audio stems, which means you can lower the music under a voiceover, remove an unwanted sound effect, or reuse the ambience track in another edit. If you have ever received a finished video with the music baked in too loud, you will know why stems matter — they turn a finished clip into editable material instead of a dead end.
Step 10: Export, Share and Build a Clip Library
Export in the aspect ratio your platform needs. H3 Flex supports 11 aspect ratios from 21:9 to 9:21, so generate 16:9 for YouTube, 9:16 for Shorts, TikTok and Reels, and 1:1 for feeds. Because a 15-second clip is short, plan your content as a series: five clips, each with its own shot list, cut together in a free editor, become a complete 60 to 75 second video.
Save everything that works. Keep a folder with your winning prompts, seeds and reference images, and note the settings next to each clip. After a week you will have a small library of proven prompts — and a repeatable style — instead of a pile of one-off experiments. That library is what turns a fun new tool into a real content workflow, whether you are posting for yourself or producing clips for clients. If you want to see how a finished short clip fits into a full publishing workflow, our guide to Screen Studio 4.0 AI shows how to record, polish and export a screen video that pairs well with H3 Flex clips.
How Pika H3 Flex AI Compares to Other AI Video Tools
H3 Flex is not the only AI video model, but its combination of speed, sound and open weights is unusual. Here is a quick comparison with tools beginners often consider next:
| Tool | Clip length | Sound | Standout feature | Free way to try |
|---|---|---|---|---|
| Pika H3 Flex | 5–15 seconds | Synced stereo audio, 5 stems | 6-step generation, 12 references, open weights | 15 free generations a day at launch |
| Runway App Studio | Varies by model | Model dependent | Describe a tool, Runway builds it as an app | Free users can run built-in apps |
| Seedance 2.5 | Short clips | Yes | Strong cinematic quality | Free credits on launch platforms |
| Google Veo (Flow) | 8 seconds per clip | Dialogue with lip-sync | Built into Google Flow | Free daily credits in Flow |
| Pika 2.2 | 5–10 seconds | Basic audio | Established Pika effects and styles | Free credits on signup |
The honest verdict: if you want the fastest iteration with sound and you like to test many ideas cheaply, start with H3 Flex while the launch pricing lasts until November 5. If you want longer cinematic scenes, render the winning idea in a longer model afterwards. The two approaches work together — H3 Flex for direction and testing, a longer model for the final scene.
Frequently Asked Questions About Pika H3 Flex AI
Is Pika H3 Flex AI free?
Yes, to start. Pika is offering 15 free generations per day for the first two weeks after launch, and all generations are 50 percent off during that window. After the launch window, generation is pay-per-second, starting from around 1 cent per second at low resolution, so a 5-second test clip costs only a few cents.
How long are the clips Pika H3 Flex makes?
Each generation runs 5 to 15 seconds at 24 frames per second. A 15-second request returns about 15.08 seconds of video. For longer videos, generate several clips and join them in an editor — each clip can be approved or regenerated on its own, which is actually an advantage.
Does Pika H3 Flex generate sound as well as video?
Yes. Every clip comes with synchronised stereo audio: dialogue, music, sound effects and ambience generated together with the picture. The hosted service can also split the audio into up to 5 separate stems for editing.
Can I use my own photos or videos as references?
Yes. Each generation accepts up to 12 references: up to 9 images, 3 videos and 3 audio clips. Image and audio references are free to add; video references are billed on their input seconds. Use references to keep a product, a face or a voice consistent across shots.
Do I need a powerful computer to use Pika H3 Flex?
No, not for the hosted app or API Club — everything runs on Pika servers, and you only need a browser. The open-weights route is different: running it locally needs the 33-billion-parameter base model, roughly 210 GB of files, plus the adapters, so that route is only for users with serious hardware.
When is Pika H3 Flex available in the main Pika app?
Pika says it arrives in the main creation app on November 2, 2026. Before that date it is available through the Pika API Club. If you do not see it in the app yet, check the API Club page at pika.art/pika-h3-flex.
Final Thoughts
Pika H3 Flex AI is the fastest useful way to iterate on short AI video with sound. Six steps instead of fifty, 15-second multi-shot clips with synchronised audio, camera moves you can actually direct, and up to 12 references to keep your product and characters consistent — all of it available free for 15 generations a day during the launch window. The draft-first workflow is the habit that makes it cheap: test ten ideas at 480p, upscale only the winner, and let the free generations do the learning for you.
Start today, while the launch offer is live and the model is fresh in the main app. Generate one clip with the starter prompt in this guide, change one variable — a camera move, a sound, a reference — and generate it again. By your fifth free generation you will know exactly how this model thinks, and by your fifteenth you will have a clip worth posting. The tools keep getting faster; the advantage goes to the creators who learn the new ones first.
Explore More Free AI Tools
Want to keep building your content toolkit? Try these free tools from AI Tool Steps: the AI Title Generator, the Meta Description Generator, the AI Rewriter, and the Keyword Density Checker. Each one is free, runs in your browser, and pairs well with the video workflow in this guide — write the title, polish the description, and check your keywords before you publish.