

What Is Cue AI?
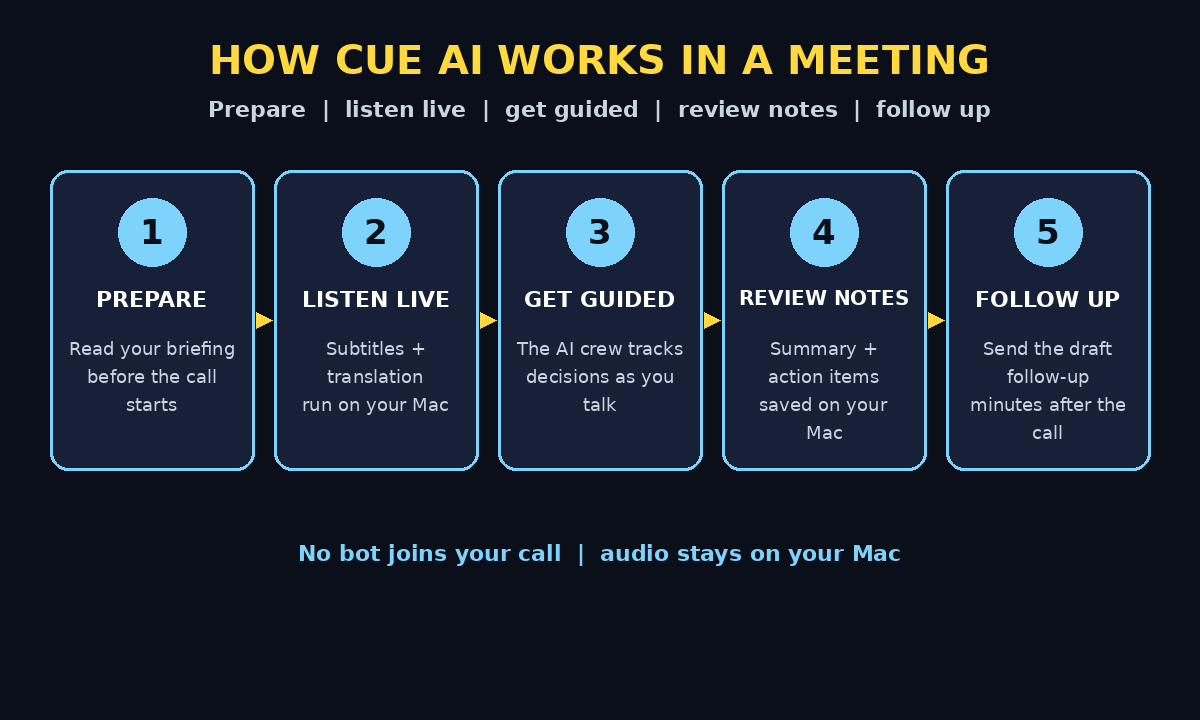
Cue AI is an ambient AI assistant for macOS that acts like a small crew working around your meetings. It prepares you before a call, takes notes and guides you during it, and drafts the follow-ups after it ends. Between meetings, it types what you say in any app and answers questions about what is on your screen. It launched on Product Hunt on November 9, 2026, with the tagline “AI meeting notes, prep” — and it solves the one problem every other meeting assistant creates: it never sends a bot into your calls.
Think about the last meeting tool you tried. It probably joined your Zoom or Google Meet as an extra participant, announced itself to everyone, and sent your audio to a cloud server. Cue AI works differently. It runs on your own Mac, captures your meeting app’s audio locally, and does its transcription and translation entirely on-device. Nobody sees an extra participant, nothing is uploaded unless you explicitly turn summaries on, and your meeting notes stay on your machine. For beginners who want AI help without the awkward “the notetaker has joined” moment, that difference matters.
This guide shows you how to use Cue AI from your first download to your first fully prepared, fully noted, fully followed-up meeting. You will learn how to install it, connect your AI backend, build your first selection skills, use live subtitles and translation, and turn every call into clear notes and next steps.
Step 1: Check Your Mac and Download Cue AI
Cue AI is built for macOS, so start by confirming you are on a Mac. The live translation and speech recognition run on Apple’s own Speech and Translation frameworks, which means Cue works best on a modern Mac running a recent version of macOS. Before you download anything, check that your Mac is up to date — open System Settings, go to General, then Software Update, and install any pending update. A few minutes here saves you from strange permission errors later.
Next, find Cue AI on its Product Hunt launch page, where it launched on November 9, 2026. The launch page is the best place to confirm the current version, the free tier, and the latest features, because a brand-new tool can change fast in its first weeks. From the launch page, follow the link to the official Cue website and download the Mac app. Always download from the official site or the Product Hunt listing — never from a random mirror, because a meeting tool has access to your microphone and your screen.
- Confirm macOS first: Cue is a Mac app, so a Windows PC or a Chromebook will not run it.
- Use the official download: the Product Hunt launch page links to the real site, so start there.
- Check the free tier: Cue is free to start, with a one-time Pro upgrade, so confirm what is included free before you pay for anything.
Step 2: Install Cue and Grant Microphone and Audio Permissions
Open the downloaded file and drag Cue into your Applications folder, then launch it. The first time it runs, macOS will ask for permissions — and this is the step most beginners rush through and then regret. Cue needs microphone access and system-audio access to capture what is said in your meetings, because it records through your Mac rather than joining the call as a participant.
When the permission prompts appear, allow them. If you accidentally click “Don’t Allow,” do not panic: open System Settings, go to Privacy and Security, then Microphone, and switch Cue on. Do the same under Screen Recording or the system-audio permission your version of macOS shows. Without these two permissions, Cue cannot hear your meetings at all, and the app will look broken even though it is only waiting for access.
Take a minute to open Cue’s settings and look at the permission status screen if it has one. A green status next to microphone and system audio means you are ready. If anything shows as blocked, fix it now, before your next meeting — not two minutes before the call starts, when you have no time to troubleshoot.
Step 3: Connect Your AI Backend — Claude Code, Codex, or Your Own Key
Cue’s meeting translation runs entirely on your Mac with no AI backend needed. Its selection skills and AI summaries, though, use an AI backend you choose — and this is where Cue is refreshingly honest about costs. It does not force you into its own subscription. Instead, it plugs into the Claude Code or Codex CLI already signed in on your Mac, and streams the answer token by token. If you prefer, you can point Cue at any OpenAI-compatible API with your own API key.
Open Cue’s settings and find the AI backend section. If you already use Claude Code on your Mac, select it — Cue will use the sign-in you already have, so there is nothing new to pay for. The same goes for Codex. If you use neither, paste in your own API key for an OpenAI-compatible service. Keep that key private, the same way you would keep a password: never share screenshots of the settings screen that show it.
Test the connection before your first real meeting. Highlight a sentence in any app, open the Cue toolbar, and run a simple skill such as “summarize this.” If an answer streams back, your backend is working. If it fails, check that your CLI is signed in or that your API key is correct — the problem is almost always the connection, not the app itself.
Step 4: Build Your First Two Selection Skills
The selection toolbar is Cue’s most useful everyday feature, and it is free. Wherever you highlight text — in your browser, your email, a document, or your code editor — a floating AI toolbar appears right next to it. Every button on that toolbar is a skill you build yourself: write the prompt, pick an icon, and it is on the bar. One click opens a streaming conversation you can keep going, or you can give a skill a keyboard shortcut so its result replaces your selection in place.
The free tier includes up to two toolbar skills, so choose the two you will actually use every day. Good first choices are “Rewrite this more clearly” for emails and messages, and “Summarize this in three bullet points” for long articles and documents. Keep the prompts short and specific: a skill that says “fix the grammar and make this sound professional” will serve you better than a vague “improve this.”
Try both skills on real text today. Highlight a rough email draft, run your rewrite skill, and read the result before you accept it. Highlight a long paragraph, run your summary skill, and check that the bullets are accurate. Skills run without tools or MCP servers, so there is nothing extra to load — and answers stream in as they are written, so you can stop a bad answer early instead of waiting for a full response.
- Start with two skills you use daily: rewriting and summarizing cover most everyday writing.
- Give each skill a clear icon: you will spot the right button faster in the middle of real work.
- Assign a keyboard shortcut: the shortcut that replaces your selection in place is the fastest way to use a skill once you trust it.
Step 5: Prepare for Your Next Meeting With Cue’s Pre-Call Briefing
A good meeting starts before the call does, and this is where Cue earns its “AI crew” name. Before your next call, open Cue and let it prepare you: the crew pulls together what you need to know — who you are meeting, what was decided last time, and the points you wanted to raise. Instead of opening five tabs and scanning old emails while the call is already starting, you walk in with a short briefing in your head.
Build a simple pre-call habit. Five minutes before a meeting, open your notes from the last call with the same person or team, and write down the three things you must get out of this one. If Cue has prepared a briefing for you, read it and add anything it missed. Keep your list visible during the call — on a second screen, on paper, or in the notes app — so you can glance at it without looking away from the camera for long.
This habit alone will change how your meetings feel. Most people walk into calls hoping they remember what matters; with a short written list, you walk in knowing. And because Cue keeps your meeting history searchable, preparing for the next call gets faster every time you use it.
Step 6: Turn On Live Subtitles and Translation During the Call
When your meeting starts, turn on Cue’s live subtitles. Cue captures your meeting app’s audio, then transcribes and translates it entirely on your Mac. You read along in a floating subtitle bar — the original words on top, the translation below. There is no internet connection and no cloud AI involved, so the words on your screen never leave your computer.
This is a lifesaver in two situations. First, if you join calls in a language you understand but do not speak fluently, the live translation lets you follow every point without asking people to repeat themselves. Second, if your audio is quiet, your connection is shaky, or someone mumbles, reading along fills in the words your ears miss. Keep the subtitle bar somewhere it does not cover the shared screen — a corner of your display works well.
Remember the privacy side of this feature, too. Because no bot joins the call, nobody is told you are transcribing — so it is on you to ask. Tell the other people on the call that you are using live subtitles for your own notes, and check your workplace rules about recording and transcription before you rely on it. A quick “I’m using live subtitles to follow along — is that okay?” takes five seconds and keeps everything above board.
Step 7: Let the AI Crew Take Notes and Guide You During the Meeting
While the call runs, Cue’s AI crew is doing the job a human assistant would do: taking notes, tracking what is decided, and guiding you when the conversation moves fast. You stay in the conversation instead of typing frantically. That is the whole point — the person who takes the best notes in a meeting is usually the person who contributes the least to it, because they are too busy writing to think. Cue removes that trade-off.
Use the freed attention well. Listen for decisions, not just discussion. When someone says “let’s do it this way,” note it mentally; Cue will have the words, but you are the one who knows why the decision matters. If the conversation drifts, glance at your pre-call list from Step 5 and steer it back. And if Cue surfaces a prompt or a nudge during the call, read it — the crew is there to keep you on track, not to distract you.
Do not try to read the full transcript while the meeting is still going. The transcript is for after the call. During the call, your job is to be present: ask the question only you can ask, catch the detail only you would notice, and let Cue handle the typing.
Step 8: Get Your Summary, Notes, and Action Items After the Call
When the meeting ends, Cue turns the transcript into a structured note. Transcripts are saved locally as Markdown files on your Mac, so you always have the full record. If you have turned on AI summaries — an opt-in feature — Cue sends the transcript to the AI backend you chose in Step 3 and writes the summary for you: the key points, the decisions, and the action items, ready to review.
Read the summary within an hour, while the meeting is still fresh in your mind. Check the action items first: who promised what, and by when. Fix anything the AI misheard — names and numbers are the usual suspects — and add the one-line context only you know, such as why a deadline moved or what a vague promise actually means. A summary you review the same day is a reliable record; a summary you never open is just a file on your disk.
Then send the follow-up. Cue drafts it for you after the call, and a short message beats a long one: the decisions, the action items with owners and dates, and the next meeting if there is one. Send it to the people who were in the room, and copy anyone who needs to know the outcome but could not attend. Fast follow-ups are what turn a good meeting into actual progress.
- Review the same day: your memory of the call fades fast, and corrections are easiest while it is fresh.
- Check names and numbers: AI transcription is good, but it still mishears names and figures — verify them before you share the note.
- Send the follow-up within the hour: a quick summary keeps the momentum, and people reply faster to a fresh email.
Step 9: Search Your Meeting History in Plain Words
After a few weeks with Cue, your meeting history becomes a second memory. Instead of asking “what did we decide about the pricing?” and digging through old emails, you search your notes in plain words — “what did Sara say about the budget?” — and land on the exact line. Because transcripts are saved locally as Markdown, they are yours to keep, search, and organize however you like.
Build a simple weekly habit around this. Once a week, open your notes from the last seven days and scan the action items. Mark the ones that are done, chase the ones that are not, and carry the open ones into next week’s meetings. This takes ten minutes and it is the difference between a note-taking app and a system that actually gets things finished.
If you want those meeting notes to do more — for example, turning them into client-ready summaries, a follow-up page on your website, or an automated workflow that sends the next steps to your team — a digital agency can build that around the notes you already have. The notes are the raw material; the system is what makes them pay off.
Step 10: Decide When Pro Is Worth It — and What Else to Try
Cue is free for everyday selection skills and on-device meeting translation, and for many people that is enough. The free tier gives you the selection toolbar with up to two skills, on-device meeting translation, and floating live subtitles — the core of the app, with no subscription and no expiry.
Go Pro when you hit the free limits in real work. Pro is a one-time purchase of $19.99 — a lifetime license, not a subscription — and it unlocks unlimited skills, Live Notes, AI summaries, and more. If you find yourself wanting a third or fourth skill, or you want the AI summaries from Step 8 turned on for every meeting, that is the moment Pro pays for itself. Because it is one-time, there is no monthly bill to forget about.
Before you pay, check the pricing page inside the app for the current details — a new tool can change its plans in its first weeks. And keep exploring: try a skill that drafts replies in your email, a skill that turns meeting notes into a task list, or a skill that explains a technical paragraph in plain English. The toolbar is yours to shape, and the best skills are the ones that solve the exact annoyance you hit every day.
Cue AI vs Other AI Meeting Note Tools
Cue AI is not the only AI meeting tool, and the right choice depends on how you meet and how much you care about privacy. Here is how it compares with three well-known alternatives.
| Tool | How it joins your meeting | Where your audio goes | Starting price | Best for |
|---|---|---|---|---|
| Cue AI | No bot — records through your Mac | On-device; cloud only if you opt into summaries | Free; Pro $19.99 one-time | Mac users who want private, bot-free notes |
| Otter.ai | A bot joins the call as a participant | Cloud transcription and storage | Free plan available; paid plans vary | Teams that want shared live transcripts |
| Fireflies.ai | A bot joins the call as a participant | Cloud transcription and storage | Free plan available; paid plans vary | Sales and recruiting teams with heavy call volume |
| Notion AI | Works on notes you paste in, not live calls | Cloud, inside your Notion workspace | Paid add-on to Notion | People who already live in Notion |
The pattern is clear: if a bot joining your call feels wrong — or your clients and colleagues dislike it — Cue AI is the only option on this list that never sends one. If you need shared transcripts that the whole team can open during the call, a bot-based tool fits better. And if you run a business and want AI to handle repetitive follow-ups, summaries, and customer messages the way Cue handles your meetings, AI automation services can set that up for you.
Tips for Better Meetings With Cue AI
- Ask before you transcribe: no bot joins the call, so nobody is warned automatically — tell people you are using live subtitles and notes.
- Prepare five minutes early: a short pre-call list beats a perfect memory, and Cue’s briefing is only useful if you read it.
- Keep two skills sharp: on the free tier, a rewrite skill and a summarize skill cover most of your daily writing.
- Review summaries the same day: fix names and numbers while the call is fresh, or the errors become facts.
- Use the subtitle bar in noisy calls: reading along catches the words a bad connection drops.
- Search before you ask: “what did we decide last week?” is usually already in your notes — search first, message second.
- Back up your transcripts: they are local Markdown files, so include them in your normal Mac backup.
Frequently Asked Questions About Cue AI
Is Cue AI free?
Yes, Cue is free to start. The free tier includes the selection toolbar with up to two skills, on-device meeting translation, and floating live subtitles. Pro is a one-time purchase of $19.99 that unlocks unlimited skills, Live Notes, AI summaries, and more. There is no subscription, and the free tier does not expire.
Does Cue AI send a bot into my meetings?
No. That is the whole point of Cue. It records through your own Mac, so nothing extra joins the call and nobody sees an additional participant. Because of that, you should still tell the people on the call that you are transcribing or taking notes — the app will not announce it for you.
Is my meeting audio sent to the cloud?
Not by default. Speech recognition and translation run 100 percent on-device using Apple’s Speech and Translation frameworks, with zero network requests, and transcripts are saved locally as Markdown. AI summaries are opt-in: only if you turn them on does Cue send a transcript to the AI backend you chose, such as Claude Code, Codex, or your own API key.
Which AI models does Cue AI use?
For selection skills and summaries, Cue uses the Claude Code or Codex CLI already signed in on your Mac, or any OpenAI-compatible API with your own API key. Meeting translation needs no AI backend at all — it runs entirely on-device. You bring the AI you already pay for, instead of paying Cue for another subscription.
Does Cue AI work on Windows?
No. Cue is an ambient AI assistant for macOS, built on Apple’s on-device Speech and Translation frameworks. If you are on Windows, look for a bot-based meeting tool instead — or use Cue’s ideas on a Mac when you have one available.
What if I don’t have Claude Code or Codex installed?
You can still use the free on-device features — the selection toolbar needs a backend for its skills, but live translation and subtitles work with no AI backend at all. For skills and summaries, either install Claude Code or Codex and sign in, or add your own API key for an OpenAI-compatible service in Cue’s settings.
Final Thoughts
Cue AI fixes the most annoying part of AI meeting tools: the bot that joins your call, announces itself, and sends your audio to a server. Instead, it works quietly on your own Mac — preparing you before the call, translating and subtitling live during it, and handing you notes, decisions, and a follow-up draft after it. The free tier covers the essentials, the Pro upgrade is a single one-time payment, and your audio stays on your machine unless you choose otherwise.
Start today, before your next meeting. Download Cue AI, allow the microphone and audio permissions, connect the AI backend you already use, and build your two free skills. Then walk into your next call prepared, with live subtitles on and the note-taking handled. The first time you send a follow-up ten minutes after a call ends — with every action item already written down — you will wonder how you ever did meetings without it.
Explore More Free AI Tools
Want more free AI tools to grow your content? Try the AI Title Generator, Meta Description Generator, AI Rewriter, and Keyword Density Checker — free tools from AI Tool Steps to help you write, polish, and rank your content faster.