
Recording a good product demo used to mean juggling two or three apps at once: one to capture your screen, another to record your face, and a video editor to stitch everything together. MoreFrame AI removes most of that work. It records your screen and a second window at the same time, adds captions and Smart Zoom automatically, and even lets an AI assistant edit the video for you. It launched on Product Hunt on 10 November 2026, it is free for Mac and Windows, and it exports without a watermark.
In this beginner guide, you will learn exactly how to use MoreFrame AI, from your first download to your first finished demo video. No video-editing experience is needed, and every step below uses the free version.
Step 1: Understand What MoreFrame AI Actually Is
MoreFrame AI is a dual-screen recorder and editor for Mac and Windows. The word “dual-screen” is the key idea: instead of recording one flat capture of your whole display, you record your main screen and a second window side by side. That second window can be your webcam, another app, a browser tab, or a document you want to show next to your work.
Think of the common situations where this matters:
- Product demos: show your app on one side and your face or a pricing page on the other, so viewers see both the product and the person explaining it.
- Tutorials: keep your code editor on the main screen and your notes, terminal, or browser on the second screen, so learners never lose context.
- Sales walkthroughs: present slides on one side and a live dashboard on the other, switching focus without stopping the recording.
- Online lessons: show a worksheet next to a whiteboard app, just like a real classroom with two boards.
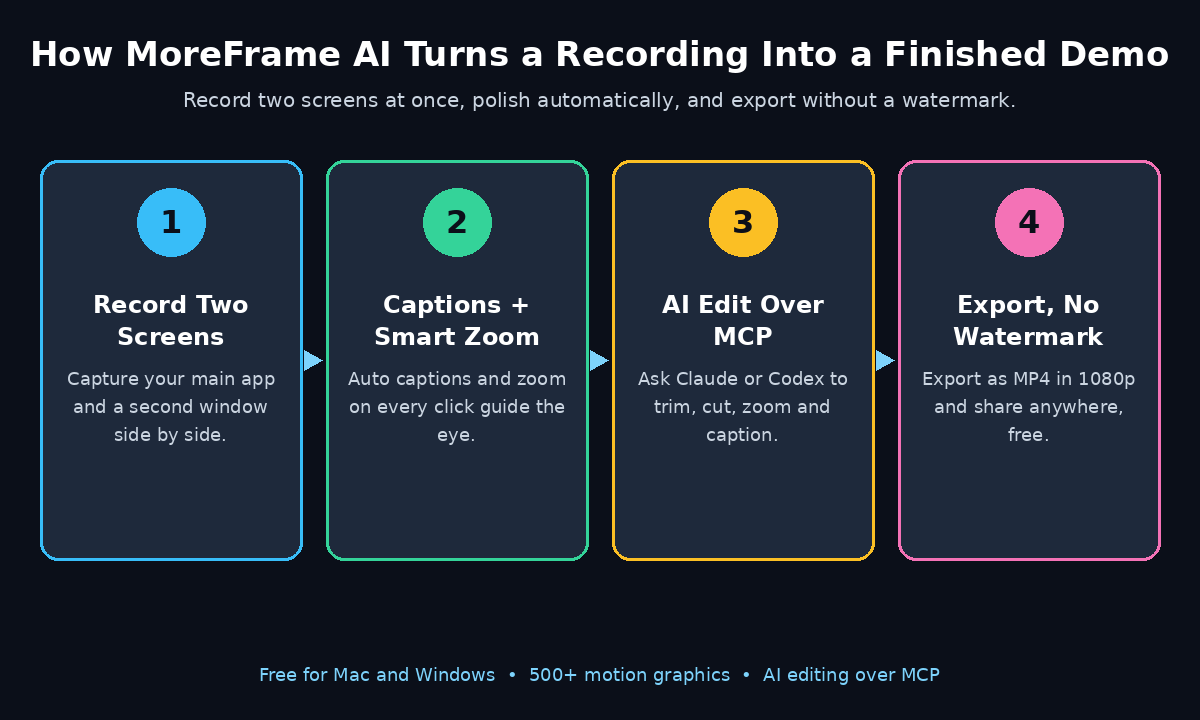
After recording, MoreFrame AI gives you a built-in editor with more than 500 motion graphics, automatic captions, and Smart Zoom, which zooms into whatever you click. And if you would rather describe the edit than make it yourself, the app can be driven by an AI assistant over MCP (Model Context Protocol), so tools such as Claude or Codex can trim, cut, zoom, caption, and export the video step by step.
One thing to know before you start: MoreFrame AI is a desktop app, so you install it on your computer rather than using it in a browser. Your recordings stay on your machine, which is good news if you record anything sensitive.
Step 2: Download and Install MoreFrame AI (Free, No Watermark)
Getting started takes about five minutes. Here is the full setup:
- Download the app: go to the official MoreFrame website and download the version for your system. There are builds for Mac and for Windows, so pick the one that matches your computer.
- Install it: on Mac, drag the app into your Applications folder. On Windows, run the installer and follow the prompts. No account is required just to start recording.
- Grant permissions: the first time you open the app, your operating system will ask for screen-recording and microphone permission. Allow both, because without them the app cannot capture your screen or your voice.
- Check your audio: plug in your microphone or headset if you use one, then open the app settings and confirm the right input device is selected. A quick ten-second test recording saves you from discovering silent audio after a twenty-minute demo.
- Pick a save folder: choose where finished videos go, so you always know where to find them. A dedicated folder such as “MoreFrame Videos” on your desktop works well.
The free version exports without a watermark, which is unusual for a free screen recorder. That means the videos you make on day one are already good enough to post publicly.
Step 3: Set Up Your First Dual-Screen Recording
Before you press record, spend two minutes on setup. A little planning here is the difference between a clean demo and a video full of awkward pauses.
- Choose your main screen: this is the window your viewers will focus on most of the time — usually the app you are demonstrating.
- Choose your second window: this is the supporting view. Common choices are your webcam, a second app window, or a browser tab with reference material.
- Pick a layout: decide whether the two views sit side by side, stacked vertically, or picture-in-picture. Side by side works best for demos where both views matter equally; picture-in-picture is better when the second view is only there for a human touch.
- Close distractions: hide desktop notifications, close unrelated tabs, and silence your messaging apps. Nothing ruins a demo faster than a private message popping up mid-sentence.
- Write a three-line outline: jot down your opening line, the two or three points you must cover, and your closing line. You do not need a full script — a short outline keeps you on track without making you sound robotic.
If you are recording a demo for a client or a team, this is also the moment to think about who will watch it. A short demo for a busy manager needs a different pace than a detailed tutorial for new users, and your layout choice should match that audience. Teams that produce demos regularly often work with a digital agency to polish the final result, and the same thinking applies here: plan the story first, then record.
Step 4: Record Your Screen and a Second Window
Recording is the simplest part of the whole workflow:
- Select your sources: in the recorder, pick the main window and the second window from the source list. You can also choose to record your full screen instead of a single window if your demo jumps between several apps.
- Turn on your microphone: check that the audio meter moves when you speak. If it stays flat, your microphone is muted or the wrong input is selected.
- Decide about system audio: turn it on if your demo includes sounds from the app itself, such as notification chimes or a video playing inside the app. Turn it off if you only want your voice.
- Press record and pause: take a breath, count to three silently, and then start speaking. That small pause gives you a clean handle to trim later.
- Talk while you click: narrate what you are doing as you do it. Viewers follow a demo far more easily when the voice explains the click at the same moment it happens.
Do not worry about small mistakes while recording. Stumbles, wrong clicks, and “um” pauses can all be cut in the editor. What matters is that you finish the take — a complete imperfect recording is far more useful than a perfect recording that was never finished. If a whole section goes wrong, just pause, say the line again from the start of that section, and cut the bad part later.
Step 5: Add Automatic Captions in One Click
Most people watch demo videos on mute at first, scrolling through a feed or checking a link a colleague sent them. Captions are what turn a silent scroll-past into a watched video, and MoreFrame AI generates them automatically from your voiceover.
- Generate captions: after your recording finishes, open the captions panel and generate captions for the whole timeline. The app transcribes your speech and places each line at the right moment.
- Fix the important words: automatic transcription is good, but it can mishear product names, brand names, and technical terms. Scan through the captions and correct any name that matters — especially your product name and any prices or numbers.
- Style the captions: choose a readable size and a position that never covers the part of the screen you are pointing at. Bold, high-contrast captions are easier to read on a phone.
- Split long lines: if a caption runs across the whole screen, split it into two shorter lines. Short captions are easier to read while the video keeps moving.
Captions also make your video accessible to viewers who are deaf or hard of hearing, and they help search engines understand what your video is about when you post it on a page. It is a small step that pays off on every platform you publish to.
Step 6: Use Smart Zoom and Motion Graphics to Guide the Eye
A flat screen recording can feel boring because everything on screen looks equally important. Smart Zoom fixes that by zooming into whatever you click, so the viewer’s eye follows your cursor exactly where it needs to go.
- Turn on Smart Zoom: enable the feature before you export, and the app will add smooth zoom movements at your clicks automatically.
- Adjust the zoom depth: a gentle zoom works for large buttons and menus, while a deeper zoom suits small text and tiny controls. If the zoom feels seasick, lower the depth.
- Add motion graphics: MoreFrame AI includes more than 500 motion graphics — callouts, arrows, highlights, and transitions. Use them sparingly: one arrow pointing at the button you just clicked is helpful; five animations on one screen is noise.
- Highlight the cursor: make the cursor slightly larger or add a soft highlight ring, so viewers on a phone can follow it without squinting.
- Use smooth transitions: when you switch between the two screens, a short fade or slide keeps the video feeling professional instead of jumpy.
The rule of thumb is simple: every zoom or graphic should answer the question “where should I look right now?” If an effect does not answer that question, delete it. Clean videos with a few well-placed zooms always outperform busy videos full of effects.
Step 7: Let AI Edit Your Video Over MCP
This is the feature that makes MoreFrame AI different from a normal screen recorder. Instead of dragging clips around a timeline by hand, you can ask an AI assistant to edit the video for you over MCP, the open protocol that lets AI tools control other apps.
- Connect your AI assistant: enable the MCP option in MoreFrame AI settings and connect the assistant you already use, such as Claude or Codex. The app gives you a setup snippet to paste into your assistant.
- Describe the edit in plain words: for example, “Cut the first 12 seconds, remove the pause at 1:40, zoom into the checkout button at 2:05, and add captions to the whole video.”
- Review each step: the assistant applies the edits one at a time, and each step can be undone. Check the timeline after each change rather than approving everything blindly.
- Ask for a second pass: once the rough cut is done, ask the assistant to tighten the pacing — “remove all pauses longer than two seconds” is a request that instantly makes a demo feel sharper.
- Keep the human in charge: AI editing is a starting point, not a final decision. Watch the full video once before exporting, because only you know whether a cut removed something your audience actually needed.
For small teams, this workflow is a genuine time saver: a founder can record a rough demo, hand the editing to an AI assistant, and publish the same afternoon. Larger teams that want this kind of hands-off pipeline often explore AI automation services to connect recording, editing, and publishing into one repeatable process, and MoreFrame AI fits neatly at the recording end of that chain.
Step 8: Polish Backgrounds, Cursor, and Layout
Before you export, give the video one careful polish pass. These small details are what separate a video that looks “recorded” from one that looks “produced”.
- Choose a background: pick a clean, solid background behind the recorded windows. A dark background suits most demos and hides the edges of your desktop.
- Frame your windows: add a subtle rounded frame or shadow around each window so the two views feel like one designed layout instead of two screenshots glued together.
- Fix the cursor path: if your cursor wandered while you were thinking, smooth or cut that section. A cursor that circles nervously is distracting.
- Check both views: watch the second window as carefully as the main one. A second window showing an old tab or an embarrassing notification is an easy mistake to miss.
- Balance the audio: make sure your voice is clear and consistent from start to finish, and that system sounds never drown it out.
Do this polish pass on the final video, not on a preview. Watch it from start to finish, at full size, with sound on. Anything that looks wrong to you will look wrong to your viewers too, so fix it now while the project is still open.
Step 9: Export and Share Your Demo (No Watermark)
Exporting is straightforward, and the free version does not stamp a watermark on your video:
- Pick your format: export as MP4 for the widest compatibility — it plays everywhere, from YouTube and LinkedIn to Slack and email.
- Choose a resolution: 1080p is the safe default for demos and tutorials. Higher resolutions make larger files without much visible benefit for screen content.
- Export the captions: if you plan to upload to a platform that supports caption files, export the subtitle file alongside the video so viewers can toggle captions on and off.
- Check the file: open the exported video and watch the first ten seconds and the last ten seconds. Export glitches, if they happen, usually show up at the start or the end.
- Share it: upload to your product page, your help centre, or your social channels. A short demo with a clear title and a link to the full guide will bring you more signups than a long video nobody finishes.
Keep your project file after exporting. If you need to fix a typo in a caption or swap one screen later, reopening the project is far faster than re-recording the whole demo.
Step 10: Pro Tips and Troubleshooting for Beginners
These are the lessons most new users learn the hard way. Learn them now, for free:
- Record in short takes: instead of one twenty-minute recording, record in two- or three-minute sections. Short takes are easier to re-record and easier to edit.
- Silence is editable: long pauses feel awkward while recording, but they are trivial to cut afterwards. Never restart a whole take because of one pause.
- Record the audio separately if needed: if your room is noisy, record the video first and add the voiceover afterwards in a quieter moment. The captions tool still works on a clean voiceover.
- Mic not detected? close the app, check your system sound settings, select the right input, then reopen the app. Most “no audio” problems are a wrong input device, not a broken app.
- Second window not showing? make sure the window is open and not minimised before you start recording, and check that you selected the right window in the source list.
- Video feels slow? cut the pauses, tighten the zooms, and remove any section where nothing changes on screen for more than five seconds.
- Captions mishearing names? speak product names slowly and clearly, and correct them in the caption editor before exporting.
If you make demos every week, build a small template for yourself: same layout, same caption style, same export settings. A template turns each new demo from a fresh project into a ten-minute job.
MoreFrame AI vs Screen Studio vs Loom vs OBS: Which One Fits You?
MoreFrame AI is not the only screen recorder, so here is an honest comparison with three popular alternatives. The right choice depends on your computer, your budget, and how much editing you want to do yourself.
| Feature | MoreFrame AI | Screen Studio 4.0 | Loom | OBS Studio |
|---|---|---|---|---|
| Platforms | Mac and Windows | Mac only | Web, Mac, Windows | Mac, Windows, Linux |
| Dual-screen recording | Yes, built in | Split-screen layouts | Screen + camera | Manual scene setup |
| Free plan | Yes, no watermark | Free trial, export needs a plan | Free plan with limits | Free, open source |
| Automatic captions | Yes | Yes, edit by transcript | Yes | No, needs a plugin |
| Smart Zoom | Yes | Yes, auto-zoom on clicks | No | No |
| AI editing | Yes, over MCP | No | AI summaries and titles | No |
| Best for | Dual-screen demos on any computer | Polished Mac demos | Quick team video messages | Live streaming and full control |
If you are on Windows, MoreFrame AI is the clearest pick in this group, because Screen Studio does not run on Windows at all. If you are on a Mac and want the most polished automatic look with the least effort, Screen Studio is still a strong choice — we covered it in detail in our How to Use Screen Studio 4.0 AI for Beginners guide. Loom wins for quick async messages to teammates, while OBS wins when you need full control or you are live streaming. MoreFrame AI sits in the middle: a real editor, dual-screen capture, and AI-assisted editing, free and without a watermark.
Frequently Asked Questions
Is MoreFrame AI really free?
Yes. MoreFrame AI is free for Mac and Windows, and the free version exports without a watermark. That is what the Product Hunt launch promises, and it is the main reason it is worth trying before you pay for any other screen recorder.
Does MoreFrame AI work on Windows?
Yes. Unlike some popular screen recorders that are Mac-only, MoreFrame AI has a Windows version as well as a Mac version, so the same workflow works on both systems.
What is dual-screen recording in MoreFrame AI?
Dual-screen recording means capturing two views at once — your main screen and a second window, such as your webcam, another app, or a browser tab. You can arrange them side by side, stacked, or picture-in-picture, and edit them together in one timeline.
How does AI editing over MCP work?
MCP (Model Context Protocol) lets an AI assistant control MoreFrame AI directly. You connect an assistant such as Claude or Codex, describe the edit in plain words — trim, cut, zoom, caption, export — and the assistant applies each step to your timeline. Every step can be undone, so you stay in control.
Can beginners use MoreFrame AI without video-editing experience?
Yes. The whole point of the tool is that recording, captions, Smart Zoom, and AI editing handle the parts that normally need an editor. If you can record your screen and describe what you want changed, you can finish a professional-looking demo on your first day.
Is MoreFrame AI good for tutorials and courses?
Yes. Dual-screen recording is ideal for teaching, because you can keep your main lesson on one side and your notes, code, or reference material on the other. Automatic captions and Smart Zoom also help learners follow along, especially on a phone.
Final Thoughts
MoreFrame AI is a genuinely useful free tool for anyone who records their screen: founders showing a product, teachers making lessons, support teams answering the same question with a video instead of a wall of text, and creators publishing tutorials. The dual-screen recording solves a real problem, the captions and Smart Zoom remove the most tedious editing, and the MCP-based AI editing points at where this whole category is heading — you describe the video you want, and the software does the cutting.
The best way to learn it is to make one short video today. Pick a simple task you already know how to do, record it with two screens, add captions, let the AI tighten the edit, and export it. That first video will teach you more than any guide, including this one. And because the free version has no watermark, the video you make in the next thirty minutes is already good enough to share.
Explore More Free AI Tools
MoreFrame AI is one of many free tools that can speed up your content workflow. Try the AI Title Generator to write better headlines for your demo videos, the Meta Description Generator to describe them for search, the AI Rewriter to polish your video scripts, and the Keyword Density Checker to keep your pages optimised. Each one is free, and each one pairs well with the videos you will make in MoreFrame AI.