

If your Mac is full of small, boring jobs — renaming downloaded files, sorting screenshots, copying text between apps, running the same routine every morning — Watchflows AI is the tool that finally lets you automate them without writing a single line of code. It launched on Product Hunt on November 9, 2026, and it brings visual automation to the Mac with AI built right into the canvas.
Think of it like this: instead of learning AppleScript or chaining together complicated shortcuts, you draw your workflow on a canvas. You connect a trigger (“when a file lands in Downloads”) to a condition (“only if it is a PDF”) to an action (“rename it and move it to my invoices folder”). And when a step needs judgement — reading a document, deciding what something is, writing a reply — the AI steps in and does it for you.
In this beginner guide, you will learn exactly how to use Watchflows AI: how to install it, how to build your first flow in under ten minutes, how the AI features work, what the free trial covers, and how it compares with the automation tools you may already know. No coding, no jargon, just practical steps.
Step 1: Understand What Watchflows AI Actually Does
Watchflows AI is a visual automation app for macOS. At its core, it watches for things to happen on your Mac and then runs a series of actions for you automatically.
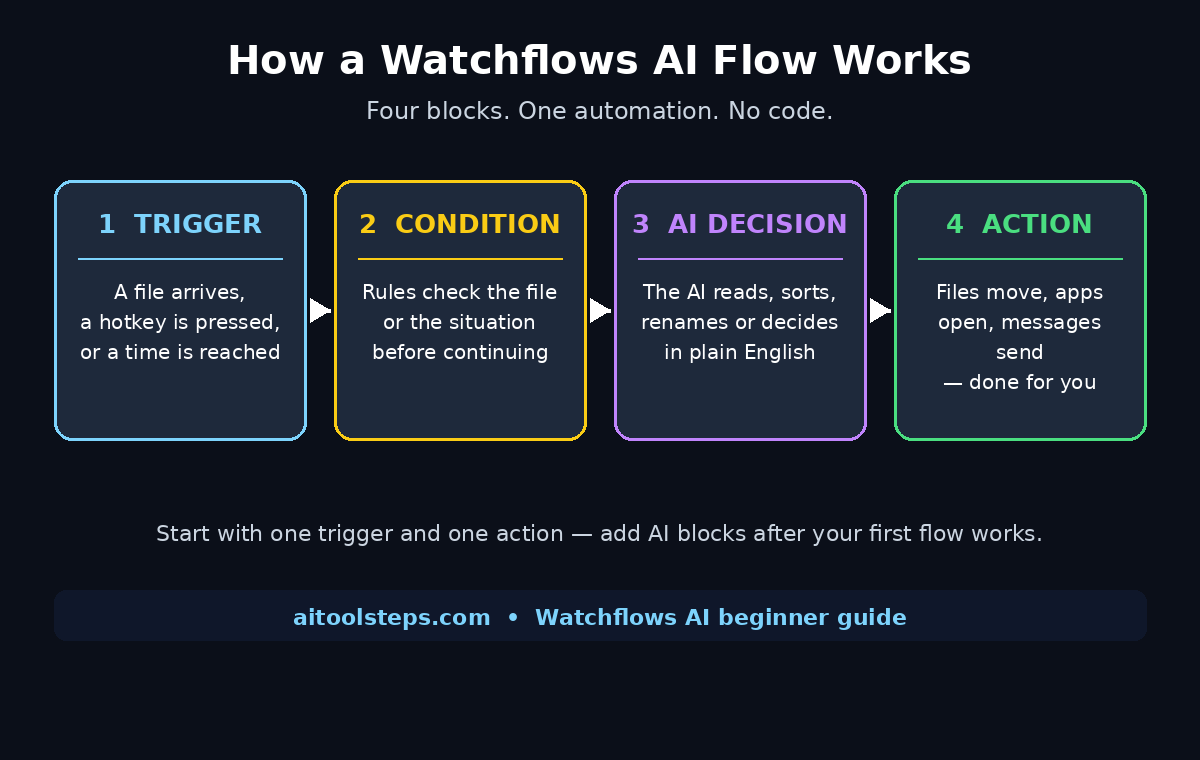
A “flow” in Watchflows has three kinds of building blocks:
- Triggers — the event that starts the flow. A file arriving in a folder, a hotkey you press, a webhook arriving from another app, or a time of day (for example, 8:30 on weekdays).
- Conditions — the rules that decide whether the flow should continue. For example, “only continue if the file is larger than 1 MB” or “only on weekdays”.
- Actions — the work itself. Rename a file, move it, send a message, open an app, run an AI step, and much more.
What makes Watchflows different from classic Mac automation is the AI layer. You can drop an AI block into the middle of any flow and ask it to read, rename, summarise, or decide. The AI can run on Watchflows AI itself, on Apple’s on-device model, on Ollama with local models, or with your own API keys. That flexibility matters: if you care about privacy, you can keep everything on your own machine.
Watchflows is local-first, which means your flows and your files stay on your Mac. There is no account to create just to try it, and the 14-day free trial gives you full access before you decide anything. After the trial, it costs $49 once — a one-time purchase, not a subscription — and it is also available through Setapp.
Step 2: Install Watchflows AI on Your Mac
Getting started takes about five minutes.
- Go to the official Watchflows website and download the Mac app.
- Open the downloaded file and drag Watchflows into your Applications folder, just like any other Mac app.
- Launch Watchflows. The first time it opens, macOS will ask for a few permissions — access to your folders, and permission to control other apps. Grant the ones you need for the flows you plan to build. You can always add more later in System Settings under Privacy & Security.
- You will see the Flow Builder canvas — a blank workspace with a panel of blocks on the side. This is where every automation lives.
- Take the quick tour if it is offered. It shows you the canvas, the block library, and how to run a flow by hand.
Tip: do not grant every permission at once. Start with folder access for your Downloads folder and Desktop, then add more as your flows need them. This keeps your Mac secure and your automations predictable.
Step 3: Build Your First Flow in Under 10 Minutes
The fastest way to learn Watchflows is to build something small and useful. Let us automate a classic beginner task: automatically rename and sort every screenshot that lands on your Desktop.
- Click New Flow and give it a name, for example “Sort My Screenshots”.
- Drag a Trigger block onto the canvas. Choose File Added to Folder and point it at your Desktop.
- Add a Condition block. Set it to continue only when the file name starts with “Screenshot” or the file type is PNG.
- Add an Action block: Rename File. Use a pattern like
Screenshot-YYYY-MM-DD-HHMMSS.pngso every screenshot gets a clean, dated name. - Add a second Action block: Move File. Choose a folder such as
Pictures/Screenshots. - Click Run to test the flow once, then toggle it On so it runs automatically from now on.
That is it. From now on, every screenshot you take is renamed and filed away before you even notice. This one flow teaches you the whole mental model: trigger, condition, action. Every bigger automation you build later is just more blocks in the same pattern.
Step 4: Let the AI Read, Rename, and Decide Inside Your Flows
This is where Watchflows earns the “AI” in its name. The Flow Builder includes AI blocks that can think in the middle of a flow.
Here are three beginner-friendly ways to use them:
- Smart renaming. Instead of a fixed pattern, ask the AI to read a file and name it by its content. A downloaded invoice becomes
Invoice-Acme-Nov-2026.pdfinstead ofdownload-8472.pdf. The AI reads the document, finds the vendor and date, and writes a clean name. - Smart sorting. Drop a file into a folder and let the AI decide where it belongs. Receipts go to Finance, contracts go to Legal, images go to Design. You describe the categories once in plain English, and the AI sorts every new file.
- Smart decisions. Add an AI condition that reads an email or a message and decides what happens next. For example, if a customer email sounds urgent, the flow can send you a notification; if it is routine, it can file it away and draft a reply.
To add an AI block, drag it from the block panel into your flow and type your instruction in plain English — “Rename this file based on what it contains” or “Decide whether this email is urgent”. You choose the AI engine in the block settings: Watchflows AI for the easiest start, Apple’s on-device model for privacy, Ollama if you run local models, or your own API key if you already pay for one.
Start with one AI block per flow. Test it with a few real files before you trust it with important documents. AI is powerful, but a beginner who verifies the first ten results builds far more reliable automations than one who automates blindly.
Step 5: Use Hotkeys to Trigger Flows Instantly
Not every automation should wait for a file or a time. Some jobs you want on demand, with a single keystroke.
Watchflows lets you attach a hotkey to any flow. For example:
- Press a hotkey to clean up your Desktop instantly.
- Press a hotkey to take selected text, ask the AI to summarise it, and copy the summary to your clipboard.
- Press a hotkey to start your “morning routine” flow: open your calendar, open your task list, and show today’s weather.
To set one up, add a Hotkey Trigger block, click into the shortcut field, and press the keys you want — something like Command + Shift + S. Make sure the combination is not already used by another app, or your flow will never fire.
Hotkey flows are the fastest way to feel the benefit of automation, because you trigger them yourself and see the result in seconds. Build two or three of these before you move on to scheduled flows.
Step 6: Schedule Flows That Run While You Sleep
Some jobs are better on a clock than on a trigger. Watchflows supports time-based triggers, so you can schedule flows for a specific time, a weekday pattern, or an interval.
Practical scheduled flows for beginners include:
- Morning briefing (weekdays, 8:30 AM): gather today’s calendar events, unread emails, and weather, then summarise them with AI and show a single notification.
- Weekly Downloads cleanup (Sundays, 6:00 PM): move files older than 7 days out of Downloads into dated archive folders.
- End-of-day backup (daily, 11:00 PM): copy your important work folder to an external drive or a backup folder.
To create one, use a Time Trigger block, pick the schedule, and connect your actions. Keep scheduled flows simple at first — one trigger, two or three actions — and check the run history the next morning to confirm they worked.
Step 7: Connect Watchflows to Your Other Apps with Webhooks
A webhook is simply a special URL that other apps can call to start your flow. Watchflows gives each flow its own webhook URL, which opens the door to connecting almost anything.
For example, a form on your website can call a webhook when someone signs up, and your flow can save the details to a spreadsheet and send you a notification. A shop order can trigger a flow that creates an invoice draft. A message in a team tool can kick off a flow that files the attachment and logs the task.
Setting it up is straightforward:
- Add a Webhook Trigger block to your flow.
- Copy the URL Watchflows generates.
- Paste that URL into the other app’s webhook or notification settings.
- Test it once by triggering the event in the other app, then watch the flow run.
If you run a small business, this is the step that turns Watchflows from a personal helper into a real operations tool. A digital agency that manages client work can use webhooks to route new enquiries automatically instead of copying them by hand, and teams that publish content can trigger flows the moment a new article goes live.
Step 8: Compare Watchflows AI with Shortcuts, Zapier, and Keyboard Maestro
Beginners often ask whether Watchflows replaces the tools they already have. The honest answer is that it overlaps with several of them, and the right choice depends on what you automate.
| Tool | Best for | Coding needed? | Price | Runs on |
|---|---|---|---|---|
| Watchflows AI | Visual Mac automations with AI decisions | No | $49 once (14-day free trial) | Your Mac, local-first |
| Apple Shortcuts | Simple built-in Mac/iPhone automations | No | Free, built into macOS | Apple devices |
| Zapier | Connecting cloud apps (Gmail, Slack, Sheets) | No | Free tier, then from $20/month | Cloud |
| Keyboard Maestro | Deep Mac automation and macros | No, but complex | $36 once | Your Mac |
| Automator | Legacy built-in Mac workflows | No | Free, built into macOS | Your Mac |
Watchflows wins when you want a visual canvas, AI judgement inside the flow, and everything running locally on your Mac. Shortcuts is better for quick phone-and-Mac automations that Apple already supports. Zapier is better when the whole job lives in cloud apps and your Mac is never involved. Many people use Watchflows alongside Shortcuts: Shortcuts for the tiny built-in jobs, Watchflows for the bigger, smarter ones.
Step 9: Avoid the 5 Mistakes Every Beginner Makes
- Automating too much at once. Build one small flow, run it for a week, then add the next. A ten-block flow that nobody tested will fail in ways a three-block flow never does.
- Skipping the test run. Always click Run and watch the flow execute before you switch it on. Watchflows shows you each block as it runs, so a mistake is easy to spot.
- Giving the AI vague instructions. “Sort my files” is vague. “Move PDFs that contain the word Invoice into the Finance folder and rename them Invoice-Vendor-Date” is a real instruction. The clearer the prompt, the better the result.
- Granting permissions you do not need. Only give Watchflows access to the folders and apps your flows actually touch. Revisit permissions every month.
- Forgetting the run history. Every flow keeps a log of its runs. When something does not happen, check the log first — it usually tells you exactly which block stopped and why.
Step 10: Build a Real Daily Routine with 3 Flows
Here is a starter kit that covers a full day. Build these three flows and you will have a working automation setup by tonight.
Flow 1 — Morning briefing (8:30 AM weekdays). Time trigger, then AI blocks that read your calendar and unread emails and produce a short summary notification. Five minutes of setup, and every morning starts with a clear picture of the day.
Flow 2 — Downloads janitor (runs when a file arrives). File trigger on Downloads, AI condition to classify the file, then move and rename actions. Your Downloads folder stays clean without you ever opening it.
Flow 3 — End-of-day tidy (6:00 PM weekdays). Time trigger, then actions that close unused apps, move Desktop files into dated folders, and show a short summary of what was tidied. You finish work with a clean machine every single day.
Once these three run smoothly for a week, add one new flow per week. That pace keeps your automations reliable and your Mac under your control — and if you want ideas for bigger workflows, teams that offer AI automation services often publish example setups you can adapt to your own routines.
Frequently Asked Questions
Is Watchflows AI really free?
Watchflows AI offers a 14-day free trial with full access to the Flow Builder, triggers, actions, and AI blocks. After the trial, it costs $49 as a one-time purchase — there is no monthly subscription. It is also included in a Setapp subscription if you already use Setapp.
Does Watchflows AI work on Windows?
No. Watchflows is a Mac-only app. It is built around macOS folders, permissions, and system events, so there is no Windows version. Windows users looking for similar visual automation should look at Power Automate or n8n instead.
Do I need to know how to code to use Watchflows AI?
No. The entire point of the Flow Builder is that you build automations by dragging blocks onto a canvas and typing instructions in plain English. If you can describe a task in a sentence, you can build a flow for it. Coders can go deeper with webhooks and scripts, but it is entirely optional.
Is my data private in Watchflows AI?
Watchflows is local-first: your flows and files stay on your Mac. For AI blocks, you choose the engine. Apple’s on-device model and Ollama keep your data on your own machine, while Watchflows AI and your own API keys send data to a cloud model. Choose the on-device options if privacy is your top priority.
How is Watchflows AI different from Apple Shortcuts?
Shortcuts is built into macOS and is great for simple automations across Apple devices. Watchflows adds a visual canvas for complex flows, AI blocks that can read and decide, webhooks for connecting other apps, and a run history that makes debugging easy. Many Mac users keep both: Shortcuts for quick jobs, Watchflows for the smart ones.
Can Watchflows AI replace Zapier?
Only partly. Zapier connects cloud apps that live on the internet, while Watchflows runs on your Mac and automates things on your own computer. If your work involves files, folders, and Mac apps, Watchflows is the better tool. If the whole job happens inside Gmail, Slack, and Google Sheets, Zapier still fits better.
Final Thoughts
Watchflows AI is one of the most beginner-friendly automation tools to arrive on the Mac in a long time. It launched on Product Hunt on November 9, 2026, and it solves a real problem: most people know exactly which boring jobs they want automated, but they have never had a tool that lets them describe the job in plain English and watch it happen.
Start small. Build the screenshot sorter, then the Downloads janitor, then the morning briefing. Let the AI handle one decision at a time, verify the first results, and grow from there. Within a week, your Mac will quietly be doing work you used to do by hand — and that is the whole point of automation.
Try the 14-day free trial, build your first flow today, and see how much of your day you get back.
Explore More Free AI Tools
Want to keep exploring? Try these free tools on AIToolSteps: AI Title Generator, Meta Description Generator, AI Rewriter, and Keyword Density Checker — all free, right on the homepage.