
Have you ever dreamed of making your own video game, but stopped because you cannot code? You are not alone. For years, building a 3D game meant learning a programming language, buying expensive software, and spending months on character rigs, physics, and publishing. That wall just fell. On November 4, 2026, a brand-new tool called Wanaka Studio topped Product Hunt as the #1 Product of the Day, and it promises something no other tool has offered before: describe the game in your head, and an AI agent builds it for you — a real, playable, AAA-style 3D game you can edit and publish yourself.
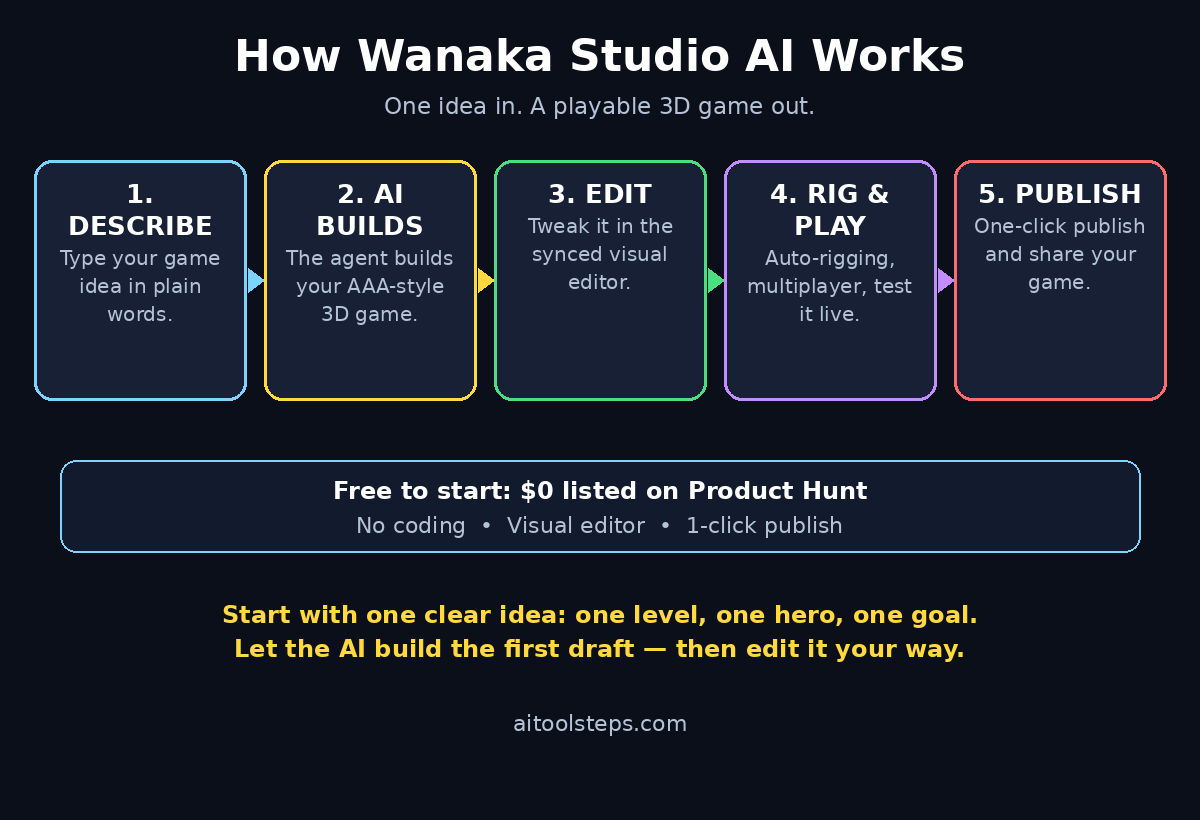
Wanaka Studio calls itself “the first all-in-one, AI-native game engine.” That is a bold claim, but the idea behind it is simple. Instead of writing code, you write a prompt. The AI agent builds the world, the characters, and the gameplay loop. Then you open a visual editor that is synced with everything the AI made, and you change whatever you want by clicking and dragging — no code at all. Auto-rigging, multiplayer, and 1-click publish are all built in.
In this guide, you will learn exactly how to use Wanaka Studio AI for beginners — from finding the tool and creating a free account to describing your first game, editing it in the visual editor, testing it, and publishing it for others to play. We will also compare it with the tools people used before, answer the most common beginner questions, and share practical prompt examples you can copy. One honest note before we start: Wanaka Studio is brand new, so details like free limits and system requirements may change quickly. Check the official site or the Product Hunt page for the latest information whenever something looks different from this guide.
Step 1: Find Wanaka Studio and Understand What It Is
Before you build anything, take five minutes to understand what you are working with. Wanaka Studio is an AI-native game engine, which means the AI is not a bolted-on extra — it is the core of the tool. You describe a game in plain English, and an AI agent generates the playable result. You then edit that result directly in a synced visual editor, so what you see is always what you get.
This is different from the “prompt a game” toys you may have seen. Anyone can prompt an AI to spit out a small playable loop — a jumping character on a flat platform, for example. Wanaka aims to go further, toward a real playable game you can edit, polish, and publish. The team behind it puts it this way: “Wanaka is built to tear down technical walls, not to replace the human soul of game design.” In other words, the AI handles the technical heavy lifting so your creativity can lead.
The easiest way to find Wanaka Studio is through its Product Hunt page at https://www.producthunt.com/products/wanaka-studio. The page was published on October 28, 2026, and updated on November 4, 2026 — the day it became the #1 Product of the Day. Follow the launch link on that page to reach the official site. Do not guess the official website address, and do not trust random links in comments or videos; the Product Hunt page is the verified starting point. Once you are on the official site, look for the sign-up or “Get Started” button and read the current free plan details before you commit to anything.
Beginner tip: Bookmark both the Product Hunt page and the official site. Because Wanaka Studio is so new, the team is shipping updates fast, and those two pages are where new features and limits are announced first.
Step 2: Create Your Free Account
The Product Hunt listing shows a starting price of $0, which means you can begin for free. Creating an account should take only a couple of minutes, and the process is similar to signing up for any modern web tool.
- Open the official Wanaka Studio site from the Product Hunt launch link.
- Click the sign-up or “Get Started” button.
- Create your account with an email address, or use a supported social sign-in if one is offered.
- Confirm your email if a verification message is sent.
- Complete any short onboarding questions, such as what kind of game you want to make first.
Once you are inside, take a tour before building anything. Look for the dashboard, the project list, the prompt box, and the visual editor button. Most beginner frustration comes from rushing straight into a big idea without knowing where the buttons are. Spend ten minutes clicking around: open a sample project if one is provided, look at how scenes are organised, and find the help or documentation link. Knowing where things live now will save you an hour later.
Beginner tip: Use an email address you actually check. New tools send important updates about free limits, feature changes, and maintenance to that inbox, and you do not want to miss a change that affects your project.
Step 3: Describe Your First Game Idea in a Prompt
This is the step that makes Wanaka Studio feel like magic — and it is also the step where most beginners make their biggest mistake. The AI agent builds what you describe, so a vague prompt gives you a vague game. A clear, specific prompt gives you a game you can actually work with.
Start small for your very first game. Do not ask for an open-world epic with fifty levels. Ask for one tight, playable loop: one character, one goal, one or two obstacles, and a clear win condition. You can always expand it later in the editor.
Here is a prompt formula that works well for beginners:
- Genre and view: “a 3D third-person adventure game”
- Setting: “in a glowing forest at sunset”
- Character: “a young explorer with a backpack”
- Goal: “collect 5 glowing crystals before the timer runs out”
- Obstacles: “avoid rolling boulders and a patrolling robot”
- Controls and feel: “simple controls, relaxed pace, suitable for beginners”
Put together, it reads like this:
“Build a 3D third-person adventure game set in a glowing forest at sunset. The player controls a young explorer with a backpack who must collect 5 glowing crystals before the timer runs out. Add rolling boulders and one patrolling robot as obstacles. Keep the controls simple and the pace relaxed for beginners.”
A few more prompt examples you can adapt:
- “Make a cosy 3D farming game where the player plants seeds, waters crops, and sells the harvest at a market stall.”
- “Create a fast 3D racing game on a floating sky track with 3 laps, boost pads, and 4 rival racers.”
- “Build a 3D puzzle game in a haunted library where the player pushes bookshelves to open a secret door.”
After you write your prompt, read it once more and ask yourself: could a stranger build my game from these words alone? If the answer is no, add one more sentence of detail. Be specific about the camera view, the goal, and what “winning” means — those three details shape the whole game.
Beginner tip: Save your best prompts in a notes app. When you find a prompt style that produces great results, reuse its structure for your next game and only change the setting, character, and goal.
Step 4: Let the AI Agent Build Your Game
Once you submit your prompt, the AI agent gets to work. This is the part that would have taken a human team weeks: building the 3D world, placing the characters, wiring up the controls, and making the gameplay loop actually playable. According to the Product Hunt listing, Wanaka Studio “uses ~80% fewer tokens and generates faster than Claude Opus 5.5 + Unity” — in plain English, it is designed to build your game with far less AI cost and in far less time than the older approach of pairing a powerful AI model with a traditional engine.
While the agent builds, do not close the tab or refresh the page. Generation time varies with the size and complexity of your game, so a small first project will finish much faster than a large one. When the build is done, you should see your game in a playable preview. Before you change anything, press play and test it. Can you move? Does the goal work? Does the game end when it should? Note down anything broken or missing — that list becomes your editing plan in the next step.
If the first build is not what you imagined, do not panic. That is normal. Read your original prompt again, find the sentence the AI misunderstood, and try one of these fixes:
- Regenerate with a clearer prompt: add the missing detail and build again.
- Ask for a smaller change: describe one specific fix instead of rewriting everything.
- Edit it yourself: if the game is 80% right, the visual editor in the next step is faster than starting over.
Beginner tip: Treat your first build as a draft, not a finished game. Professional game designers prototype rough and polish later — the AI build is your rough prototype, and the editor is where it becomes a real game.
Step 5: Edit Your Game in the Synced Visual Editor
Here is where Wanaka Studio earns its “all-in-one” label. The AI build is not locked away in code you cannot touch. It opens directly in a synced visual editor, which means the editor and the AI build stay in sync: what the AI created appears as objects you can click, move, resize, recolour, and delete.
Open your project in the editor and learn these basic moves first:
- Select and move: click any object — a tree, a character, a platform — and drag it to a new position.
- Resize and rotate: use the handles on a selected object to make it bigger, smaller, or turn it around.
- Change the look: swap colours, materials, and lighting to change the mood of a scene without rebuilding it.
- Add and remove objects: duplicate a good platform, delete a tree that blocks the camera, or add a new obstacle where the level feels empty.
- Adjust the rules: find the settings for timers, scores, and win conditions and tune them until the game feels fair.
Work in small steps and test after every few changes. Change one thing, press play, and check that it still works. This habit is the single best way to avoid the classic beginner trap: making twenty edits at once and then having no idea which one broke the game.
If you work with clients or a team, this editor is also where the tool becomes a business asset. A digital agency that wants to prototype an interactive 3D experience for a brand, for example, can now show a playable draft in days instead of commissioning a full development cycle. The same idea applies to anyone offering AI automation services — when a workflow or a product demo needs a playable 3D scene, a tool like Wanaka Studio turns a description into something a client can actually try. You can learn more about that kind of service at agentic-affairs.com.
Beginner tip: Make a copy of your project before a big edit. If the experiment goes wrong, you still have the working version, and you can compare the two side by side.
Step 6: Add Characters with Auto-Rigging
Characters are usually the hardest part of game development. A 3D character needs a “rig” — an internal skeleton that tells the model how to bend, walk, jump, and wave. Rigging by hand is skilled, slow work, and it stops most beginners before they start.
Wanaka Studio builds auto-rigging in, which means the tool creates that skeleton for your characters automatically. For a beginner, the practical workflow looks like this:
- Choose or describe the character you want in your game.
- Let the AI generate the character and rig it automatically.
- Test the basic movements — walking, running, jumping, and idling — in the preview.
- Swap animations or adjust movement speed in the editor until the character feels right.
- Add a second character, such as a friendly guide or an enemy, and repeat the process.
Because rigging is automatic, you can focus on the fun decisions: what your character looks like, how fast they move, and what they do when the player wins or loses. Try different character ideas early, while changes are still cheap. A robot explorer, a floating spirit, or a small dragon will each change how your game feels, and with auto-rigging you can test those ideas in minutes instead of days.
Beginner tip: Watch the character’s feet and hands during the test play. If the walk looks stiff or the jump looks floaty, adjust the movement speed or the animation first — small tweaks here make the whole game feel more polished.
Step 7: Add Multiplayer to Your Game
Single-player games are a great start, but playing together is where games become memorable. Wanaka Studio includes multiplayer as a built-in feature, so you do not need to set up servers or write networking code to let friends join your game.
For your first multiplayer test, keep it simple:
- Decide the player count — start with 2 players before trying a crowd.
- Choose the mode — cooperative play (work together toward a goal) is easier to balance than competitive play.
- Test with one friend first, and check that both players can see each other, move smoothly, and trigger the same game events.
- Decide what happens when a player joins late or disconnects, and make sure the game does not freeze for everyone else.
Multiplayer changes game design in ways beginners often miss. A level that feels perfect alone can feel empty with four players, and a timer that is generous for one person can be brutal for a group. Playtest every multiplayer mode with real people, not just by imagining it, and adjust the timer, the number of collectibles, and the size of the map to fit the player count.
Beginner tip: Add a simple lobby or waiting area where players gather before the game starts. It gives everyone time to load in and makes the start of the match feel intentional instead of chaotic.
Step 8: Test and Play Your Game Like a Real Player
You have built the world, edited it, added characters, and switched on multiplayer. Now comes the most important step, and the one beginners skip most often: real testing. Do not just watch the game run — play it the way a stranger would, trying to break it.
Run through this beginner testing checklist:
- Controls: Can a new player understand the controls within 30 seconds?
- First minute: Is something fun happening in the first minute, or is the player walking through an empty map?
- Goal clarity: Does the player always know what to do next?
- Difficulty: Is the game challenging but fair, or frustratingly hard?
- Bugs: Do characters fall through the floor, get stuck on objects, or freeze at any point?
- Ending: Does the win screen appear when the goal is complete, and does the lose screen make sense?
- Performance: Does the game run smoothly on a normal computer, or does it stutter?
Ask at least one other person to play it while you watch silently. Do not explain anything — if they get stuck, that is a design problem, not a player problem. Write down every moment of confusion, then fix the biggest one first. One round of honest playtesting improves a game more than ten rounds of guessing.
Beginner tip: Test on the device your players will actually use. If most of your friends will play on a laptop in a browser, test on a laptop — not only on your most powerful machine.
Step 9: Publish Your Game with 1-Click Publish
When your game plays well, it is time to share it. Wanaka Studio includes 1-click publish, which means you do not need to rent a server, configure hosting, or upload files by hand. Publishing should be a single action from inside the editor or dashboard.
Before you hit publish, run this final checklist:
- Play the full game from start to finish one last time.
- Give your game a clear, memorable title and a one-sentence description.
- Check that your game’s thumbnail or cover image actually shows the game.
- Confirm the player count, controls, and goal are explained somewhere the player can see them.
- Publish, then open the published link yourself in a fresh browser window to confirm it works.
Once it is live, share the link where your players already are: a message to friends, a post in a gaming community, or a link on your own website or portfolio. Ask every early player the same two questions — “What was the best moment?” and “Where did you get stuck?” — and use their answers to plan your first update. Publishing is not the end of the process; it is the start of the feedback loop that makes a game good.
Beginner tip: Share the published link with a small group first. Fix the issues they find, then share it widely. A game that works for ten people will work far better for a thousand.
Step 10: Keep Improving Your Game After Launch
A published game is a living project, and Wanaka Studio’s editor makes updating it easy. The best beginner habit is to improve in small, regular cycles instead of trying to fix everything at once.
- Week one: fix bugs and confusing moments reported by your first players.
- Week two: add one new feature — a second level, a new character, or a new obstacle.
- Week three: polish the presentation — better lighting, a clearer goal marker, a nicer title screen.
- Ongoing: keep a short list of player requests and pick the most requested one for each update.
Each time you edit, the synced editor means you are changing the live project directly, not rebuilding from scratch. Save a version or a copy before big changes, test after every update, and republish when you are happy. Players who see a game improving week after week are far more likely to return — and to tell their friends about it.
Remember that Wanaka Studio launched publicly in late October 2026 and topped Product Hunt on November 4, 2026. The tool is very new, which means new features are likely to arrive quickly, and some details in this guide may change. Check the official site or the Product Hunt page for current system requirements and free limits, as a brand-new tool changes fast. The skills you are learning here — clear prompting, visual editing, playtesting, and publishing — will stay useful no matter how the tool itself evolves.
Wanaka Studio vs Other Ways to Build a Game
If you are wondering whether Wanaka Studio is the right tool for you, this comparison puts it next to the workflows people used before it existed. The older routes can still be right for large professional studios, but for a beginner who wants a playable 3D game without coding, the differences are stark.
| Tool | Best for | Coding needed | Starting price |
|---|---|---|---|
| Wanaka Studio | Beginners building a playable 3D game with AI, then editing and publishing it | No | $0 |
| Unity + Claude Opus 5.5 | Experienced developers who want full control and are comfortable wiring an AI model to a traditional engine | Yes | $0 |
| Google Playground | Quick experiments and learning how AI tools work | No | $0 |
| Classic prompt-to-game toy | A fun one-off playable loop or demo with no editing or publishing | No | $0 |
The key difference is what happens after the first build. A prompt-to-game toy gives you a loop and stops there. Unity plus Claude gives you power but demands coding skill and a long setup. Wanaka Studio sits in the middle: the AI builds the game, and you keep editing it in a visual editor until it is ready to publish. For a beginner, that combination of “AI builds it” and “I can still change it” is the whole point.
Frequently Asked Questions
Is Wanaka Studio really free?
The Product Hunt listing shows a starting price of $0, so you can begin for free. That said, Wanaka Studio is brand new, and free plans on new tools often have limits — for example, on the number of projects, the size of a game, or how much AI generation you can use. Check the official site or the Product Hunt page for current system requirements and free limits, as a brand-new tool changes fast. Start with the free plan, build your first game, and only consider a paid option once you know the tool is right for you.
Do I need coding skills to use Wanaka Studio AI?
No. That is the core promise of the tool. You describe your game in plain English, the AI agent builds it, and you edit it in a visual editor by clicking and dragging. Auto-rigging, multiplayer, and 1-click publish are built in, so none of those steps require code either. Knowing a little about game design — goals, difficulty, and player feedback — helps far more than knowing a programming language.
What kind of games can I make with Wanaka Studio?
Because the AI agent builds from your description, you can try many genres: adventure, racing, farming, puzzle, platformer, or a cosy exploration game. The realistic advice for a beginner is to start with one small, focused idea — one character, one goal, and one or two obstacles — and expand once that first loop plays well. A small game that works is worth far more than a huge game that never finishes.
Can I publish and share my game?
Yes. Wanaka Studio includes 1-click publish, so you can put your game live and share the link with friends, communities, or your audience without setting up hosting yourself. Before you share widely, play the published link yourself in a fresh browser window to confirm it works, and test it with a small group first so you can fix any early issues.
Who owns the game I create in Wanaka Studio?
Ownership and licensing terms are set by Wanaka Studio’s own terms of service, which you should read on the official site before publishing anything commercial. As a general rule for any AI tool, keep a copy of your prompts and your project, and check the terms if you plan to sell your game or use it for a client. If ownership matters for your project, confirm it in writing from the official terms rather than assuming.
What are the limits of such a brand-new tool?
Wanaka Studio launched on Product Hunt on October 28, 2026, and topped the charts on November 4, 2026 — so it is only days old at the time of writing. Expect fast changes: new features, shifting free limits, occasional bugs, and documentation that is still catching up. That is normal for a new launch, and it is also an advantage: early users often shape the product by giving feedback. Build small, keep copies of your projects, and check the official site or the Product Hunt page for the latest information before relying on any single detail.
Final Thoughts
Learning how to use Wanaka Studio AI is less about learning a complicated tool and more about learning to describe what you want clearly. If you can explain your game idea in a few honest sentences — the setting, the character, the goal, and what winning looks like — the AI agent can build the first version for you. The visual editor then puts you back in control, so you can move objects, adjust the rules, add characters with auto-rigging, switch on multiplayer, and publish with one click.
The timing could not be better for a beginner. Wanaka Studio topped Product Hunt on November 4, 2026, as the first all-in-one, AI-native game engine, and it arrived at a moment when AI tools are removing the technical walls that kept ordinary people out of game development. The team says Wanaka “is built to tear down technical walls, not to replace the human soul of game design” — and that is exactly how you should use it. Let the AI handle the rigging, the setup, and the first build. You bring the idea, the taste, and the playtesting that turn a generated draft into a game people actually enjoy.
So start today, while the tool is free to try and the community around it is just forming. Open the Product Hunt page at https://www.producthunt.com/products/wanaka-studio, follow the launch link to the official site, create your free account, and build your first small game. Test it with a friend, fix what confuses them, publish it, and then build the next one a little bigger. Your first game will not be perfect — nobody’s is — but it will be yours, it will be playable, and it will prove that you do not need to write code to be a game creator.
Explore More Free AI Tools
Want to keep building with free AI tools? Try these free tools on AIToolSteps:
- AI Title Generator — https://aitoolsteps.com/
- Meta Description Generator — https://aitoolsteps.com/
- AI Rewriter — https://aitoolsteps.com/
- Keyword Density Checker — https://aitoolsteps.com/
Explore the full collection of free AI tools and beginner-friendly guides at AIToolSteps.