

Design tools have changed fast in 2026. You no longer need to drag every rectangle by hand — you can now ask the AI you already code with to design with you, on a real canvas, in a real file you can open, change, and hand to a developer. That is exactly what Tanvas AI does, and it does it for free, with no account and no AI fees of its own.
Tanvas is a free design app for Mac and Windows that launched on Product Hunt on November 13, 2026. Instead of locking you into its own AI, it lets Claude Code, Ollama, or Ollama Cloud work on the same canvas as you. You describe what you want, the AI builds real, editable design layers, and you refine the result like a designer — because the file is yours, stored on your own computer.
In this beginner’s guide, you will learn how to use Tanvas AI step by step: downloading it, connecting your AI, building your first design, using auto layout and components, and handing the finished file to a developer. No design degree needed. If you can write a clear sentence, you can design with Tanvas.
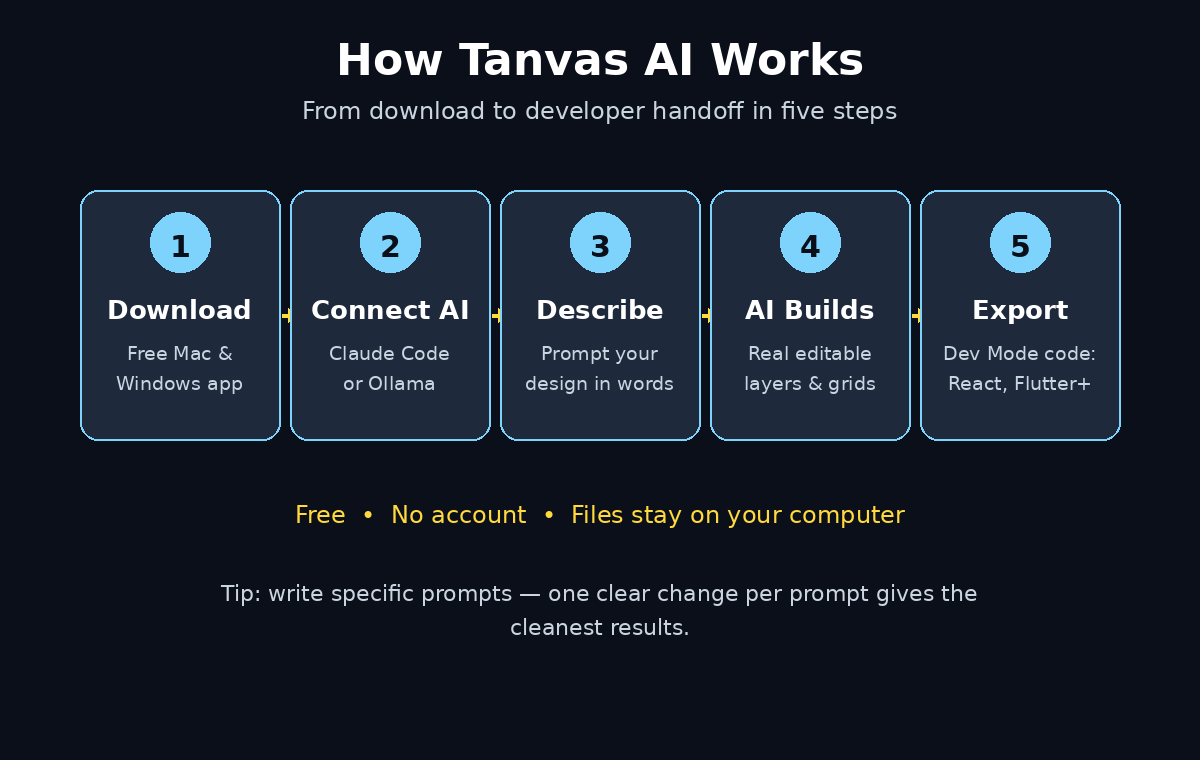
Step 1: What Is Tanvas AI and Why Designers Are Talking About It
Tanvas is a design app, not an image generator. That distinction matters. Image generators give you a flat picture. Tanvas gives you a real design file — frames, text layers, buttons, grids, and components — that you can edit, rearrange, and export as code.
Here is the idea in plain words: you already trust an AI coding assistant such as Claude Code to write code with you. Tanvas extends that partnership to design. Your AI works on the same canvas you do, in the same file, at the same time. You can point at a section and say “make this warmer” or “add a pricing table here,” and the AI edits the actual layers.
Why beginners love it:
- It is free. There is no subscription, no account, and no AI fee from Tanvas itself — you bring your own AI, such as Claude Code or a local Ollama model.
- Your files stay on your computer. Nothing is uploaded to a Tanvas cloud by default, which is great for client work and privacy.
- The output is real design, not a picture. Every element is a layer you can select, move, restyle, or delete.
- It speaks developer. Dev mode exports code in SwiftUI, Compose, Flutter, React, and Tailwind, so your design becomes a working interface faster.
One honest note: Tanvas is in alpha as of November 2026, and its maker ships updates most days. Expect rough edges — an occasional glitch or a missing convenience feature — but the core experience already works, and alpha users shape what gets built next.
Step 2: Download and Install Tanvas AI on Mac or Windows
Getting started with Tanvas AI takes about five minutes. There is no account to create and no credit card to enter.
- Visit the official Tanvas page and download the installer for your system — macOS or Windows. The app is a normal desktop download, not a browser tab.
- Run the installer and open Tanvas. Because there is no account, you land straight on the welcome screen instead of a sign-up form.
- Allow the app to access your files when your system asks. Tanvas saves your design files locally, so it needs permission to read and write in your chosen folder.
- Create your first project folder somewhere sensible, such as Documents/Designs, so every Tanvas file stays easy to find later.
Tip: keep one folder per project. A Tanvas file is a real file on your disk, so good folder habits now will save you from hunting through Downloads later.
Step 3: Connect Your AI to Tanvas AI
Tanvas adds no AI fees, because it does not sell you an AI model. You bring your own. At launch, it supports three routes:
- Claude Code: the most powerful option for most beginners. If you already use Claude Code for coding, connect it and the same assistant designs with you.
- Ollama: run a local AI model on your own machine. Your prompts never leave your computer, and there is no per-token bill at all.
- Ollama Cloud: the hosted version of Ollama, for when you want cloud power without a local setup.
To connect, open Tanvas settings and choose your AI provider. Follow the on-screen prompts to link your Claude Code session or point Tanvas at your Ollama installation. The connection is read-only in one important sense: your coding agent can build from it, but Tanvas never sends your files anywhere you did not ask it to.
Which should you pick? If you already pay for Claude Code, start there — it gives the smartest results. If you want zero ongoing cost and full privacy, Ollama with a capable local model is the free route. You can switch providers later without losing your files.
Step 4: Set Up Your First Canvas and Brand Basics
Open a new Tanvas AI canvas and think of it as a blank artboard with superpowers. Before you ask the AI to design anything, set a few basics — five minutes here saves twenty minutes of fixing later.
- Pick a frame size. Start with a common size: 1440 by 900 pixels for a website landing page, or 1080 by 1920 for a mobile screen or social post.
- Choose two or three brand colors. A dark background, one accent color, and white text is a safe, modern starting point.
- Pick one or two fonts. One for headings and one for body text is enough. Mixing five fonts is the fastest way to make a design look messy.
- Decide the goal of the page. One clear goal — “get visitors to join the waitlist” — beats a page trying to do five things at once.
Write these choices down in a short note inside your project. You will paste them into your AI prompts, and consistent prompts produce consistent designs.
Step 5: Ask Tanvas AI to Design — Your First Real Project
This is the fun part. Instead of drawing, you describe. Open the AI panel and write a prompt the way you would brief a human designer: clear, specific, and honest about the goal.
A good first prompt looks like this: “Design a landing page for a small bakery called Morning Crumb. Dark warm background, cream text, one big hero headline, a photo-style hero section, three product cards for bread, cakes, and pastries, and a signup form for a weekly menu email. Use auto layout and a 12-column grid.”
Watch what the AI does:
- The AI creates real frames, text layers, and buttons — not a flat image.
- Auto layout is applied, so sections resize sensibly when you change text.
- Everything stays editable, so you can click any element and change it.
When the first draft appears, resist the urge to judge it instantly. AI first drafts are starting points. Your job is the second pass: tighten the headline, fix spacing, swap a color, and remove anything that does not serve the page’s goal. If your project grows into a full website, a digital agency can take your Tanvas file and turn it into a live, polished site — the Dev mode handoff makes that step much smoother than handing over a screenshot.
Step 6: Edit, Refine and Arrange Like a Pro
Here is where Tanvas AI feels like a real design tool rather than a chatbot with a canvas. Click any element to select it, then edit it directly.
- Move and resize: drag elements, or nudge them with arrow keys for pixel-perfect placement.
- Restyle text: change font, size, weight, and color from the side panel. Keep headings large and body text readable — 16 pixels or more for paragraph text.
- Fix spacing: even gaps look professional. Select two elements and use the alignment tools to line them up.
- Ask the AI to iterate: select a section and prompt, “Make this section warmer and add a testimonial row with three short quotes.” The AI edits only what you selected.
A beginner habit that pays off: zoom out to 50 percent every few minutes and look at the whole page. Designs that look fine up close often reveal crooked alignment or crowded sections when you see the full picture.
Step 7: Use Auto Layout, Grids and Components
Three features separate a tidy design from a messy one, and Tanvas AI includes all of them:
- Auto layout: elements inside a frame flow and resize together. Change a button label from “Buy” to “Get Started Free” and the button grows instead of the text overflowing.
- Grids: a 12-column grid keeps your content aligned. If everything snaps to the same columns, the page instantly looks more professional.
- Components: turn a button or card into a reusable component with properties. Change the component once, and every copy on the page updates. Set up variants — such as a primary button and a secondary button — and reuse them everywhere.
Practice these on your first project even if it feels slow. Ten minutes learning components now saves hours of manual fixes when your design grows to ten screens.
Step 8: Hand Off to Developers with Dev Mode
A design is only half the job if a developer cannot build it. Tanvas AI Dev mode is built for that handoff. Switch to Dev mode and click any element to inspect it like a developer would.
- Copy real code: export the selected element in SwiftUI, Compose, Flutter, React, or Tailwind — pick the stack your developer actually uses.
- Share a read-only connection so your coding agent can build from the design file without editing it by accident.
- Check measurements first: confirm spacing, font sizes, and colors in Dev mode before you send the file, so the developer never has to guess.
This is the feature that makes Tanvas different from a picture generator. A screenshot cannot be handed to a developer. A Tanvas file can.
Step 9: Save, Share and Export Your Tanvas AI Work
Because your files live on your computer, saving is simple — but sharing needs a little thought.
- Save often. Tanvas stores your project as a local file. Press save after every big change, and keep a backup copy in a cloud folder.
- Export images of individual frames as PNG or JPG when you need a preview for a client chat or a social post.
- Export code from Dev mode when the design is ready to become a real product.
- Version your files: save copies as
bakery-v1,bakery-v2, and so on. In alpha software, a named backup is cheap insurance.
If you want feedback, export a frame image and share it. People react to pictures far faster than they react to a design-file link, and fresh eyes catch the crooked button you stopped seeing an hour ago.
Step 10: Tanvas AI Pro Tips, Limits and Troubleshooting
A few lessons that will save you time in your first week with Tanvas AI:
- Write specific prompts. “Make a nice page” gives you a generic page. “A landing page for a bakery, dark warm background, three product cards, signup form” gives you a bakery page.
- Iterate in small steps. One change per prompt is easier to undo than five changes at once.
- Keep a prompt notebook. Save the prompts that worked well. You will reuse them on every project.
- Expect alpha quirks. The app is in alpha and updates ship most days. If something glitches, save your file, restart the app, and check for an update before worrying.
- Check AI output carefully. AI can invent text, misspell a headline, or place a button oddly. Read every word before you publish or share a design.
- Use the right model for the job. A small local Ollama model is fine for simple layouts, but a stronger model like Claude Code handles complex multi-section pages far better.
Tanvas sits at the center of a bigger shift: AI agents are moving from writing code to doing whole creative jobs — designing, laying out, and handing off finished work. The Agentic Affairs site tracks this agentic-AI wave closely, and Tanvas is a clear example of it: an agent that does not just suggest a design, but builds it in a file you own.
Tanvas AI vs Other Free Design Tools
How does Tanvas compare with the tools beginners usually try first? Here is a quick side-by-side.
| Feature | Tanvas AI | Canva (Free) | Figma (Free) |
|---|---|---|---|
| Price | Free, no account | Free with paid extras | Free starter plan |
| AI designs for you | Yes, with your own AI | Yes, built-in Magic Studio | Yes, Figma AI (limited) |
| Real editable layers | Yes | Yes | Yes |
| Works offline / local files | Yes, files on your PC | No, cloud only | Mostly cloud |
| Developer code export | SwiftUI, Flutter, React, more | Limited | Yes, via Dev Mode |
| Best for | AI-assisted real design | Quick social graphics | Team product design |
Tanvas wins when you want AI to do the heavy lifting and still end up with a real, ownable design file. Canva wins for a five-minute social post. Figma wins for large teams. Most beginners will end up using two of the three — and Tanvas is the one that teaches you how AI-assisted design actually works.
Tanvas AI Frequently Asked Questions
Is Tanvas AI really free?
Yes. Tanvas itself is free, with no account and no AI fees. You bring your own AI — Claude Code (which you may already pay for) or a free local Ollama model — so Tanvas charges nothing on top.
Do I need a Claude Code subscription to use Tanvas?
No. Claude Code is one option. You can also use Ollama with a local model, which costs nothing, or Ollama Cloud. Claude Code simply gives the smartest results for complex designs.
Is Tanvas available on Mac and Windows?
Yes. Tanvas is a desktop app for Mac and Windows. There is no browser version — you download and install it, and your files stay on your computer.
Can Tanvas replace Figma or Canva?
For solo beginners and small projects, it can replace much of what you would do in either. For large team design systems, Figma is still stronger. For quick social graphics, Canva is still faster. Tanvas shines when AI builds a real design you own.
Is my design data private in Tanvas?
Your files are stored locally on your computer, not in a Tanvas cloud. With Ollama running locally, your prompts stay on your machine too. With Claude Code or Ollama Cloud, prompts go to that provider under its own terms.
Is Tanvas stable enough for client work?
It is in alpha, so treat it with care: save often, keep versioned backups, and export finished work. Many early users already ship real projects with it, but do not make it your only copy of a client file.
Final Thoughts
Tanvas AI is a glimpse of where design is heading: you describe what you want, an AI you already trust builds it in a real file, and you stay in control of every layer. It is free, it needs no account, it keeps your files on your own computer, and it hands developers real code instead of a screenshot.
Start small. Download Tanvas, connect Claude Code or Ollama, and build one landing page today. Write a specific prompt, refine the draft, learn auto layout and components, and export the result. By your third project, the workflow will feel natural — and you will wonder why design ever meant dragging rectangles by hand.
Explore More Free AI Tools
Want to keep building with free AI? Try the AI Title Generator, Meta Description Generator, AI Rewriter, and Keyword Density Checker at aitoolsteps.com — free tools that pair perfectly with your new Tanvas designs, from naming your project to writing the copy that goes inside it.