

We have all been there. A cryptic error message pops up on your screen. A chart in a report makes no sense. A form is written in a language you barely read. The old way of getting help was slow and annoying: take a screenshot, open a chatbot in a new tab, upload the image, type out what you are looking at, wait, then switch back to what you were doing. By the time the answer arrived, you had lost your train of thought.
Squint AI removes all of that busywork. It is a small desktop app that explains whatever is on your screen. You press a hotkey, drag a box around the confusing part, and ask. The answer appears right next to what you selected, usually within a couple of seconds. There is no screenshot to save, no tab to open, and no chat window to manage.
Squint AI first launched on September 30, 2026, and its Mac version arrived on November 22, 2026, when it reached the top of Product Hunt for the day. It runs on Windows, macOS and Linux, and the free plan gives you three captures a day with no credit card required. This guide shows you exactly how to use Squint AI, from installing it to getting genuinely useful answers out of it every day.
Step 1: What Is Squint AI — and Why It Matters
Squint AI is a desktop AI screen explainer. It sits quietly in your menu bar on a Mac or your system tray on Windows and does nothing until you call it. When you press its hotkey, your screen freezes, you draw a box around the part you care about, and an AI model reads that cropped image and streams an answer into a small panel beside your selection.
The clever part is that the capture itself is the prompt. You never have to describe what you are looking at, because the model can see it. That is what makes Squint AI different from a normal chatbot: the context is the picture, not a paragraph you typed.
It belongs to a new wave of tools that act on what they see rather than what you type. If you want to understand where this kind of software is heading, you can read more about how agentic AI is changing everyday work at Agentic Affairs. For now, think of Squint AI as a pocket expert that lives on your screen and answers questions about anything you point at.
Here is what it is good at, in plain terms:
- Explaining error messages in plain English, including what caused them and how to fix them.
- Reading charts, graphs and tables and telling you what the numbers actually mean.
- Translating and explaining text in another language, right where it appears.
- Walking through code line by line, or spotting the bug in a snippet.
- Reading diagrams, slides and forms and summarising them in seconds.
Step 2: What You Need Before You Start
Squint AI is genuinely beginner-friendly, and the setup is short. Before you begin, make sure you have these four things ready:
- A supported computer. Windows 10 or 11, macOS 14 or newer, or Linux with Wayland. The Mac version is the newest arrival, so it needs a reasonably recent macOS.
- An internet connection. The reading happens on a remote model through OpenAI’s API, so nothing here works offline. That is the one real limitation to know about up front.
- An email address. A free account needs an email address only. There is no password to invent and no card to add.
- Five minutes. From download to your first explained screenshot is about five minutes, including the account step.
One honest note: the free plan gives you three captures a day. That is enough to learn the tool and to solve a few real problems daily, but if you fall in love with it and start reaching for it twenty times a day, you will hit the limit and need to look at a paid plan. Treat the free tier as a proper trial, not a promise that it stays unlimited forever.
Step 3: Download and Install Squint AI
Getting Squint AI onto your computer is the easy part.
- Open the official website. Go to heysquint.com in your browser. This is the only place you should download it from, so you always get the real app and not a copycat.
- Pick your system. Download the installer for Windows, macOS or Linux. Windows users can also install it from the Microsoft Store if they prefer.
- Run the installer. On a Mac, drag Squint into your Applications folder as usual. On Windows, run the installer and accept the defaults.
- Look for the icon. Once it is running, Squint AI lives in your menu bar on a Mac or your system tray on Windows. It stays out of the way until you press the hotkey, and it does not open a big window or a chat panel on your desktop.
Because Squint AI is built in Rust with native screen capture, it starts fast and feels light. It does not behave like a heavy Electron app that eats memory while it waits. If the icon is not visible after installation, check that the app actually launched — on a Mac, open Spotlight and type Squint to start it once, and it will stay in the menu bar after that.
Step 4: Create Your Free Squint AI Account
Your first job is to create the free account that unlocks your three daily captures.
- Open Squint AI from the menu bar or system tray icon.
- Enter your email address when asked. There is no password step — the sign-up is email-only, which is one less credential to manage.
- Confirm your email if a verification message arrives, then return to the app.
- Check your daily balance. Your free plan should show three captures available for the day. If it shows zero, the account step may not have finished — sign out and back in once before assuming something is broken.
That is the whole account process. There is no card on file, no trial countdown ticking, and no settings maze to get through before your first capture. Squint AI is designed to be useful within minutes of installing it, and the account step is deliberately the shortest part of the setup.
Step 5: Learn the Hotkey and Make Your First Capture
This is the core skill of Squint AI, and it takes about thirty seconds to learn.
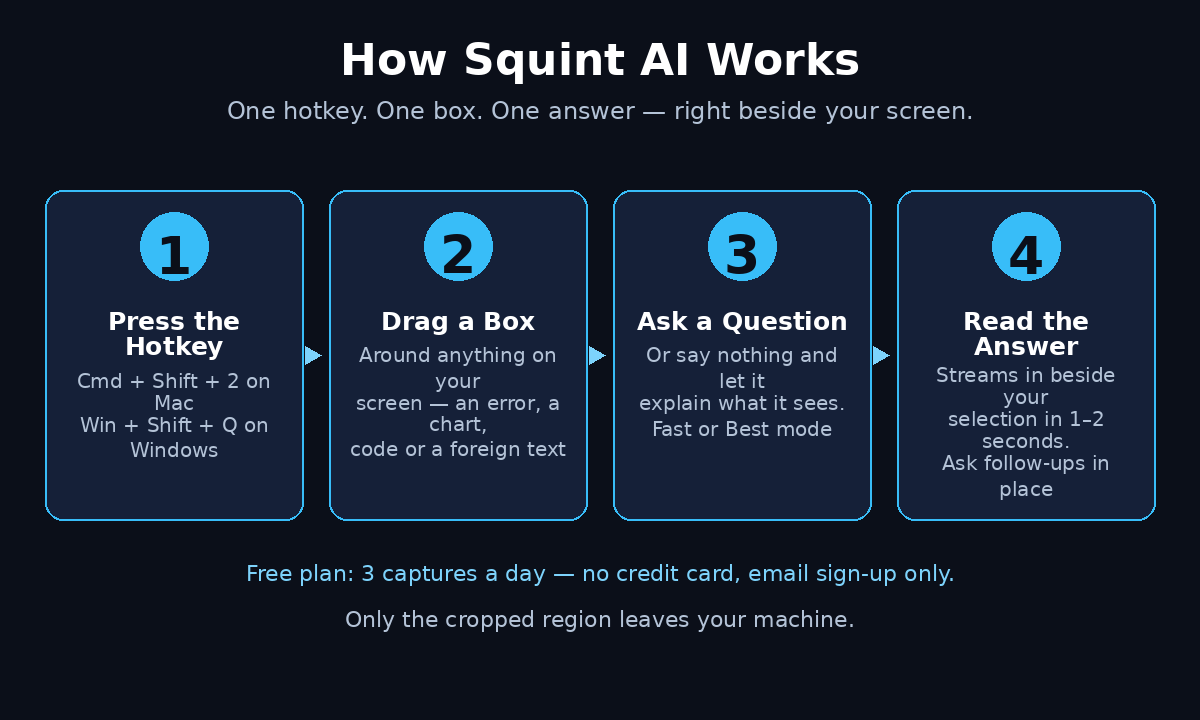
- Press the hotkey. On a Mac, press
Cmd + Shift + 2. On Windows, pressWin + Shift + Q. Your display freezes exactly as it is, so nothing can change while you select. - Drag a box around the part you care about. Click and drag over the error message, the chart, the paragraph or the line of code. Only the cropped region is sent to the model — nothing else on your display leaves your machine.
- Wait for the panel. An answer panel opens beside your selection, and the answer starts streaming in. Fast mode usually starts answering in one to two seconds.
- Read the answer where you work. You never switch apps. The explanation sits next to the thing it explains, which is the whole point.
Try your first capture on something simple, like a confusing settings screen or a paragraph in a foreign language. A good first test is a chart or a graph, because the answer will show you immediately whether the tool understands numbers, labels and trends — and it does, including tables and even mathematical notation in its answers.
If the hotkey clashes with another app on your computer, you can change it in Squint AI’s settings. Pick something you can press without thinking, because the hotkey is the entire interface. The faster it becomes muscle memory, the more you will actually use the tool.
Step 6: Ask Your Question and Read the Answer
Drawing the box is only half the job. What you ask decides how useful the answer is.
When the selection is made, you can type a prompt in the box next to it — or you can type nothing at all and let the model explain what it sees. A bare capture with no question gets you a general explanation. A specific question gets you a specific answer. The difference is large, so it is worth learning to ask well.
Good prompts are short and direct. Try these patterns:
- “What does this error mean, and how do I fix it?” — for error messages and crash dialogs.
- “Explain this chart in simple words. What is the main trend?” — for graphs, dashboards and reports.
- “Translate this and explain what I need to do.” — for foreign-language text, forms and notices.
- “Walk me through this code line by line. Where is the bug?” — for code on screen.
- “Summarise this in three bullet points.” — for long documents, slides and articles.
Above the prompt box you will see a model choice: Fast or Best. Fast mode starts answering in one to two seconds and is right for quick questions. Best mode thinks longer and gives deeper answers, which is what you want for dense charts, long code or anything where a wrong answer would cost you time. Use Fast by default, and switch to Best when the question matters.
Answers arrive as formatted text with headings, lists, tables and code blocks, so they are easy to scan. And you can ask follow-up questions in the same panel while the context is still fresh — the model remembers what you captured, so you can drill deeper without drawing the box again.
Step 7: Use Squint AI for Real Everyday Jobs
The hotkey is simple, but the value of Squint AI shows up in the jobs it quietly takes over during a normal day. Here are the ones beginners use most:
- Fixing errors without Googling. When software throws a strange error, capture it and ask what it means and how to fix it. You get the cause and the fix in one answer instead of opening five forum threads.
- Understanding reports and dashboards. Capture a sales chart or an analytics screen and ask for the main trend and the one number that matters. Squint AI reads the labels, not just the shape.
- Reading foreign-language screens. Capture a message, a menu or a document in another language and get both a translation and an explanation of what you are supposed to do next. Answers come back in your own language, with Spanish, French, German, Portuguese, Japanese, Chinese and Arabic among the supported ones.
- Learning from code on screen. Whether it is a tutorial, a colleague’s snippet or your own code with a bug, capture it and ask for a line-by-line walkthrough. It is a patient teacher that never gets tired of “what does this line do?”
- Decoding forms and contracts. Capture a dense form, a bill or a terms screen and ask for a plain-English summary of what you are agreeing to and what the deadlines are.
- Studying diagrams and slides. Capture a diagram from a lecture or a slide deck and ask it to explain the process step by step. It can even catch wrong labels in a diagram, which makes it a surprisingly good study partner.
If meetings are the bigger time sink in your day, Squint AI pairs well with a meeting notetaker. Our guide to ElevenAI shows how an AI teammate can listen, take notes and hand you a summary with action items when the call ends. And if you run a small business and want this kind of screen-level AI help built into your team’s daily workflow rather than bolted on one app at a time, a digital agency can set up practical AI automations around the tools your team already uses.
Step 8: Capture Up to Four Regions at Once
Some questions need more than one part of the screen. A bug might involve an error message in one window and the code that caused it in another. A chart might only make sense next to its legend or its data table.
Squint AI handles this with multi-region capture. While you are drawing your first box, hold Shift and drag a second, third or fourth region. You can select up to four regions in a single capture, and the model reads them together as one question.
This is worth practising, because it turns Squint AI from a simple explainer into a comparison tool. Try it on:
- Two versions of the same document — ask what changed between them.
- A chart plus its data table — ask whether the chart matches the numbers.
- An error message plus the code around it — ask what caused the error.
- A product page plus a competitor’s price — ask which is the better deal and why.
Keep each region tight. A box that includes half the screen forces the model to guess what matters; a box around exactly the two things you are comparing gives you a sharp answer. The selection is the prompt, so the quality of your box is the quality of your answer.
Step 9: Hand a Capture to Your Coding Agent in One Click
One of the newest Squint AI features is built for people who write code with an AI coding agent. After you capture an error or a piece of code and get an answer, a one-press copy button hands the whole capture — the image and the question — to your coding agent, so it can pick up the problem with full context.
The workflow looks like this in practice. Your code fails and an error appears. You press the hotkey, draw a box around the error and the code, and ask what went wrong. Squint AI explains the bug. You press copy, paste into your coding agent, and it applies the fix. The error message never had to be retyped, screenshotted or described, and the agent never had to guess which error you meant.
It is a small feature, but it removes the most annoying step in AI-assisted coding: moving context from your screen into the agent. If you already use a coding agent daily, this single button may be the reason Squint AI earns a permanent place in your workflow.
Step 10: Manage Your History, Themes and Hotkey
Squint AI keeps a local chat history of your captures and answers. Everything is stored on your own device and indexed so you can search it later — which means last week’s chart explanation is still there when you need it again, without any cloud account to manage.
A few settings are worth setting once and forgetting:
- Search your history when a problem repeats itself. If the same error or the same kind of chart comes back, your old answer is usually still correct, and it costs you no daily captures to re-read it.
- Pick a theme you like. Squint AI ships with sixteen interface themes, including Dracula and Gruvbox, so the answer panel can match your setup instead of clashing with it.
- Set a hotkey you will actually remember. The default works for most people, but if it clashes with another app, change it now rather than fighting it every day.
- Check your daily balance before a heavy session. Three free captures a day goes fast if you use one per question, so save them for real problems and re-read your history for repeats.
Step 11: Squint AI vs the Old Screenshot-and-Chat Routine
It helps to see exactly what Squint AI replaces. The old routine was five steps for every single question; Squint AI turns it into one gesture plus a question.
| Task | Old screenshot-and-chat routine | With Squint AI |
|---|---|---|
| Ask about an error | Screenshot, save file, open chatbot, upload, describe the error | Hotkey, drag a box, ask |
| Time to first answer | One to two minutes of switching apps | Fast mode starts in 1–2 seconds |
| Context the AI gets | Whatever you remembered to type | The exact pixels you selected |
| Follow-up questions | Re-upload or re-explain from scratch | Ask in the same panel, context kept |
| Comparing two things | Two uploads and a long description | Hold Shift, capture up to 4 regions |
| Daily cost to try it | Depends on your chatbot plan | Free — 3 captures a day, no card |
| Works offline | No, chatbots need the internet too | No — reading happens on remote servers |
The table makes the trade-off clear. Squint AI does not replace a general chatbot — it is deliberately not built to become one. What it replaces is the repetitive copying, uploading and describing that used to stand between you and an answer about something on your screen. If your question is “what am I looking at?”, Squint AI is the fastest route to the answer. If your question is “write me an essay”, use a chatbot.
Step 12: Privacy, Limits and Pro Tips
Before Squint AI becomes a daily habit, know its boundaries. They are reasonable, but they matter.
Only the cropped region leaves your machine. When you capture a box, only that cropped image is sent to the model through OpenAI’s API. The rest of your screen never leaves your computer. Even so, do not capture passwords, private messages, medical records or confidential work documents unless your own rules allow it. A good habit is to ask yourself, before every capture, whether you would be comfortable emailing that cropped image to a stranger — because in effect, that is what the tool does.
Nothing works offline. The model does the reading on remote servers, so Squint AI is useless on a plane without Wi-Fi or in a dead zone. Plan around that rather than discovering it mid-task.
Three free captures a day is a real limit. Use them on genuine problems. Re-reading history is free, so check there first when a problem repeats.
And a few pro tips that make every capture better:
- Draw tight boxes. Include only what the question needs. A tight box gives a sharp answer; a box around half the screen gives a vague one.
- Use Best mode for dense visuals. Fast is fine for a short error message, but charts, long code and detailed diagrams deserve Best mode.
- Ask one question at a time. “What is this and how do I fix it?” is two questions. Ask the first, read the answer, then ask the follow-up in the same panel.
- Keep the selection still. The screen freezes when you press the hotkey, so you never have to chase a moving popup — but if the thing you want to capture is a menu that disappears, open it first, then press the hotkey.
- Save your best answers. If an explanation is one you will need again — a recurring error, a standard chart — copy it into your notes while it is fresh. History is searchable, but your own notes are faster.
Frequently Asked Questions
Is Squint AI really free?
Yes, the free plan gives you three captures a day with no credit card and no password — just an email address to create the account. That is enough to learn the tool and solve a few real problems every day. If you need more captures, there are paid plans, but the free tier is a genuine free tier, not a short trial.
Does Squint AI work offline?
No. The image reading happens on a remote model through OpenAI’s API, so Squint AI needs an internet connection for every capture. Your history is stored locally and you can search it offline, but new captures will not work without a connection.
Which computers can run Squint AI?
Windows 10 and 11, macOS 14 or newer, and Linux with Wayland. The Mac version launched on November 22, 2026, alongside answers in your own language, one-press copy to a coding agent, and a Microsoft Store install for Windows users.
Does Squint AI record my whole screen?
No. Squint AI idles in the menu bar or system tray and does nothing until you press the hotkey. When you capture, only the cropped region you selected is sent to the model — the rest of your display never leaves your machine. It does not record video, and it does not watch your screen in the background.
Can Squint AI help me write code?
It can explain code, walk through it line by line, and help you find bugs — and its one-press copy button hands the capture straight to your coding agent so the agent can apply the fix with full context. It is not a code editor or a replacement for your coding agent, but it is the fastest way to get an error message explained and handed over.
What is the difference between Fast and Best mode?
Fast mode starts answering in one to two seconds and is best for quick questions like short error messages or simple translations. Best mode takes longer and gives deeper, more careful answers, which is what you want for dense charts, long code, detailed diagrams or anything where a wrong answer would cost you real time.
Final Thoughts
Squint AI solves a problem so ordinary that most of us stopped noticing it: the five-step dance of screenshot, switch, upload, describe and switch back, every single time something on screen confused us. By turning that into one hotkey and one drag, it gives you back the minutes that used to disappear into busywork — and because the answer appears next to the thing it explains, you never lose your place.
The free plan is genuinely usable at three captures a day, the setup takes five minutes, and the Mac version that arrived on November 22, 2026 makes it available on every major desktop system. Install it today, make your first capture on something that has been confusing you, and see how quickly the hotkey becomes muscle memory. The next time an error message, a chart or a foreign-language form appears on your screen, you will not reach for a screenshot — you will just squint at it, and get your answer.
Explore More Free AI Tools
Want to keep exploring? Try our free tools — the AI Title Generator, Meta Description Generator, AI Rewriter, and Keyword Density Checker — all free on AI Tool Steps, no sign-up needed.