

AI agents are only as useful as the tools they can reach. An agent that can read your Gmail, update your Notion pages, check your Jira tickets, and post in Slack is a real teammate. An agent stuck inside a chat window is just a clever toy. The hard part has always been the plumbing: every app needs its own login, its own permissions, and its own token, and the moment an agent acts for a real customer, you have to prove it only touched what that customer allowed. This guide shows you how to use Scalekit AgentKit from your first account to a working agent.
That is exactly the problem Scalekit AgentKit solves. It is an MCP gateway for production AI agents, built by Scalekit, an identity-infrastructure company. It launched on Product Hunt on November 3, 2026, and won the number one Product of the Day spot. The core idea is simple and powerful: every tool call runs as the user who asked for it, inside the permissions that user granted — never through a shared service account with access to everything.
In this beginner-friendly guide, you will learn how to use Scalekit AgentKit step by step: what it is, how to create your free account, how to install the CLI, how to enable connectors like Gmail and Slack, how to build a Virtual MCP Server for one agent role, how to connect it to Claude or Cursor, and how to keep everything safe with short-lived tokens and audit logs. You do not need to be a developer to follow along, and you can start free — the free plan includes 10,000 tool calls and 10,000 trigger events every month.
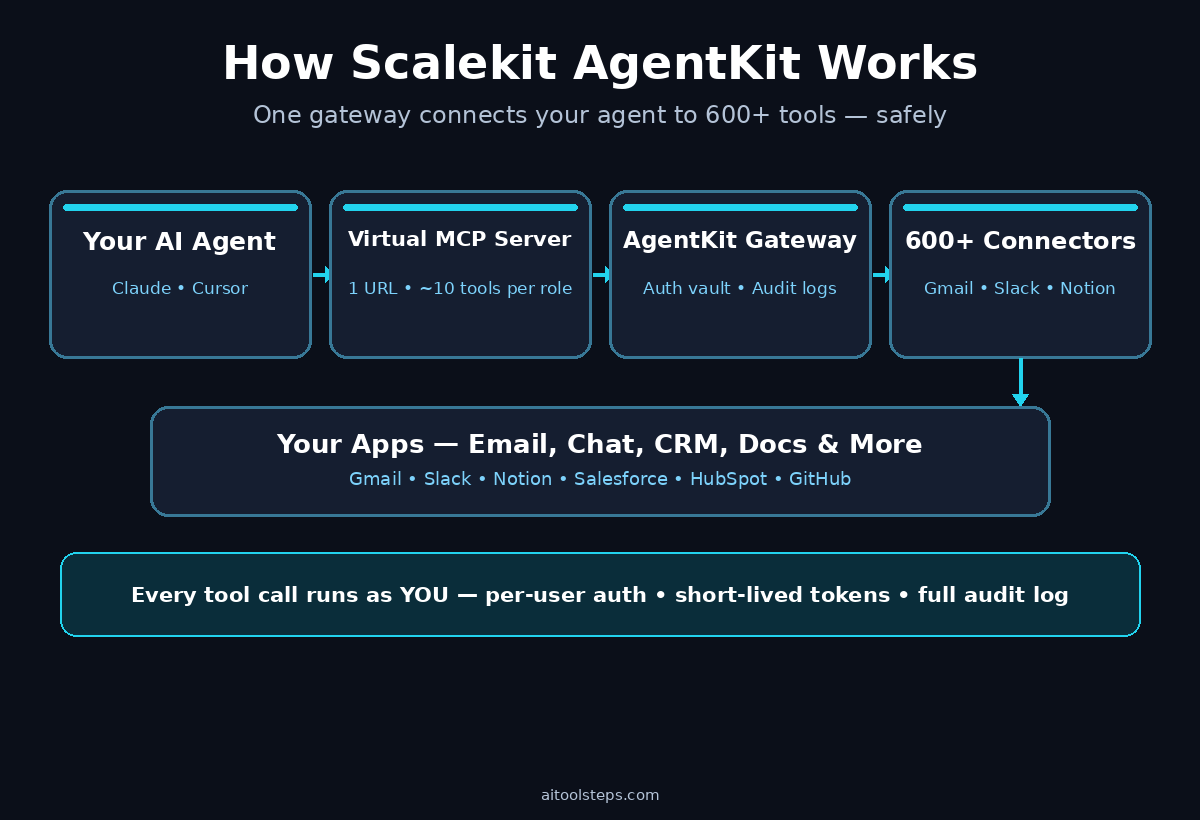
Step 1: Understand What Scalekit AgentKit Actually Is
Before you click anything, it helps to understand the three pieces AgentKit puts together.
First, it is a gateway. Instead of your agent connecting to Gmail, Slack, Notion, Salesforce, and twenty other apps one by one, it connects to one place — AgentKit — and AgentKit talks to all of them. The catalog covers more than 600 connectors and over 30,000 tools, including Gmail, Slack, Notion, HubSpot, Jira, GitHub, and Salesforce, with tool descriptions optimized so language models pick the right one.
Second, it is an identity layer. AgentKit stores every user’s app tokens in a per-tenant AES-256 encrypted vault and refreshes them automatically. Your tokens never touch your code, your logs, or your prompts. When an agent reads a customer’s inbox, it sees only what that customer can see.
Third, it is a control layer. You decide which tools each agent role can use, you set retries and rate limits, and every single action is written to an audit log you can stream to tools like Datadog or Splunk. If anyone asks “was that the rep or the agent?”, you have the answer.
Think of it this way: without a gateway, giving an agent access to four apps can mean exposing more than 100 tool definitions — around 20,000 tokens of context — which makes the model slower and more likely to pick the wrong tool. AgentKit’s Virtual MCP Servers expose roughly 10 tools per role, about 2,000 tokens. Scalekit claims that is around 80 percent less tool overhead, and in practice it means faster, cheaper, and more accurate agents.
Step 2: Create Your Free Scalekit Account
Start at the official Scalekit website and look for AgentKit. Creating your account is the first real step in how to use Scalekit AgentKit, and it takes about two minutes. Use your work email — the same email you use for the apps you plan to connect later.
- No credit card is needed for the free plan. The free tier gives you 10,000 tool calls and 10,000 trigger events per month, which is generous for learning and for small projects.
- Pick a workspace name you will recognize. If you build agents for clients, name the workspace after your business, not after one project. A digital agency that ships agents for several customers, for example, will want one clean workspace per client later on.
- Turn on two-factor authentication right away. You are about to store app connections in this account, so protect it like you would protect your email.
- Bookmark the dashboard. You will come back here to enable connectors, create Virtual MCP Servers, and read logs.
Once you are inside the dashboard, take two minutes to look around. You will see sections for connectors, Virtual MCP Servers, triggers, and logs. You do not need to touch any of them yet — just knowing where they live makes the rest of this guide faster.
Step 3: Install the Scalekit CLI and Run the Setup Command
AgentKit gives you a command-line tool that sets up your first connection in minutes. You need Node.js installed on your computer first — if you have never installed it, download it from the official Node.js website and accept the defaults.
Open your terminal and run:
npx @scalekit-inc/cli setupThe setup wizard walks you through the basics: it asks you to sign in, picks up your workspace, and checks that everything is reachable. Answer the prompts honestly — the wizard is setting up the link between your computer and your AgentKit workspace.
- If the command fails with a “command not found” error, Node.js is not installed or not on your system path. Reinstall Node.js and try again.
- If the setup asks for an API key, you will find it in your AgentKit dashboard under API keys or settings. Copy it carefully and never paste it into a chat window or a public document.
- Keep the terminal open after setup finishes. You will use the CLI again when you test your first Virtual MCP Server.
This one command is the whole “installation”. There is no server to run and no database to configure — AgentKit is a hosted gateway, so the heavy work lives on Scalekit’s side.
Step 4: Enable Your First Connectors
A connector is AgentKit’s link to one app — Gmail, Slack, Notion, Jira, and hundreds more. Enabling a connector does not give anyone access yet. It only says “this workspace is allowed to use this app”.
- Start with two or three apps you actually use every day. Gmail and Slack are the classic first pair, because most agent tasks start with a message and end with a reply. Notion is a great third, because agents are excellent at organizing notes.
- Open the Connectors section in the dashboard and search for each app by name. Click enable, and read the short description of what the connector can do. Each connector lists its tools — for example, the Gmail connector can search messages, send email, and manage labels.
- Do not enable everything at once. A tidy catalog is part of the point. Every connector you enable is another set of tools your agent has to choose from, and a short list means better choices.
- Check the “custom connectors” option if your app is missing. AgentKit also supports custom connectors with OAuth 2.0, API keys, bearer tokens, RSA, or basic auth, plus remote MCP servers you already run. If your team has an internal API with no ready-made connector, this is how you bring it in.
By the end of this step, your workspace should have a small, deliberate list of connectors — the apps your agent genuinely needs, and nothing else. That restraint is the whole point of how to use Scalekit AgentKit well: fewer tools, better choices.
Step 5: Connect a User Account With a Secure Auth Link
Here is where AgentKit earns its keep. Instead of you copying and pasting passwords or API keys, AgentKit creates a secure auth link for each user. The user clicks the link, signs in to their own app account, and grants exactly the permissions your agent needs.
- Create the auth link from the dashboard. Pick the connector, pick the permissions, and AgentKit generates a link you can send to the user by email or chat.
- The user approves in their own app, not in yours. They see the familiar Google or Slack login screen, they see exactly what access is being requested, and they can revoke it any time from their own account settings.
- Tokens go straight into the encrypted vault. The token is stored per tenant with AES-256 encryption and refreshed automatically when it expires. It never appears in your code, your logs, or your agent’s prompts.
- Test with your own account first. Before you send an auth link to a customer or a teammate, connect your own Gmail or Slack and watch the flow from the user’s side. If anything feels confusing, fix the permission wording before anyone else sees it.
This per-user model is the difference between a demo and a production agent. A shared service account sees everything; a per-user connection sees only what that person can see. For a business that builds agents for clients, that difference is the whole product — and it is also why many teams pair AgentKit with professional AI automation services when they roll agents out to real customers.
Step 6: Create a Virtual MCP Server for One Agent Role
Now comes the cleverest part of AgentKit: the Virtual MCP Server. A normal MCP server exposes every tool of every app it connects to. A Virtual MCP Server exposes only the small set of tools one agent role needs, behind one static MCP URL.
- Pick one role to start. “Support agent” is a good first role: it needs to read Gmail, search Notion for help articles, and reply in Slack. That is three apps and roughly ten tools — a tight, focused set.
- In the dashboard, create a new Virtual MCP Server and name it after the role. “Support Agent” is clearer than “Server 1” when you have five of them six months from now.
- Add only the tools that role needs. For the support agent, add Gmail search and send, Notion search, and Slack post message. Leave out delete, admin, and billing tools. Least privilege is not just a security slogan here — fewer tools also means a faster, more accurate agent.
- Copy the static MCP URL. This single URL is the only thing your agent needs to reach all of those tools. If you later add or remove a tool, the URL stays the same, so nothing downstream breaks.
- Create one Virtual MCP Server per role, not per person. A sales agent, a support agent, and a research agent get three different servers with three different tool sets, even if they share the same underlying connectors.
This step is also where the token savings happen. If you remember one thing about how to use Scalekit AgentKit, remember this: ten tools at roughly 2,000 tokens of context beats a hundred tools at 20,000 tokens every time — and it is the reason AgentKit agents stay cheap to run even as you add more apps behind the gateway.
Step 7: Connect the MCP URL to Claude, Cursor, or Your Agent Framework
With your Virtual MCP Server ready, plug its URL into the AI tool you already use. AgentKit works with MCP clients such as Claude, Cursor, and Windsurf, and with agent frameworks that accept a remote MCP server.
- In Claude, open Settings, then Connectors or MCP, and add a remote MCP server. Paste the Virtual MCP Server URL, give it the role name, and save. Claude will list the tools it can now call.
- In Cursor, open the MCP settings and add the same URL as a new server. Restart the agent chat if the tools do not appear immediately.
- In your own agent framework, pass the MCP URL as the server address when you configure the agent, exactly as you would with any other remote MCP server.
- Ask the agent a test question that needs a real tool. Try “find my latest unread email from a customer” or “search Notion for our refund policy”. If the agent calls the right tool and shows a real result, the connection works.
- If no tools appear, check the URL first. A copied URL with a missing character is the most common failure. Then check that the Virtual MCP Server has at least one tool enabled — an empty server shows up as nothing at all.
You have now done the core job: your agent can act inside real apps, through one URL, with per-user permissions. Everything after this is about making that setup reliable and safe at scale.
Step 8: Mint Short-Lived Session Tokens for Each User
A static MCP URL plus a permanent token would be a security risk, so AgentKit uses short-lived session tokens instead. You mint a fresh token for each user, for each run, and it expires quickly.
- Mint one token per user per run. When a customer starts a session with your agent, your backend asks AgentKit for a session token tied to that user, then hands the MCP URL and the token to the agent framework.
- Never hard-code a token. Tokens belong in memory for the length of one session, not in source code, environment files, or documentation.
- Let expiry do its job. If a token leaks, it dies on its own within minutes. That is the point — short-lived tokens turn a potential breach into a non-event.
- Rotate on every new session, even for the same user. Fresh tokens also make your audit logs cleaner, because every session has its own clear start and end.
If you are building for yourself, you can mint tokens from the dashboard for testing — that is the safest way to learn how to use Scalekit AgentKit without touching production. If you are building for customers, wire the minting step into your backend once, and it runs automatically forever after.
Step 9: Set Up Triggers So Events Wake Your Agent
Agents that only work when you type a message are only half an agent. Triggers let real events start work: a new email arrives, a Slack message mentions a keyword, a Jira ticket changes status — and your agent wakes up and acts.
- Pick one event that already causes you manual work. “A customer emails support” is the classic first trigger, because the agent can read the email, look up the answer, and draft a reply without anyone touching it.
- Create the trigger in the AgentKit dashboard. Choose the connector, choose the event, and choose which Virtual MCP Server should handle it.
- Start with “draft, do not send”. Let the agent prepare the reply and wait for a human to approve it. You can switch to automatic sending later, once you trust the drafts.
- Watch the trigger budget. The free plan includes 10,000 trigger events a month, which covers hundreds of events a day for a small team. If you outgrow it, the Growth plan raises the limit to 50,000 events.
- Add retries and rate limits to every trigger. AgentKit lets you set both, so a flood of events — a mailing list reply-all storm, for example — does not burn your whole monthly budget in an afternoon.
Triggers are where AgentKit stops being a connector dashboard and starts being a workforce. One well-built trigger can quietly handle a whole category of repetitive work, day after day.
Step 10: Read the Audit Logs and Keep Control
Every tool call through AgentKit is logged: who asked, which tool ran, what it touched, and when. This is not a nice-to-have — it is the feature that lets you put agents in front of real customers.
- Open the logs after your first real session. Check that the agent called the tools you expected and nothing else. A support agent that suddenly lists billing tools has a configuration problem, not a curiosity problem.
- Stream logs to your observability tool. AgentKit can send audit logs to Datadog or Splunk, so agent activity sits next to the rest of your system logs.
- Review weekly, not yearly. Ten minutes a week scanning the log catches misconfigurations early, while they are still small.
- Use the logs to answer hard questions. If a customer asks what the agent changed, or a teammate asks why a message went out, the log gives you the exact tool call, the exact time, and the exact user it ran as.
- Treat “was it the rep or the agent?” as a question you can always answer. That is the auditability promise, and it is what makes AgentKit safe for regulated or high-trust work.
Good logging is also how you improve, and it is the habit that makes how to use Scalekit AgentKit sustainable long term. The tools your agent never calls are tools you can remove. The tasks it gets wrong are prompts you can fix. The log is your feedback loop.
Step 11: Understand the Free Plan Limits and When to Upgrade
AgentKit’s pricing is simple, and the free tier is genuinely usable. Here is how the plans compare.
| Plan | Price | Tool calls / month | Trigger events / month | Best for |
|---|---|---|---|---|
| Free | $0 | 10,000 | 10,000 | Learning, side projects, small teams |
| Growth | $99/month | 100,000 | 50,000 | Production agents with real customers |
| Enterprise | Custom | Custom | Custom | HIPAA, VPC, self-hosted, custom limits |
- Free is enough to learn and to ship a first agent. 10,000 tool calls a month is roughly 300 calls a day — plenty for a support agent handling a small inbox or a personal productivity agent.
- Upgrade to Growth when you hit the limits, not before. Growth adds 100,000 calls and 50,000 trigger events, plus overage at $0.50 per 1,000 calls if you spike.
- Enterprise is for compliance and control. It adds a HIPAA business associate agreement, bring-your-own-key encryption with AWS or GCP KMS, VPC or self-hosted deployment, US or EU data residency, and IP allowlisting. AgentKit is already SOC 2 Type II and ISO 27001 certified on the standard plans.
- Watch usage in the dashboard. You can see calls and trigger events as they accumulate, so there are no surprise bills — and no surprise cutoffs either, because you can see the limit coming.
Start free, measure real usage for a month, and let the numbers tell you when to pay. That is the whole pricing strategy.
Frequently Asked Questions About Scalekit AgentKit
Is Scalekit AgentKit really free?
Yes, you can start free. The free plan includes 10,000 tool calls and 10,000 trigger events every month, with access to the full connector catalog. You only pay when you need more volume or enterprise compliance features. Check the pricing page on the official Scalekit website for the current limits, because pricing for a fast-moving product can change.
Is Scalekit AgentKit the same as OpenAI AgentKit?
No, and the similar names cause real confusion. OpenAI’s AgentKit is a toolkit for building agents on OpenAI’s platform. Scalekit AgentKit is an MCP gateway from the identity company Scalekit — it connects your agents to 600+ SaaS apps with per-user authentication, Virtual MCP Servers, and audit logs. They solve different problems and can even be used together.
Do I need to know how to code to use Scalekit AgentKit?
You need almost no code for the basics. Creating an account, enabling connectors, building a Virtual MCP Server, and connecting it to Claude or Cursor are all dashboard work, plus one terminal command to install the CLI. You only need a developer if you want to mint session tokens from your own backend or build custom connectors for internal APIs.
Which AI tools does Scalekit AgentKit work with?
It works with MCP clients such as Claude, Cursor, and Windsurf, and with agent frameworks that accept a remote MCP server URL. On the app side, the catalog covers more than 600 connectors — Gmail, Slack, Notion, Salesforce, HubSpot, Jira, GitHub, and hundreds more — with custom connectors for anything missing.
Is my data safe with Scalekit AgentKit?
AgentKit stores app tokens in a per-tenant AES-256 encrypted vault, refreshes them automatically, and never puts tokens in your code, logs, or prompts. Every tool call runs as the user who asked, inside their permissions, and every action is written to an audit log. The platform is SOC 2 Type II and ISO 27001 certified, and the Enterprise plan adds HIPAA support and bring-your-own-key encryption.
What happens if I outgrow the free plan?
Nothing breaks suddenly. You can watch your usage in the dashboard, and when you approach 10,000 tool calls or trigger events, upgrade to Growth at $99 a month for 100,000 calls and 50,000 events. Overage is $0.50 per 1,000 extra calls, so even a busy month stays predictable.
Final Thoughts
Scalekit AgentKit fixes the least glamorous and most important part of building AI agents: the connection between the agent and the real world. A gateway with 600+ connectors, per-user authentication that never leaks tokens into prompts, Virtual MCP Servers that keep each agent role focused on ten tools instead of a hundred, short-lived session tokens, triggers that wake agents on real events, and audit logs that answer every “who did what” question — that is the difference between a demo agent and one you can put in front of customers.
Start small. Enable Gmail and Slack, build one Virtual MCP Server for one role, connect it to Claude, and watch it handle one real task. Then add a trigger, then a second role, then a second app. Each step takes minutes, and the free plan gives you 10,000 calls a month to learn with. The teams that get the most from tools like this are the ones that treat the setup seriously from day one — and if you want help turning a working agent into a service you sell to clients, a good digital agency can handle the rollout while you focus on the product.
If you build agents for a living, learning how to use Scalekit AgentKit is worth an afternoon of your time. It launched on November 3, 2026, took the top spot on Product Hunt the same day, and it solves a problem every agent builder hits within the first week. Try the free plan, build your first Virtual MCP Server, and see how much simpler your agents feel when the plumbing is someone else’s job.
Explore More Free AI Tools
Want to keep building with free AI tools? Try these helpers on AIToolSteps — the AI Title Generator for headlines that get clicks, the Meta Description Generator for search snippets that earn the click, the AI Rewriter for polishing rough drafts, and the Keyword Density Checker for keeping your pages on topic. All four are free at https://aitoolsteps.com/ — open the homepage, pick a tool, and put it to work on your next article.