

OpusClip 4.0 AI turns a long video into short, shareable clips. You recorded a great hour-long video — a podcast, a webinar, a tutorial — and now it is sitting on your hard drive doing nothing. Cutting it into short clips for TikTok, Reels, and Shorts would take hours in a video editor, and that is exactly why most long videos never reach a wider audience.
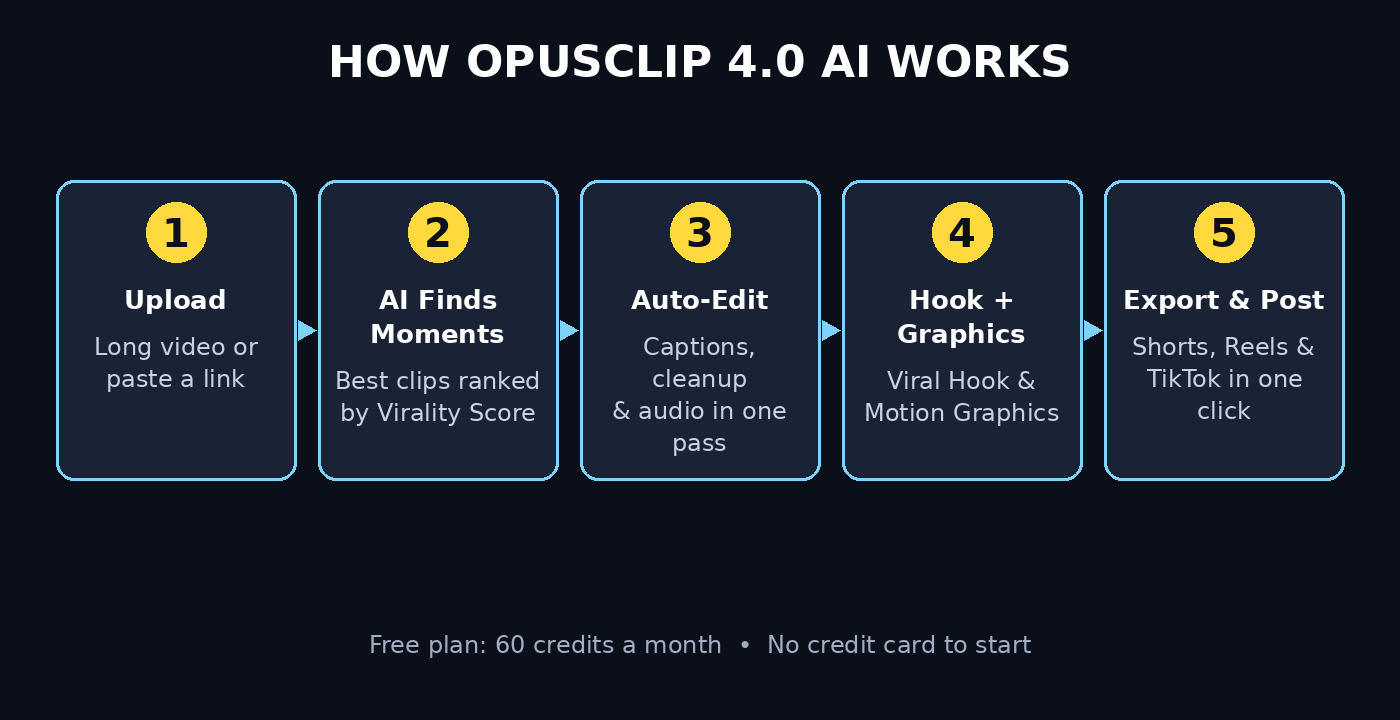
OpusClip 4.0 AI changes that. Launched on November 2, 2026, version 4.0 turns OpusClip from a clipping tool into a full AI editor: it finds the best moments in your long videos, cuts them into vertical shorts, and now it can also auto-edit a raw talking-head take into a finished video in one pass — captions, hook, motion graphics, and all. It launched on Product Hunt on November 4, 2026, and it is free to start with 60 credits a month and no credit card. In this beginner-friendly guide, you will learn exactly how to use OpusClip 4.0 AI, from your first free account to your first published clips — no editing experience needed.
What Is OpusClip 4.0 AI?
OpusClip is an AI video tool that turns long videos into short, social-ready clips. You upload a podcast, interview, webinar, livestream, or vlog, and its ClipAnything model finds the moments worth sharing, cuts them into vertical clips, adds animated captions, reframes the shot for each platform, and gives every clip a Virality Score so you know which ones to post first.
Version 4.0, released on November 2, 2026, adds a second half to the product. Next to the familiar “Clip long video” mode there is now an “Auto-edit footage” mode: you drop in a raw take — the unedited recording straight from your camera — and switch on the edits you want. Speech cleanup removes pauses and filler words, captions appear automatically, a viral hook opens the video, motion graphics turn what you say into animated icons and charts, AI image B-roll covers the dull moments, and the audio gets enhanced with sound effects, auto zoom, transitions, and colour correction. What comes back is a finished video, not a rough cut.
That matters because editing has always been the bottleneck. Recording is easy; turning a recording into something people actually watch is the slow part. OpusClip 4.0 AI is built for creators, podcasters, coaches, founders, and small teams who record a lot and edit very little — and for beginners who have never opened a timeline editor. If you can upload a video and tick a few boxes, you can use it.
Step 1: Understand What Changed in OpusClip 4.0
Before you sign up, get clear on what is new, because 4.0 is two tools in one workspace and you will use them for different jobs.
Here is what version 4.0 adds, straight from the launch announcement:
- Auto Edit — takes a raw talking-head take and applies the edits you switch on in one pass: captions, hook, B-roll, speech cleanup, audio enhancement, and more.
- Viral Hook — turns your opening seconds into an animated hook with motion and sound effects, built from OpusClip’s template library.
- Motion Graphics — animates the names, numbers, and dates you say on camera into icons, numbers, and charts on screen. The set covers 32 graphics across text, data, social, and promo styles.
- Recipes — saves any combination of edits as a reusable setup, so your tenth video gets the same treatment as your first with one click. Built-in Recipes include Clean up recording, Social edits, and Translate and dub.
- AI Producer — a plugin for ChatGPT, Claude, Claude Code, Codex, and Cursor that lets you edit by chatting: show it a style you like and it edits your footage to match. It is free to use.
The older clipping workflow is still there, unchanged, as the “Clip long video” Recipe. So the rule of thumb is simple: long video with many moments to mine — use clipping. One raw take that needs to look finished — use Auto Edit. Most creators end up using both, sometimes on the same recording.
Step 2: Create Your Free OpusClip Account
Start at the OpusClip website — search for “OpusClip” and open the official site from the results, or follow the launch link from the Product Hunt page. Create your account with your email and a password, or sign in with Google if that option is offered.
OpusClip lists a Free plan at $0 a month that gives you 60 credits a month — roughly 60 minutes of source video — with no credit card required. New users also get a 7-day free trial of the Pro plan, again with no credit card. Use the same email you use for your YouTube or TikTok account if you plan to auto-post later, because matching accounts makes the connection step smoother.
Know the free plan’s limits before you start, so nothing surprises you later: every free clip carries an OpusClip watermark, there is no manual editing on the free plan — you keep the clips as the AI cuts them — clips cannot be exported after 3 days, and free use is personal and non-commercial only. Paid plans start at $15 a month for Starter (150 minutes) and $29 a month for Pro, or $14.50 a month billed annually, for 300 minutes. A launch offer of 40% off the first month of Pro was advertised when 4.0 shipped, so check the pricing page for the current offer before you pay for anything.
Step 3: Choose Your Starting Point — Clip Long Video or Auto-Edit Footage
After sign-in, the start screen opens on two tabs: Clip long video and Auto-edit footage, with a row of Recipes underneath. Picking the right tab is the most important decision in the whole workflow, so choose by what you are holding.
Choose Clip long video when you have a long recording — a podcast episode, an interview, a webinar, a livestream, or a vlog — and you want several short clips out of it. This is the classic OpusClip job, and it is where the Virality Score and the multi-clip output shine.
Choose Auto-edit footage when you have a single raw take — a talking-head video you just recorded for TikTok or YouTube — and you want it cleaned up and finished. This is the new 4.0 job, and it is the one beginners will use most, because it replaces the entire editing session.
If you are not sure, start with Clip long video on your longest recording. It shows you what the AI thinks your best moments are, and that teaches you how the tool sees your content. You can always run the same footage through Auto Edit afterwards.
Step 4: Clip a Long Video Into Shorts
Upload your video or paste a link to it — OpusClip accepts uploads and links to hosted videos. Before the AI starts, you will see a free-text box labelled “include specific moments”. This is your steering wheel: type a prompt in plain English describing the moment you want, such as “the part where I explain the pricing mistake” or “the story about the first customer”, and the AI will hunt for it instead of guessing.
OpusClip’s ClipAnything model works on podcasts and interviews, and also on vlogs, sports, TV shows, and videos with little dialogue, so do not assume it only works for talking heads. Once the run finishes, you get a set of vertical clips, each with animated captions in one of 20-plus languages, automatic reframing for each platform, and a Virality Score that ranks them by likely performance.
Do not post them all. Watch the top three by Virality Score first, and check two things: does the clip make sense without the rest of the video, and does the caption text match what is actually said? A clip that needs the previous five minutes to understand will underperform no matter how high its score is. Keep the ones that stand alone, and save the rest for later — you can always come back to them.
If you run a small content team and the clipping workflow starts saving you real hours, a digital agency can help you turn those clips into a proper publishing calendar, so the shorts feed your main channel instead of floating around on their own.
Step 5: Auto-Edit a Raw Talking-Head Take
This is the new 4.0 experience, and it is where beginners save the most time. Upload your raw take or paste a link, then switch on the edits you want. According to OpusClip’s launch email, the edits run in one pass: captions, a viral hook on the opening seconds, motion graphics, AI emojis, AI image B-roll, speech cleanup that removes pauses and filler words, enhanced audio, sound effects, auto zoom, transitions, and colour correction.
Start with a simple combination on your first video: speech cleanup, captions, and enhanced audio. That trio alone makes a raw take feel finished. Then add one visual layer — either the Viral Hook or Motion Graphics — and watch the result before you switch on everything at once. Turning on all ten edits on your first try makes it hard to tell which one helped and which one hurt.
The honest limit to remember is that Auto Edit works from your own footage. It does not generate video from a text prompt, so if you want an AI video made from scratch, that is a different kind of tool — our guide to Videco AI covers a tool that turns one long recording into clips, landing pages, and a full campaign, which pairs well with OpusClip when you want more than just the edit.
Step 6: Add a Viral Hook to the First Seconds
The first three seconds decide whether someone keeps watching or scrolls past, and the Viral Hook feature is built for exactly that moment. It takes the opening of your clip and turns it into an animated hook, with motion and sound effects, using a style from OpusClip’s template library.
Pick a hook style that matches your topic, not the flashiest one on the list. A business tip works best with a clean, bold text hook that states the promise — “The pricing mistake that cost me $10,000” — while a story works better with a hook that teases the ending. Watch the first three seconds on mute, because that is how most people will first see it in their feed: if the hook is not clear without sound, change the wording, not the animation.
One common beginner mistake is putting the hook on a clip whose opening line is weak. If the first sentence of your take is “So, um, today I wanted to talk about…”, no animation will save it. Re-record the opening line as a single clear sentence, then let the Viral Hook do its job on top of it.
Step 7: Turn Your Words Into Motion Graphics
Motion Graphics is the feature that makes a talking-head video feel produced. When you say a name, a number, or a date on camera, OpusClip animates it on screen — an icon, a chart, a number counter, or a lower third — so the viewer sees the point as well as hearing it. The set covers 32 graphics across text, data, social, and promo styles.
Use them where they add proof, not decoration. A revenue number, a date, a statistic, or a three-step list are perfect candidates. A graphic on every single sentence is visual noise, and viewers tune it out within seconds. A good rule is one graphic per idea, not one per sentence: when you move to a new point, that is when a graphic earns its place.
If you create educational or explainer content and want the graphics to match your brand, keep your wording consistent — say numbers the same way every time, and name things the same way — so the AI picks them up reliably. And if your wider content operation needs a hand, an AI automation services partner can help you build a repeatable pipeline around tools like this one, so every video ships with the same polish.
Step 8: Save Your Setup as a Recipe
A Recipe is your saved combination of edits. Once you find a setup you like — say, speech cleanup plus captions plus Viral Hook plus your brand’s motion graphics — save it as a Recipe and you can run it again on your next video with one click. OpusClip ships built-in Recipes such as Clean up recording, Social edits, and Translate and dub, and you can build your own on top of them.
Think in weekly workflows, not single videos. A podcaster might keep one Recipe for episode clips and another for guest highlights. A founder might keep one for product updates and one for hot takes. A marketer running a webinar series might keep one Recipe per show, so every episode ships with the same captions, hook style, and branding without anyone rebuilding the setup.
Name your Recipes by their job, not by their settings: “Podcast Clips — Bold Captions” beats “Cleanup + Captions + Hook 3”. Six months from now you will thank yourself, because the name tells you when to use it.
Step 9: Review, Edit and Export Your Clips
Before you export anything, watch every clip you plan to post from start to finish — with sound, on your phone, in the app where it will appear. Check the captions for misheard words, especially names and technical terms. Check that the reframing kept your face in the frame and did not cut off text on screen. Check that the B-roll images actually match what you are saying, because an AI image of the wrong thing is worse than no image at all.
On the free plan, remember there is no manual editing: you keep the clips as the AI cuts them, and they stop being exportable after 3 days, so review quickly and export the keepers the same day. On Starter and Pro, you get a proper editor, filler and silence removal, and on Pro you can export an XML file to Adobe Premiere Pro or DaVinci Resolve if you want to finish the edit there.
Export in the format your platform wants. Shorts, Reels, and TikTok all take vertical video, and OpusClip’s AI Reframe resizes any video for every platform in one click. Download in HD, keep the original file name the AI gives you or rename it with the clip’s topic, and store your keepers in a folder per video so you can find them again when you need a repost.
Step 10: Post Everywhere and Track What Works
OpusClip can auto-post your clips to YouTube Shorts, TikTok, and Instagram Reels, and the Pro plan adds a social media scheduler, so you can queue a week’s clips in one sitting. If you prefer to post by hand, that works too — download the clips and upload them yourself, which also lets you write a custom caption per platform.
Do not post all your clips on the same day. Space them out, one or two a day, and watch which ones perform. The Virality Score is a prediction, not a guarantee: a clip it ranked third can easily outperform the top-ranked one, because your audience’s taste is the real test. Keep a simple note of each clip’s views after 48 hours, and after two weeks you will see a pattern — a topic, a hook style, or a length that your audience prefers — and that pattern is worth more than any single score.
Link every short back to the long video it came from. Put the full episode link in the caption or in a pinned comment, because the short is the trailer and the long video is the product. That is how clipping turns into subscribers instead of just views.
Step 11: Understand the Free Plan and When to Upgrade
The free plan is genuinely useful for learning: 60 credits a month, no credit card, and the full clipping and auto-edit experience to try. It is the right plan while you are testing whether OpusClip fits your workflow, and for a hobby creator posting a few clips a month it may be enough for a long time.
Upgrade when a free-plan limit starts costing you something. The usual triggers are: you need more than 60 minutes of source video a month; the watermark looks unprofessional on client work; you need manual editing instead of accepting the AI cut; or you need clips to stay exportable longer than 3 days. Starter at $15 a month (150 minutes) removes the watermark and adds editing, and Pro at $29 a month, or $14.50 a month billed annually (300 minutes), adds 4K, music, clip analytics, the scheduler, and export to Premiere Pro and DaVinci Resolve. Check the pricing page inside your account before you pay, because launch offers change — and remember that free-plan use is personal and non-commercial, so client work needs a paid plan.
OpusClip 4.0 vs Other Ways to Make Shorts
Option | Best for | Setup effort | Free to start? | Manual editing?
OpusClip 4.0 AI | Turning long videos into shorts + auto-editing raw takes | Upload and tick boxes | Yes, 60 credits a month | On paid plans
CapCut | Full manual editing with templates and effects | Learn the timeline | Yes, free tier | Yes
Videco AI | Clips plus landing pages and a full campaign | Upload a recording | Yes, free to start | Limited
Manual editing (Premiere/DaVinci) | Full control over every cut | Hours per video | No, paid software | Yes, full control
OpusClip 4.0 AI wins when you record a lot and edit very little, because the AI does the finding, the cutting, and now the finishing. CapCut wins when you enjoy editing by hand and want template effects. Videco AI wins when you want the clips plus the campaign around them. Manual editing wins when you need frame-perfect control and have the hours to spend. Choose by how much footage you record, not by which logo you like.
Frequently Asked Questions About OpusClip 4.0 AI
Is OpusClip 4.0 AI free?
Yes, to start. OpusClip lists a Free plan at $0 a month with 60 credits a month — about 60 minutes of source video — and no credit card is required. The limits are a watermark on every clip, no manual editing, a 3-day export window, and personal, non-commercial use only. New users also get a 7-day free trial of the Pro plan with no credit card.
What is new in OpusClip 4.0?
Version 4.0, released on November 2, 2026, adds Auto Edit for raw talking-head footage, Viral Hook templates for the opening seconds, Motion Graphics that animate what you say on screen, Recipes that save your edit setup for reuse, and AI Producer, a free plugin that lets you edit by chatting in ChatGPT, Claude, Claude Code, Codex, or Cursor. The original Clip long video workflow is still there as a Recipe.
Can OpusClip 4.0 edit a video I recorded on my phone?
Yes. Upload the raw take or paste a link, choose Auto-edit footage, and switch on the edits you want — speech cleanup, captions, hook, motion graphics, B-roll, and audio enhancement all run in one pass. It works from your own footage, so it cannot generate a video from a text prompt; for that job you need a text-to-video tool instead.
How does the Virality Score work?
Every clip OpusClip cuts gets a Virality Score that ranks it by likely performance, based on the moment’s content, pacing, and hook strength. Treat it as a shortlist, not a verdict: watch the top-ranked clips yourself, post the ones that stand alone without context, and track real views after 48 hours to learn what your audience actually prefers.
Can I post OpusClip clips straight to TikTok and YouTube?
Yes. OpusClip offers auto posting to YouTube Shorts, TikTok, and Instagram Reels, and the Pro plan adds a social media scheduler so you can queue clips in advance. You can also download the clips and post them by hand, which lets you write a custom caption for each platform.
Do I need editing experience to use OpusClip 4.0 AI?
No. That is the point of the tool. You upload a video, pick Clip long video or Auto-edit footage, tick the edits you want, and the AI does the cutting and finishing. If you later want finer control, the paid plans add a proper editor and export to Premiere Pro or DaVinci Resolve.
Final Thoughts
OpusClip 4.0 AI is the version where OpusClip stops being just a clipping tool and becomes a full AI editor. It launched on November 2, 2026, it is free to start with 60 credits a month and no credit card, and it takes the two jobs every creator hates — finding the good moments and finishing the edit — and turns them into an upload and a few ticked boxes. Auto Edit, Viral Hook, Motion Graphics, Recipes, and the free AI Producer plugin are all there, and the original clipping workflow you may already know is still underneath it all.
Start with your longest recording. Run Clip long video on it, keep the three clips with the highest Virality Scores that stand alone, and post one a day. Then take your next raw take through Auto Edit with just speech cleanup, captions, and audio turned on, and watch how close to finished it comes. Your first week with OpusClip 4.0 AI will teach you more about your own content than any tutorial can — because you will finally see which moments your audience actually watches.
Explore More Free AI Tools
Want to keep building with free AI tools? Try the AI Title Generator, the Meta Description Generator, the AI Rewriter, and the Keyword Density Checker — all free on AI Tool Steps. You can also explore our full library of beginner-friendly guides at aitoolsteps.com and find your next tool to learn today.