
Imagine recording yourself once — just fifteen seconds — and then never having to sit in front of a camera again. Your AI twin delivers every future video for you: product updates, course lessons, social posts, even client messages, all in your voice and face, in more than 175 languages. That is exactly what HeyGen Avatar 6 promises, and it is why the launch shot to number one on Product Hunt on November 19, 2026.
HeyGen calls Avatar 6 its most realistic avatar model yet, claiming it is 84.4% indistinguishable from real footage. Whether or not you believe that number, the practical shift is real: earlier avatar tools looked like polished cartoons, while Avatar 6 keeps your identity consistent across wide, medium, and close-up shots, with natural expressions and accurate lip-sync. For beginners, the best part is the price of entry. Your first video is free, with no credit card required, and the free plan gives you enough room to learn the whole workflow before spending anything.
This guide walks you through HeyGen Avatar 6 from zero to your first published video. You will learn how to record a clip Avatar 6 can actually learn from, how to write a script that sounds like you instead of a robot, how to pick voices and languages, and how to avoid the beginner mistakes that waste your free videos. No camera skills needed. No editing software needed. Just a phone, fifteen seconds, and a script.
What Is HeyGen Avatar 6?
HeyGen Avatar 6 is the newest generation of HeyGen’s AI avatar technology. You record a short clip of yourself talking, or upload a few clear photos, and HeyGen builds a digital twin — an AI version of you that can say anything you type. You write a script, choose a language, and HeyGen renders a finished video in minutes. The company positions it as a way to publish video without filming: write a script, choose a language, and share the result anywhere.
Here is what makes Avatar 6 different from the avatar tools that came before it:
- A 15-second start: Your twin is built from a single 15-second clip of you talking to camera. Older video avatars often needed several minutes of footage.
- Consistent identity: Avatar 6 holds your face, proportions, and mannerisms steady across wide, medium, and close-up shots, so the result does not drift into a stranger halfway through a video.
- 175+ languages: Type your script in one language and generate the same video in another. Your twin’s lip movements follow the new language.
- Realistic motion: Expressions, head movement, and gestures look closer to a real presenter than the stiff, floating-head avatars of earlier generations.
- First video free: You can create your first Avatar 6 video without a card. Paid plans start at around $29 per month for 600 credits.
- Recognized quality: HeyGen says Avatar 6 was ranked number one on G2 for the most realistic avatars.
Avatar 6 sits alongside HeyGen’s other avatar types. Stock avatars are ready-made presenters you can use instantly. Photo avatars animate a single still image. Avatar 6 is the premium option: a full video avatar trained on your real footage, built for creators who want the result to actually look like them.
Step 1: Create Your Free HeyGen Account
Start at heygen.com and click Get started free. You can sign up with Google or with an email address. The free plan needs no credit card, which makes this a genuine zero-risk test.
Once you are in, take two minutes to look around the dashboard before you create anything. The left menu holds the main areas: creating a video, avatars, templates, and your projects. Find Usage & History — that is where you track how many free videos you have left this month. On the free plan you get up to three watermarked videos a month, up to one minute each, downloadable at 720p with a HeyGen logo in the bottom-right corner. Three short videos is not much, so treat each one as a deliberate experiment rather than a throwaway test.
One habit that saves beginners real frustration: decide your first video’s topic before you touch any settings. A 60-second product announcement, a welcome message for your website, or a single tip from your niche all work well. Pick one, write it down, and keep it in front of you for the rest of this guide.
Step 2: Open the Avatar 6 Studio
Avatar 6 lives in HeyGen’s avatar creation flow. From the dashboard, go to the Avatars tab and click New Avatar, then choose the option to clone a real person — this is the path that builds your digital twin. HeyGen’s own landing page for Avatar 6 also offers two free takes right in the browser, which is a fast way to preview the quality before you commit to a full account setup.
You will see two ways to start: record a clip, or upload photos. For the most realistic result, choose the video route. A still photo can only teach the model what your face looks like; a short video teaches it how your face moves, how your mouth forms words, and how your head tilts when you speak. That motion data is most of what separates Avatar 6 from a talking photo.
If you have used HeyGen before, you may remember the older Avatar IV photo-avatar flow. Avatar 6 replaces that as the flagship option, but the photo route still exists for quick experiments. Start with video for your real twin; use photos only for a fast preview.
Step 3: Record Your 15-Second Clip
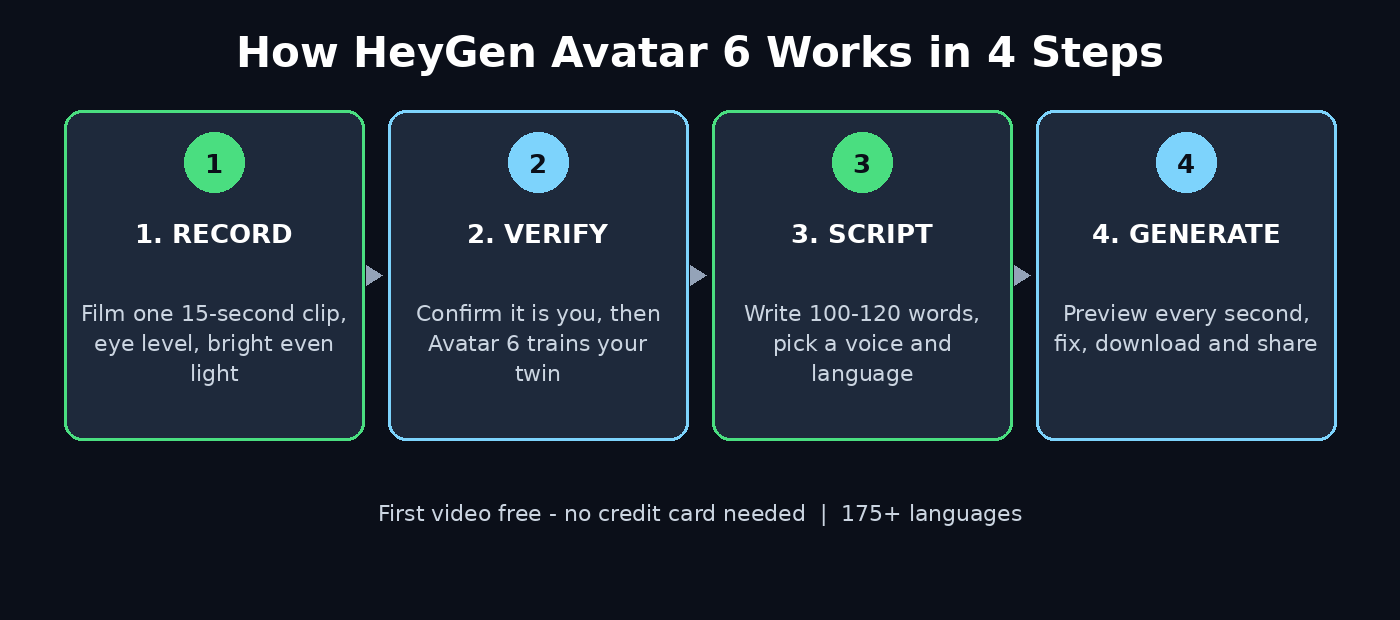
This is the step that decides 80% of your result. Avatar 6 can only be as good as the footage you feed it, and the recording rules are simple but strict. HeyGen asks for at least 1080p resolution at 30 frames per second, one continuous take with no cuts, bright and even light, and a plain background.
Set up your shot like this:
- Face the camera directly. Look into the lens, not at your own preview. Keep your whole head and shoulders in frame, with a little space above your head.
- Talk naturally for at least 15 seconds. Read a paragraph aloud, introduce yourself, or explain what you do. Use your normal speaking voice and your normal pace — the model learns your rhythm from this clip.
- Use bright, even light. Face a window in daylight, or put a lamp in front of you. Avoid light from behind you, which turns your face into a silhouette, and avoid mixed light that paints half your face yellow and half blue.
- Keep the background plain. A blank wall beats a busy room. The model needs to learn you, not your bookshelf.
- Stay still, but not frozen. Small natural head movements are fine and actually help. Do not walk around, turn away, or cover your face with your hands.
- Record in one take. No cuts, no edits, no filters. Filters and beauty modes distort the facial proportions the model is trying to learn.
If you are recording on a phone, prop it at eye level on a stack of books or a cheap tripod. A phone held at chest height looking up at your chin is the single most common beginner mistake, and it makes every avatar look strange. Eye level, fifteen seconds, one take — that is the whole recipe.
Step 4: Verify Your Identity and Let Avatar 6 Learn You
After you upload your clip, HeyGen asks you to verify that the person in the footage is you. This is a consent and safety step, not a formality: realistic avatars of real people are powerful, so HeyGen checks that you are creating a twin of yourself and not of someone else. Follow the on-screen verification prompts exactly, and do not try to create an avatar of another person without their consent — HeyGen will reject it.
Once verification passes, HeyGen starts training your avatar. This is not instant, so use the wait productively: draft your first script while the model works. When training finishes, your twin appears in your avatar library, ready to use across the platform. Free accounts get one custom video avatar slot, so your first twin is also your only twin on the free plan — make it count.
A practical tip from experienced users: create your video avatar before you start making videos with it. HeyGen itself notes that having the avatar ready improves approval rates and speeds up processing later, because the system does not have to validate you again on every project.
Step 5: Write a Script That Sounds Like You
Open a new project and click Create Video, then choose Start from Scratch. Pick portrait if the video is for Shorts, Reels, or TikTok, or landscape for YouTube and your website. HeyGen opens the AI Studio, its main editor, where everything is script-based rather than timeline-based.
Your script is the single biggest lever on quality. Avatar 6 will say exactly what you type, in the tone you type it, so write the way you talk. Read every sentence aloud before you submit it. If a sentence feels stiff on your tongue, it will sound stiff from your twin.
Remember the free plan’s one-minute cap. At a normal speaking pace, one minute is roughly 150 words, so aim for 100 to 120 words to leave room for pauses and a natural ending. Here is a 100-word starter script you can adapt:
“Hi, I’m [Your Name], and this video was made without a camera. I recorded myself once, for fifteen seconds, and HeyGen’s Avatar 6 turned that clip into a digital twin that can deliver any script I write. No studio, no retakes, no editing timeline. In this video I’ll show you the three settings that matter most, the mistake that ruins most first videos, and how to make your twin speak another language in one click. Let’s get started.”
A few script rules that pay off immediately: write numbers as words when you want them read aloud, break long sentences into short ones, and put your most important point in the first ten seconds. Viewers decide whether to keep watching almost immediately, and your twin cannot rescue a slow opening.
Step 6: Choose a Voice and a Language
Every avatar ships with a default voice, but you should not accept it blindly. Open the voice menu, filter by language and accent, and play several samples before you commit. A voice that matches your age, energy, and audience makes the video feel like you; a mismatched voice is the fastest way to break the illusion.
Avatar 6 supports more than 175 languages, and this is where the tool becomes genuinely powerful for small creators. You can write one script in English, generate the video, then translate the same script and generate the same video in Spanish, Urdu, French, or Hindi — your twin’s lips follow the new language. If you run a digital agency that serves clients in more than one country, that single feature can replace a whole round of re-recording in each market.
For your first video, stick to one language and one voice. Get the workflow right in your native language first, then experiment with translation on your second free video. And note the free plan’s hidden cost: the allowance is measured in seconds, so script length is cost. A 60-second video spends twice as much of your monthly allowance as a 30-second one.
Step 7: Pick Your Framing and Presenter Style
Avatar 6 keeps your identity consistent across wide, medium, and close-up shots, so you get to choose how your twin appears on screen. For a first video, a medium shot — head and shoulders, centered, at eye level — is the safest choice. It reads as a presenter, it hides small motion quirks, and it works in both portrait and landscape.
Avoid the extremes on your first attempt. A tight close-up magnifies every small facial distortion, and a wide full-body shot gives the model more body to invent, which is where extra fingers and odd posture tend to appear. Medium framing is the sweet spot, and it is what most professional avatar videos use anyway.
Your presenter style also includes pace and energy. In the generation settings, keep the pace at normal and the style at conversational. An overly energetic setting makes the twin gesture like a television host, which reads as uncanny rather than lively. Calm, natural, and steady is the look that survives a full minute of watching.
Step 8: Add Motion, Backgrounds, and On-Screen Text
This is where a plain avatar video starts to look like a finished production. In the AI Studio, you can set a background color, image, or video behind your twin, add titles from the Elements panel, and drag your avatar to a different position on the canvas.
Keep the design simple. One background, one title, and your twin are enough. A busy animated background fights the avatar for attention, and three different fonts in one minute of video look amateurish no matter how good the avatar is. If you want a branded look, use your brand color as the background and put your website name in small text at the bottom — once, not on every scene.
Motion is optional, and for beginners it should stay optional. Avatar 6 adds natural head movement and expressions on its own. Extra hand gestures and head turns from the motion settings can help a longer video feel alive, but they can also introduce the jerky movements that mark a video as AI-made. Add motion only if your first plain render feels too still when you watch it back.
Step 9: Generate, Watch, and Fix Your First Video
Press generate and let HeyGen render. A one-minute video takes a few minutes to process. When it is ready, watch the whole thing before you download it — every second, with sound on. This is the step beginners skip, and it is the step that catches nearly every defect.
Check these five things in order:
- Lip-sync: Do the lips match the words all the way through, or do they drift in the last ten seconds?
- Face stability: Does your face stay the same person from start to finish, or does it subtly morph?
- Hands: If hands appear in frame, do they look normal? Odd hands are the classic AI tell.
- Audio: Is the voice clear and at a steady volume, with no sudden dips or robotic glitches?
- Text: Is every on-screen word spelled correctly? AI tools do not check your spelling for you.
If something is wrong, fix one thing at a time and regenerate. The most common fix is a shorter script — long scripts push the model harder and defects cluster near the end. The second most common fix is a simpler background. Do not regenerate the same broken script five times hoping for a different result; change the input, then regenerate.
Step 10: Download, Translate, and Share
When the video passes your watch-through, download it. On the free plan, downloads are 720p with a HeyGen watermark in the bottom-right corner. That is fine for a first video, a test, or a social post — just do not try to crop the watermark out, which violates the terms and looks worse than the watermark itself.
Before you spend your remaining free videos, try one translation. Duplicate the project, swap the script for a translated version, pick the same voice family in the new language, and generate. You now have two videos from one recording session, and you have learned the feature that makes Avatar 6 worth paying for later.
Share the result where your audience already is: your website, YouTube Shorts, Instagram Reels, TikTok, or a client message. If you publish regularly, think about how avatar video fits your content system — for example, creators who follow AI automation services and agentic workflows often pair an avatar presenter with an automated pipeline that turns one script into videos for every platform. Avatar 6 is the presenter; the system around it is what makes it scale.
Avatar 6 vs Photo Avatar vs Stock Avatar
HeyGen offers three ways to put a presenter on screen. They are not interchangeable, so here is the honest comparison for a beginner deciding where to start.
| Feature | Avatar 6 (Video Avatar) | Photo Avatar (Avatar IV) | Stock Avatar |
|---|---|---|---|
| What you need | 15-second video clip of yourself | One clear photo | Nothing — pick from the library |
| Realism | Highest — 84.4% indistinguishable from real footage, per HeyGen | Good for short clips, limited motion | Professional, but clearly not you |
| Languages | 175+ | 175+ | 30+ on the free plan |
| Identity | Your face, your voice, your mannerisms | Your face from a photo | A stranger’s face |
| Free plan | First video free; one twin slot | 3 photo avatar slots; 10 seconds per video, 30 seconds a month | Included; 3 videos a month, up to 1 minute each |
| Best for | Personal brand, courses, client videos | Quick tests, single-image explainers | First project, faceless channels |
The practical rule: use a stock avatar for your very first experiment, a photo avatar for a quick test of a new script, and Avatar 6 for anything that carries your name. Your audience forgives a stock presenter; they remember your face.
7 Beginner Mistakes to Avoid
- Recording in bad light. Dim or backlit footage teaches the model a shadowy version of you. Face a window or a lamp.
- Writing a 300-word script for a 60-second video. The free plan caps videos at one minute. Keep scripts near 100 to 120 words.
- Skipping the watch-through. Defects hide in the last ten seconds. Watch every video end to end before you share it.
- Choosing the default voice without listening. Play five voices. The right one is worth two minutes.
- Using a busy background. Your twin is the content. A plain background keeps the viewer looking at the presenter.
- Creating an avatar of someone else. HeyGen verifies identity. Only create a twin of yourself, with consent, or it will be rejected.
- Burning all three free videos on tests. Plan three real videos: one in your language, one translation, and one improved version of the best of the two.
Frequently Asked Questions
Is HeyGen Avatar 6 really free?
Your first Avatar 6 video is free, and you do not need a credit card to create an account. The free plan also includes up to three watermarked videos a month, up to one minute each, at 720p. After the free allowance, Avatar 6 uses credits, with paid plans starting at around $29 per month for 600 credits. Check the pricing page before you plan a large project, because credit costs depend on video length and model.
How long does it take to create an Avatar 6 twin?
Recording takes 15 seconds. Upload, identity verification, and training take longer — expect minutes rather than seconds, and use that time to write your first script. Once your twin is trained, generating a one-minute video takes a few minutes.
Can Avatar 6 speak other languages?
Yes. Avatar 6 supports more than 175 languages. You write or translate your script, choose the language, and your twin delivers it with matching lip-sync. The voice should be chosen in the same language family for the most natural result.
Is Avatar 6 better than a photo avatar?
For realism, yes. A photo avatar animates a single still image, so motion is limited and the result suits short clips. Avatar 6 is trained on real video of you, so it captures how your face moves when you speak, and it holds your identity steady across different shot sizes. Use photo avatars for quick tests and Avatar 6 for anything public.
Can I use Avatar 6 for commercial videos?
HeyGen’s paid plans are built for commercial use, including marketing, training, and client work. The free plan is best treated as a learning and testing tier: short, watermarked videos that show you the workflow. Review the current terms on HeyGen’s site before publishing client work, because plan terms can change.
What if my avatar does not look like me?
The cause is almost always the source clip: poor light, a low camera angle, a filter, or a recording shorter than 15 seconds. Re-record at eye level in bright, even light with no filters, verify your identity carefully, and retrain. If the face still drifts, shorten your script and use a medium shot, which is the most forgiving framing.
Final Thoughts
HeyGen Avatar 6 is the first avatar tool that feels built for people who actually want to be on camera without being on camera. The 15-second setup is honest — it really is that fast — and the free first video means you can judge the quality with your own face before you pay anything. The catch is the same as with every AI video tool: the model is only as good as your input. A careful recording, a script written the way you talk, and a full watch-through before you publish will put your first video ahead of most of what is already online.
Start with one real video, not five tests. Record your clip today, write a 100-word script about something you already know well, and publish the result. Then translate it, and you will understand in one afternoon why Avatar 6 topped the Product Hunt charts the week it launched.
Explore More Free AI Tools
Want to keep building without spending a rupee? Try these free tools on our site: AI Title Generator for headlines that get clicks, Meta Description Generator for search snippets that earn the click, AI Rewriter for polishing rough drafts, and Keyword Density Checker for keeping your SEO on track — all free at aitoolsteps.com. Pair them with your new Avatar 6 twin and one afternoon of recording can turn into a week of content.