

Imagine typing one sentence — “an animated chart showing our sales growth this year, in our brand colours” — and watching a finished motion graphic appear on your screen, ready to post. No timeline to learn, no keyframes to set, no expensive software to install. That is exactly what Hera AI does. Hera AI is an AI-powered motion design platform that turns simple text prompts into professional animations, and on November 2, 2026 it launched its biggest update yet: the Hera AI Creative Canvas, which topped the Product Hunt charts on launch day.
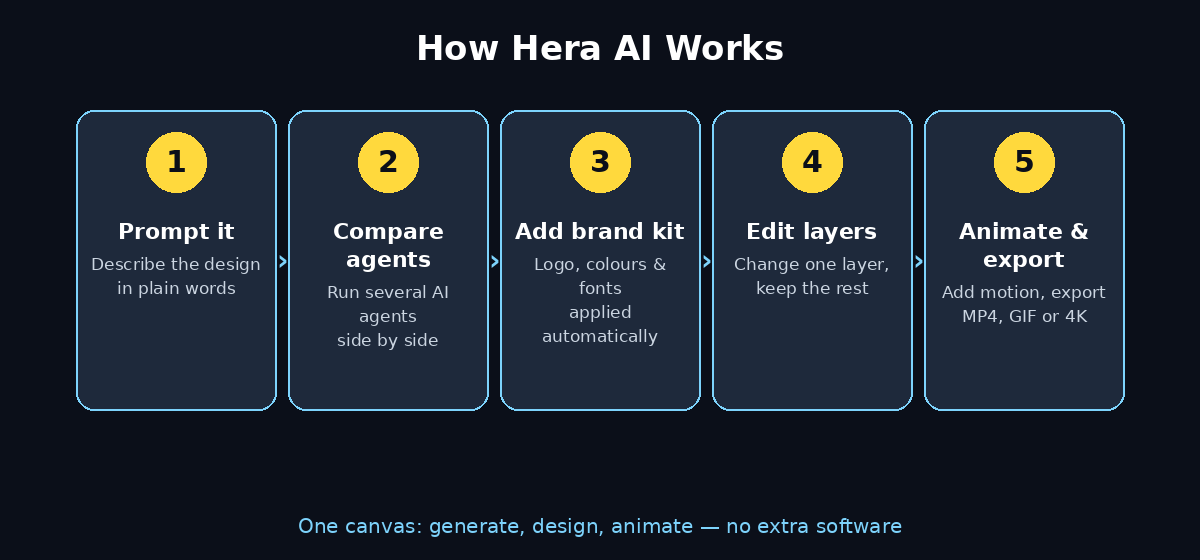
The new canvas changes how the tool works. Instead of getting one result at a time and starting over every time you want a small change, you now generate images, design, and animate in one place. You can direct several AI agents at the same time, compare their results side by side, keep your brand look consistent with a brand kit, and edit every result as layers — so you change the one thing you want and keep the rest. When the design is ready, you turn it into motion on the same canvas and export it as a video, a GIF, or a transparent-background clip.
In this beginner-friendly guide, you will learn exactly how to use Hera AI — from creating your free account and finding your way around the canvas, to generating your first image, directing multiple AI agents, adding your brand kit, editing layers, animating your design, and exporting it. You do not need design experience, and you do not need to install anything: Hera AI runs entirely in your browser. Whether you are a founder making a launch video, a marketer creating ads, or a creator making social posts, this guide walks you through every step.
Step 1: Understand What Hera AI Actually Is
Before you open the canvas, it helps to know what Hera AI is — and what it is not. Hera AI is an AI motion design platform backed by Y Combinator. You describe what you want in plain words, and it generates professional, code-based animations in seconds: animated charts, maps, infographics, social media clips, and presentation assets. The results are not static pictures. They move — bars grow, maps highlight, text slides in — and you can edit everything after generation.
Here is what makes Hera AI different from the design tools you may already know:
- Text-to-motion graphics: Hera AI turns a written prompt into a finished animation, with typography, layout, pacing, and motion already handled.
- The Creative Canvas: The new November 2026 canvas is one workspace where you generate images, design, and animate — instead of jumping between three different tools.
- Multiple AI agents at once: You can direct several AI agents at the same time and compare their results side by side, instead of waiting for one result, rejecting it, and trying again.
- Editable layers: Every result arrives as editable layers. Change the headline, swap a colour, or move one element — the rest of your design stays exactly as it is.
- Brand kits: Upload your logo, colours, and fonts once, and Hera AI applies them to every project automatically.
- 100+ remixable templates: Start from prebuilt templates for charts, maps, presentations, and social video instead of a blank screen.
- Flexible exports: Export as MP4 video, GIF, or with a transparent background, with up to 4K quality on paid plans.
Think of Hera AI as a motion designer who works at the speed of a chat message. You stay in charge of the idea and the decisions; the AI handles the tedious animation work. If you have ever used an AI image generator, the idea will feel familiar — but Hera AI goes one step further, because the output is a moving design, not a still image.
For small businesses, this matters a lot. A digital agency would normally charge hundreds of dollars and take days to produce a single animated ad. Hera AI lets you test the idea yourself first, for free, and only invest in professional help once you know the design works. That is a smarter order of operations for any founder on a budget — and it is exactly the kind of workflow that modern AI automation services are built around: let the AI do the repetitive work, and keep humans on the creative decisions.
Step 2: Create Your Free Hera AI Account
Getting started with Hera AI takes only a few minutes. You do not need a credit card to try the free version, and you do not need to install anything — Hera AI runs entirely in your browser.
Follow these steps to set up your account:
- Open the Hera AI website: Go to hera.video in your browser, or find Hera AI on Product Hunt and follow the launch page link to the site.
- Sign up with your email or Google account: Pick the option that is easiest for you. A Google sign-in is the fastest route for most beginners.
- Confirm your email: If you signed up with an email address, check your inbox for a confirmation link and click it.
- Complete the short onboarding: Hera AI may ask what kind of content you want to create — ads, social posts, presentations, or something else. Answer honestly, because it helps the tool suggest the right templates.
- Open your dashboard: You will land on a clean dashboard with your projects, templates, and a button to start a new canvas.
Take a minute to look around before you create anything. Find where your projects live, where the template library sits, and where the brand kit settings are. Knowing the layout now saves you hunting later when you are in the middle of a design. The free version gives you a real taste of the platform, including free credits to generate your first designs — check the pricing page inside your account for the current free allowance, because launch offers change.
Step 3: Take the 5-Minute Tour of the Hera AI Creative Canvas
The Creative Canvas is the heart of the new Hera AI. It looks like a big white board, and everything you make lives on it. Spend five minutes learning the layout before your first prompt — it will save you twenty minutes later.
Here is what you will see:
- The prompt bar: This is where you type what you want. Be specific: “a 15-second animated Instagram post announcing a 20% sale, dark background, yellow headline” works far better than “make an ad”.
- The canvas itself: Your designs appear here as cards you can move, resize, and arrange. Think of it as a desk where you can spread out several ideas at once.
- The agent panel: This is where you direct your AI agents. You can run more than one agent on the same brief and watch their results appear side by side.
- The layers panel: Every design is made of layers — background, text, images, charts. Click any layer to select just that piece.
- The brand kit area: Your logo, colours, and fonts live here once you add them. Drop them into any design with one click.
- The animation controls: Once a design is finished, this is where you add motion — how elements enter, how long they stay, and how they leave.
A good first habit: keep your canvas tidy. Name your projects clearly, and keep your best version in the centre of the canvas. When you run several agents at once, the canvas can fill up fast, and a tidy board makes comparing results much easier.
Step 4: Generate Your First Image on the Hera AI Canvas
Now for the fun part. Your first generation should be small and simple — a single social media image — so you can learn the flow without waiting on a complex animation.
Follow these steps:
- Start a new canvas: From your dashboard, open a new project and choose a format. For a first try, pick a square social post (1080 x 1080) or a vertical story (1080 x 1920).
- Write a clear prompt: Describe the image, the style, and the mood in one or two sentences. For example: “A bright, modern product photo style image of a coffee cup on a wooden desk, morning light, minimal background, space at the top for a headline.”
- Generate: Click generate and wait a few seconds. Hera AI creates the image on your canvas as an editable design, not a flat picture.
- Check the details: Look closely at the text, the spacing, and the colours. AI-generated images can have small flaws — a misspelled word, a strange shadow — and it is better to catch them now.
- Regenerate or refine: If something is off, change one part of your prompt and generate again. Change one thing at a time, so you learn what each word in your prompt actually does.
A strong Hera AI prompt has four parts: what it is (a social post, a chart, a logo animation), what it shows (the subject and the key message), how it should look (colours, style, mood), and what it is for (Instagram, a presentation, a website banner). Write all four parts and your results will improve immediately.
Here is a prompt formula you can reuse for almost anything:
“Create a [format] for [platform] about [topic]. Style: [colours and mood]. Include the headline ‘[your words]’. Keep the layout clean with space for [logo/text].”
Keep your first ten generations experimental. Try different styles, different colours, and different headline lengths. The free credits exist so you can learn what works — use them to practice, not to protect.
Step 5: Direct Several Hera AI Agents at Once and Compare Results
This is the feature that makes the new Creative Canvas genuinely different, and it is the one most beginners underuse. In older AI tools, you get one result at a time: if you do not like it, the AI makes the whole thing again from scratch. On the Hera AI canvas, you can direct several AI agents at the same time and compare their results side by side.
Here is how to use it:
- Give all agents the same brief: Write one clear prompt, then send it to two or three agents at once. Same words, different agents — the differences in the results will teach you what each agent is good at.
- Or give each agent a different angle: Ask one agent for a bold, colourful version, another for a minimal version, and a third for a playful version. In one generation round you will see three creative directions instead of one.
- Compare on the canvas: The results appear side by side on your canvas. Look at them together: which headline reads best, which layout feels balanced, which colour scheme fits your brand?
- Pick a winner and keep going: Choose the strongest result and keep refining it. You can also steal the best element from a losing version — a headline from one, a background from another — because everything is made of editable layers.
- Do not run too many at once: Three agents is the sweet spot for a beginner. More than that and comparing becomes harder, not easier.
This side-by-side workflow is also the fastest way to learn prompting. When the same prompt produces three different results, you can see exactly which details the AI understood and which ones it ignored — and your next prompt gets sharper. If you also build mobile apps, the same compare-and-pick habit works in tools like Huxly AI, which turns prompts into real apps; the skill of judging AI output transfers across every AI tool you use.
Step 6: Add Your Brand Kit So Every Design Matches
A brand kit is the difference between designs that look like they came from your business and designs that look like they came from a random generator. Set it up once, and Hera AI applies it to every project automatically.
Here is what to add:
- Your logo: Upload a clean version of your logo, ideally with a transparent background (PNG). Hera AI can place it on any design.
- Your colours: Add your two or three main brand colours. If you do not have exact colour codes, pick the colours from your website or your existing social posts and save them here.
- Your fonts: Add the fonts you use for headlines and body text. Consistent fonts are the fastest way to make a set of posts look like a family.
- A reference image: Drop in any reference — a past design you liked, a competitor’s ad, a mood-board image — and new work picks up that look.
Once your brand kit is saved, test it: generate a design and check that your colours and fonts were applied. If a result ignores the kit, mention the brand explicitly in your prompt — “use my brand kit colours” — until it becomes a habit for the tool. Founders and marketers use this feature the most, because it turns a one-off AI image into a repeatable brand asset: every ad, launch video, and social post comes out looking like it belongs to the same business.
Step 7: Edit With Layers Instead of Starting Over
This is the step that saves you the most time. In most AI tools, changing one word means regenerating the whole image and losing everything you liked. In Hera AI, every result arrives as editable layers — so you change the one thing you want and keep the rest.
Here is the layer workflow:
- Click the element you want to change: The layers panel shows every piece of your design — background, headline, subtext, image, chart, logo. Click a layer to select only that piece.
- Edit text directly: Click any text layer and type your new headline. The font, size, and colour stay the same unless you change them.
- Swap colours and images: Select a layer and change its colour, or replace an image while keeping the layout around it untouched.
- Move and resize: Drag elements to a better position, or resize them to fix a crowded layout. Small moves often fix a design that felt slightly off.
- Lock what you love: Once a layer looks right, lock it so a later edit cannot accidentally move it.
A practical rule: never regenerate a design just to fix a typo. If the layout is good and only the words are wrong, edit the text layer. Regeneration is for when the idea itself is wrong — the layout, the concept, or the mood. Learning this distinction will cut your generation time in half, because most “bad” AI results are actually good designs with one small fixable flaw.
Step 8: Turn Your Finished Hera AI Design Into Motion
A still design is only half the job in Hera AI. The platform’s real strength is motion — and the canvas lets you animate a finished design without leaving the workspace or learning a timeline editor.
Follow these steps to animate your design:
- Finish the still design first: Get the layout, text, and colours right before you add motion. Animating a design you still want to change means redoing the animation too.
- Choose what moves: You do not need to animate everything. Pick two or three elements: the headline slides in, the chart bars grow, the logo fades up. Restraint looks more professional than everything flying at once.
- Set the order: Decide the sequence — headline first, then the image, then the call to action. A clear order guides the viewer’s eye through your message.
- Pick the timing: For social posts, keep the whole animation between 5 and 15 seconds. Shorter is better: most viewers decide in the first two seconds whether to keep watching.
- Preview on the canvas: Watch the animation play on the canvas before you export. Check that the text is readable while it moves, and that nothing overlaps at any point.
- Adjust the pacing: If the animation feels rushed, slow the entrances down. If it feels sleepy, speed them up. One small timing change often fixes the whole feel.
Animated charts deserve a special mention, because they are one of Hera AI’s strongest features. A bar chart that grows in front of the viewer communicates growth far better than a static chart — and Hera AI builds that motion from your prompt, with the numbers, labels, and grid lines kept intact. Try it once with your own data and you will see why marketers use it for launch videos and presentations. If video is your main goal, you can pair this with a dedicated video tool like Pika H3 Flex AI, which adds synced sound to short clips — Hera AI handles the designed motion, and a video tool handles the footage and audio.
Step 9: Start From a Hera AI Template When You Are in a Hurry
Not every design needs to start from a blank canvas. Hera AI ships with more than 100 remixable templates for charts, maps, presentations, and social video, and using them is the fastest route when you have a deadline.
Here is how to use templates well:
- Browse by use case, not by looks: Start from the template built for your job — a product launch, a sales chart, a quote post — rather than the prettiest one. The structure matters more than the colours.
- Swap in your content first: Replace the template’s headline, numbers, and images with your own before you change anything else. A template with your real content already looks halfway finished.
- Apply your brand kit: One click applies your colours and fonts, and the template instantly looks like yours.
- Remix, do not copy: Change the layout, the headline, or the animation so the result is not identical to the template. Your audience has seen the same templates too.
- Save your own templates: When you finish a design you love, save it as a template. Your next post in the same series then takes minutes instead of an hour.
Templates are also the best learning tool in Hera AI. Open a template you like, look at its layers, and see how a professional motion design is put together — how many layers it has, how the text is spaced, how the animation is timed. Then build your own version from scratch using the same structure. After five or six templates, you will be prompting and designing noticeably better.
Step 10: Export and Share Your Hera AI Design
Your design is finished, animated, and previewed. The last step is exporting it in the right format for where it will be seen.
Here is what to choose:
- MP4 video: The default choice for social media, ads, and presentations. It plays everywhere and keeps the full animation with the best quality.
- GIF: Use this for short loops — a few seconds of motion in an email, a chat message, or a website banner. GIFs are bigger files, so keep them short.
- Transparent background: Choose this when your animation needs to sit on top of another video or a website background. It is the professional option for overlays and lower-thirds.
- Check the resolution: Export at the highest quality your plan allows — up to 4K on paid plans. For social media, 1080p is usually enough, but never export below the resolution of the platform you are posting to.
- Match the format to the platform: A vertical 9:16 export for TikTok, Reels, and Shorts; a square 1:1 for the feed; a wide 16:9 for YouTube and presentations. Exporting the wrong shape is the most common beginner mistake.
- Name your files clearly: Use a name like “hera-launch-ad-v1.mp4” instead of “export-1.mp4”. When you have ten versions, you will be glad you did.
Before you post, watch the exported file once from start to finish on the device your audience will use — usually a phone. Check the text size, the timing, and the ending frame, because the last frame is what viewers see if the video loops or pauses. If anything looks off, fix it on the canvas and export again. A two-minute check now saves you from deleting and re-uploading a post later.
Hera AI vs Other Design and Video Tools
Hera AI is not the only AI design tool, so it helps to know where it fits. This table compares it with the tools beginners usually consider first.
| Feature | Hera AI | Canva | Runway AI | Traditional tools (After Effects) |
|---|---|---|---|---|
| What it makes | Motion graphics from text prompts | Static designs + basic animation | AI video from text and images | Any animation, full manual control |
| Creative Canvas | Yes — image, design, animation in one place | No — separate design and video tools | No — video-focused workspace | No — timeline-based editor |
| Multiple AI agents at once | Yes, side-by-side comparison | No | No | No |
| Editable layers | Yes, every result | Yes, for templates | Limited | Yes, full control |
| Brand kit | Yes, auto-applied | Yes, on paid plans | Limited | Manual setup |
| Learning curve | Low — prompt and edit | Low — drag and drop | Medium — video prompting | High — weeks to learn |
| Best for | Ads, launch videos, social posts | Quick social graphics | AI video clips | Professional broadcast work |
| Price | Free version available | Free + paid plans | Free credits + paid plans | Paid subscription |
| Runs in browser | Yes, nothing to install | Yes | Yes | No, desktop software |
The honest summary: if you want a designed animation — a chart that moves, an ad with your brand on it, a social post with motion — Hera AI is the fastest route for a beginner. If you want a quick static graphic, Canva is still simpler. If you want realistic AI video footage, a video generator is the better tool. And if you need broadcast-level control, nothing replaces learning a professional editor — but for most founders, marketers, and creators, Hera AI covers the daily work without the learning curve.
Frequently Asked Questions
Is Hera AI really free?
Yes, Hera AI has a free version that lets beginners generate and design without paying. The free version includes credits to create your first designs, and the exact allowance can change during launch periods, so check the pricing page inside your account. Like most AI tools, heavier use — more generations, higher export resolutions, or team features — may eventually need a paid plan. Start free, make something real, and only pay when the tool earns its keep.
Do I need design experience to use Hera AI?
No. Hera AI is built for people who have never opened a design tool. You describe what you want in plain words, the AI builds it, and you edit the result by clicking layers. The templates and brand kit do most of the design work for you. If you can write a clear sentence, you can use Hera AI.
What can I make with Hera AI?
Animated charts and data visualisations, maps with highlights, product launch videos, social media ads, quote posts, presentation assets, and infographics. Founders use it for launch videos, marketers for ads, and creators for social posts. Anything that benefits from a little motion — and most content does — is a good fit.
Who owns the designs I create with Hera AI?
You own the designs you create with your prompts, and you can export and use them in your own projects, ads, and social posts. Check the current terms of service inside your account for the exact wording, especially if you plan to use a design in a paid advertisement or a client’s project.
Does Hera AI work on my phone?
Hera AI runs in the browser, so it works on any device with a modern browser. For serious design work, a laptop or desktop is far more comfortable — the canvas is wide, and editing layers on a small screen is fiddly. Use your phone to preview exports and check how a design looks on a small screen, and do the actual building on a computer.
Can I use my own images and logos in Hera AI?
Yes. You can upload your logo, product photos, and any reference image, and Hera AI will use them in your designs. Uploading your own images is also the best way to keep a design accurate — the AI cannot invent your real product, but it can build a beautiful design around your real photo.
Final Thoughts
Hera AI’s Creative Canvas solves the problem that made older AI design tools frustrating: one result at a time, start over for every small change, and no place to keep your brand consistent. The new canvas lets you direct several AI agents at once, compare their work side by side, edit everything as layers, keep your brand kit applied, and turn a finished design into motion without leaving the workspace. For a beginner, that is a complete design workflow in one browser tab.
The best way to learn it is to make something small today. Set up your brand kit, generate one social post with three agents, pick the best result, fix one layer, animate the headline, and export it. That single exercise teaches you prompting, comparing, layer editing, animation, and exporting — the whole workflow — in under an hour. Your second design will be faster, and your tenth will feel easy.
Hera AI will not replace a professional motion designer for broadcast work, and it should not try to. What it does is give founders, marketers, and creators a fast, free way to make designed motion that looks professional — ads, launch videos, and social posts that would have taken days and cost hundreds of dollars just a year ago. Start free, stay consistent with your brand, and let the AI handle the tedious parts while you keep the creative decisions.
Explore More Free AI Tools
Want to keep building your content toolkit? Try these free tools from AI Tool Steps: the AI Title Generator, the Meta Description Generator, the AI Rewriter, and the Keyword Density Checker. Each one is free, runs in your browser, and pairs well with the design workflow in this guide — write the title, polish the description, and check your keywords before you publish.