

AI can now design a whole interface from a single sentence, but anyone who has tried it knows the problem: screen one looks great, screen five drifts into different colours, screen ten uses a font you never picked, and by the end the product looks like ten different designers worked on it. That messy, inconsistent output has a name in the community — AI slop — and it is the exact problem AI Canvas was built to solve. AI Canvas launched on Product Hunt on November 17, 2026, finished as the number two product of the day on November 18, and it takes a different approach from every prompt-to-UI tool you have tried: instead of giving your AI agent a better prompt, it gives your agent a real design system it has to follow.
This guide shows you how to use AI Canvas from zero. You will learn what the tool actually is, what you can use for free, how to connect it to Claude, ChatGPT, Codex or VS Code through its MCP server, and how its Andromeda Pro system, AI Brain rulebook and done-gate keep every screen consistent. You do not need design experience, and you do not need to write code to follow along — though if you do code, everything AI Canvas produces lands in your project as real, editable source. By the end, you will know exactly how to make your AI agent design interfaces that look like one product, not ten.
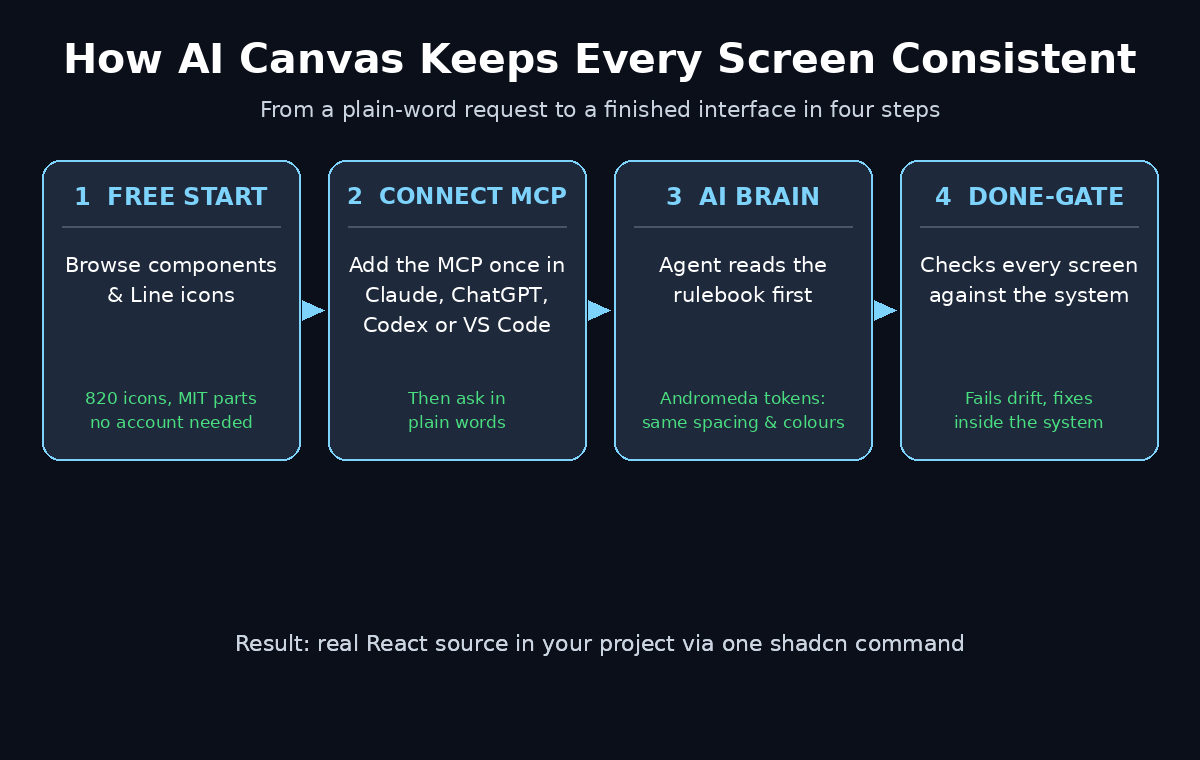
Step 1: Understand What AI Canvas Actually Is
AI Canvas is a design system for AI agents. That sentence is worth unpacking, because it is not a design tool in the Figma sense and it is not a prompt-to-website generator either. It is a set of rules, tokens, components, templates and icons that your AI agent reads before it writes a single line of interface code — so the agent stops guessing about colours, spacing and fonts, and starts building from a system.
The core of the product is Andromeda Pro, a token-driven design system. It ships with components and complete templates in both dark and light themes, with every state designed — not just the happy path, but hover, disabled, loading and error states too. Sitting on top of it is the AI Brain, which is the rulebook your agent reads before it writes a line. The AI Brain tells the agent which tokens and patterns to use, so screen ten uses the same tokens, spacing and components as screen one. And if the agent still drifts, a done-gate checks the work and fails anything that breaks the system — a raw colour value instead of a token, for example.
Around that core, AI Canvas adds three more pieces. There are standalone React components and effects built for real product jobs, from AI agent interfaces (plans, checkpoints and tool calls) to 3D heroes and backgrounds, made to fit any design system. There are 820 React icons in four styles, so you get one consistent icon set instead of whatever the agent happens to find. And there is the AI Canvas MCP server, which connects the whole system to Claude, ChatGPT, Codex, VS Code or any MCP-compatible client, so you can ask for designs in plain words. Everything lands in your project as real, editable source through one shadcn command, and the free components and Andromeda Legacy are released under the MIT licence.
Step 2: Start Free — Know What Costs $0 and What Does Not
Before you build anything, get the pricing picture straight, because AI Canvas mixes a genuinely free layer with a paid Pro system — and knowing the split saves you from surprises later.
The free layer is generous. The Product Hunt listing shows a price of 0 USD, the free components and Andromeda Legacy are MIT licensed, and the Line icon style is free with no account needed. That means you can browse components, grab icons and start using the free parts of the system without creating an account or entering a card. For a beginner, that is the right place to start: learn the system on the free pieces before you spend anything.
Andromeda Pro is the paid part. It is the full token-driven system with the AI Brain rulebook, the complete templates and the done-gate — the pieces that actually keep a multi-screen product consistent. At launch, the maker offered a launch gift: the code ProductHunt takes 40 percent off the Lifetime plan until November 30, 2026. If you try the free parts first and decide the Pro system is worth it, that code is worth using before it expires — but do not buy on day one. The free components will teach you most of what you need to know about how the system feels.
One honest note: AI Canvas is brand new. It launched publicly in mid-November 2026, and brand-new tools change fast in their first weeks. Features appear, small bugs get fixed, and details such as pricing can move after launch week. The Product Hunt launch page and the official site are the reliable sources for the latest information, so always check there if something in this guide looks different from what you see on screen.
Step 3: Browse the Free Components and Icons First
Do not connect anything yet. The fastest way to understand AI Canvas is to look at what it actually gives your agent to work with, and the free library is the best place to do that.
Start with the components. These are React pieces built for real product jobs, not decorative demos. Look for the AI agent interface pieces first — plan views, checkpoint lists and tool-call displays — because those are the parts most design systems simply do not have, and they are the pieces that make an agent-built product look like a real product instead of a generic dashboard. Then look at the 3D heroes and backgrounds, which give a landing page depth without you having to design anything in 3D yourself.
Next, open the icon set. AI Canvas ships 820 React icons in four styles, and the Line style is free with no account. Icons sound like a small detail, but they are one of the biggest sources of AI slop: left alone, an agent will mix icon styles from three different libraries on the same screen. One consistent set fixes that at the source. Pick one style and stick to it for your whole project — that single decision does more for visual consistency than any prompt tweak.
As you browse, keep a short list of the pieces you actually need. A landing page might need a hero, a pricing section and a footer. A dashboard might need cards, tables and a sidebar. Knowing your list before you ask the agent to build means the agent spends its effort on your product, not on guessing what you want.
Step 4: Connect the AI Canvas MCP to Your Agent
The MCP server is what turns AI Canvas from a library you browse into a system your agent actually uses. MCP — the Model Context Protocol — is the open standard that lets AI assistants use outside tools, and AI Canvas ships one MCP server that plugs into Claude, ChatGPT, Codex, VS Code or any MCP-compatible client.
Connecting it takes one step: add the AI Canvas MCP server to your agent’s MCP configuration, once, using the address given on the AI Canvas site. You keep using the AI subscription you already have — Claude, ChatGPT or Codex — because the MCP is the connection, not a new chat app. After that single setup, you ask for designs in plain words inside the agent you already use, and the agent can search the AI Canvas system, find the right components and install them into your project.
If you have never connected an MCP server before, do not worry. The pattern is the same everywhere: open your agent’s settings, find the MCP or integrations section, add a new server with the address AI Canvas gives you, and save. The agent will confirm the connection by listing the new tools it can see. If it does not, double-check the address character by character — a single wrong character is the most common reason an MCP connection fails.
Beginners sometimes ask whether they need a coding agent like Claude Code or Cursor for this. You do not. Any MCP client works, including the chat apps you already use. The agent does the technical work; your job is to describe what you want in plain language.
Step 5: Ask in Plain Words and Watch It Build
With the MCP connected, the actual designing starts with a sentence. Describe the screen you want the way you would describe it to a human designer: what it is for, who uses it, and what should be on it. A good first request is specific but not over-specified — for example, “a pricing page for a small fitness app, three plans, monthly and yearly toggle, dark theme.”
Here is what happens behind that sentence. Your agent reads the AI Brain rulebook first, then searches the AI Canvas system for the components and templates that fit your request, then builds the screen from those pieces instead of inventing its own buttons, cards and colours. Because it is working from a system, the pricing cards match each other, the toggle uses the designed state, and the spacing follows the same rules as every other template in the system.
Watch the first build happen rather than asking for five screens at once. Check the result against three simple questions: does it look like one product, can you read everything clearly, and does every button look like it belongs to the same family? If the answer to all three is yes, the system is doing its job. If something looks off, say so in plain words — “make the yearly price stand out more” — and the agent adjusts within the system instead of starting over.
Resist the urge to micromanage colours and pixel values in your first requests. The whole point of AI Canvas is that those decisions already exist in the tokens. Your words should describe the goal and the content; the system handles the consistency.
Step 6: Set Up Andromeda Pro Tokens and the AI Brain
The free components teach you the workflow, but the consistency guarantee lives in Andromeda Pro — and specifically in two pieces that work together: the tokens and the AI Brain.
Tokens are the named values behind every visual decision in the system: colours, spacing, font sizes, corner radii and shadows, each with a name instead of a raw value. When the agent wants a background colour, it does not pick a hex code it likes; it uses the token for “surface” or “background”. When it needs space between two cards, it uses the spacing token, not a number it invented. That is why screen ten matches screen one — both screens read the same names from the same list.
The AI Brain is the rulebook that makes the agent actually follow those tokens. Before the agent writes a line, it reads the Brain, which tells it which tokens and patterns to use and which shortcuts are forbidden. Think of it as the difference between handing a builder a pile of materials and handing the same builder a blueprint: the materials are the same, but the blueprint is what makes the result a building instead of a pile.
Setting this up means pointing your agent at the Andromeda Pro system and letting the AI Brain load before the build starts. In practice, that happens automatically once the MCP is connected and Pro is active — the agent reads the rulebook as part of its first step. Your job is to make sure the agent is actually using the Pro system and not falling back to its own habits. A quick check is to ask for two screens in a row and compare them: same buttons, same spacing, same colours. If they match, the Brain is loaded and working.
If your team wants to put systems like this into real client work instead of one-off experiments, working with a digital agency that already builds AI-powered design workflows can help. The design system is only half the job — the workflow around it, from brand tokens to review steps, is the other half.
Step 7: Let the Done-Gate Catch Drift
Even with a rulebook, agents drift. They get creative, they improvise, they use a raw colour because it looked right in the moment. That is what the done-gate is for — it is the quality check at the end of the build, and it is the feature that separates AI Canvas from a plain component library.
The done-gate reviews the finished work against the system and fails anything that drifts off it. A raw colour value where a token belongs? Failed. A component used in a way the system does not allow? Failed. Spacing that does not match the scale? Failed. The agent then has to fix the failure inside the system before the work counts as done. You do not have to police the details yourself, because the gate does it for you.
For a beginner, the practical lesson is simple: do not override the done-gate, and do not ask the agent to skip it. When a build fails the gate, that is the system working, not the system breaking. Read the failure, let the agent fix it, and notice how the fixed version looks more consistent than the first attempt. Over a few builds, you will start to see the pattern — the gate catches exactly the kind of small inconsistencies that make AI-built interfaces look cheap.
If you are building something where a failed check would be embarrassing — a client demo, a launch page — run the build early and leave time for one fix cycle. The first pass rarely needs more than that, but the buffer means a gate failure never becomes a deadline problem.
Step 8: Retune the Tokens to Match Your Brand
A design system only earns its keep when it looks like yours, not like the default. AI Canvas is built for that: retune the tokens and it builds with your colours. This is the step where a generic-looking product starts to look like your brand.
Start with the three values that matter most: your primary colour, your background, and your text colour. Change those three tokens and rebuild a screen you already made — you will see the whole interface shift to your palette in one pass, because every component reads the tokens instead of hard-coded values. That is the power of a token system: one change, everywhere, consistently.
Then move to the secondary details: the accent colour for calls to action, the border colour for cards, the radius that makes corners sharp or soft. Change one at a time and rebuild, so you can see what each token controls. Beginners who change ten tokens at once usually cannot tell which change caused which result, and they end up undoing good work along with bad.
Keep a note of your token choices — a simple list in a document is enough. When you start a second project with the same brand, those tokens are your starting point, and the agent will build the new product in the same visual language as the first. That is how small teams get the consistency that used to require a full design department. And if you want to keep learning how agentic tools are reshaping creative work, Agentic Affairs covers the tools and patterns behind this shift in plain language.
Step 9: Add Standalone Components, Effects, and Icons
Once the core system is working, the standalone pieces are where AI Canvas gets fun. These are React components and effects built for real product jobs, and they are designed to fit any design system — including one you already have.
The most useful set for beginners is the AI agent interface kit: plan views that show what the agent is about to do, checkpoint lists that show progress, and tool-call displays that show what the agent just did. If you are building any product with an AI agent inside it, these pieces solve the hardest design problem in that space — how to show the user what the agent is doing without confusing them. Drop them in through the MCP the same way you added everything else, and they arrive styled to your tokens.
Then try the visual effects: 3D heroes and backgrounds that give a landing page depth and motion. These are the pieces that make a page feel expensive, and they are also the pieces beginners usually avoid because 3D sounds hard. With AI Canvas, it is not — the agent installs the effect and wires it to your content. Ask for one hero on a test page first, check that it loads fast and looks right on mobile, and only then use it on a real page.
Finally, finish the icon discipline you started in Step 3. The set has 820 React icons in four styles — pick your one style and use it everywhere. When the agent reaches for an icon, the system gives it one from your set, not a random find from the internet. That single habit keeps dashboards, settings pages and marketing pages looking like they belong to the same product.
Step 10: Ship It as Real Source with One shadcn Command
The last step is the one that matters most for anyone who actually ships products: everything AI Canvas makes lands in your project as real, editable source through one shadcn command. You are not renting a design from a black box, and you are not stuck with generated code you cannot change.
When your agent finishes a screen, it installs the pieces into your project with the shadcn command shown on the component page. The result is ordinary React source code in your own repository — you can open it, edit it, restyle it, and commit it like any other code. If the agent built a button you want to change, you change the button. If a template needs a field the system does not have, you add it. Nothing is locked, and nothing phones home to keep working.
That ownership changes how you should think about the tool. A prompt-to-UI generator gives you a picture of a website. AI Canvas gives you a website, built from a system, in your own codebase. For a beginner, the practical takeaway is to keep your project in version control from the first install — commit after each screen, so you can always step back to the last good version if an experiment goes wrong. And because the free components and Andromeda Legacy are MIT licensed, what you build on the free layer is yours to use and ship without a licence worry.
AI Canvas vs Figma vs v0
| Feature | AI Canvas | Figma | v0 |
|---|---|---|---|
| Built for | AI agents designing interfaces | Human designers | AI generating UI from prompts |
| Consistency system | Andromeda tokens + AI Brain + done-gate | Manual design systems, plugins | Prompt-based, no persistent rulebook |
| Agent connection | MCP server for Claude, ChatGPT, Codex, VS Code | Agent plugins and API | Chat-based generation |
| Output | Real React source via one shadcn command | Design files, handoff to code | React code, copy or export |
| Icons included | 820 React icons in four styles | Community icon libraries | No built-in icon system |
| Free start | Free MIT components, Line icons free, no account | Free starter plan | Free credits to try |
| Best for | Teams whose agents build many screens | Human-led product design | Quick one-off UI drafts |
The table makes the positioning clear. Figma is still the best tool when a human designer is doing the designing. v0 is still the fastest way to draft a single screen from a sentence. AI Canvas wins in the case neither of them covers: an AI agent building many screens that all have to look like one product. If that is your workflow, it is the only tool of the three built for it from the ground up.
Frequently Asked Questions
Is AI Canvas really free?
The free layer is real: the Product Hunt listing shows a price of 0 USD, the free components and Andromeda Legacy are MIT licensed, and the Line icon style is free with no account needed. Andromeda Pro — the full token system with the AI Brain and done-gate — is paid, with a launch offer of 40 percent off Lifetime using the code ProductHunt until November 30, 2026. Start on the free parts and upgrade only when the Pro consistency features earn it.
Do I need to know how to code to use AI Canvas?
No. You describe what you want in plain words and your agent does the building. Knowing a little about how websites are structured helps you judge the results, but the MCP connection and the plain-language requests are designed for non-coders. If you do code, the real React source output is a bonus, not a requirement.
Which AI agents work with AI Canvas?
The MCP server connects to Claude, ChatGPT, Codex, VS Code and any MCP-compatible client. You use the AI subscription you already have — the MCP is the bridge between that agent and the AI Canvas system, not a separate chat app you have to learn.
What is the AI Brain, exactly?
It is the rulebook your agent reads before it writes a line of interface code. It tells the agent which tokens, components and patterns to use, so every screen follows the same system. Without it, an agent improvises; with it, screen ten matches screen one.
What happens when the done-gate fails my design?
The build is rejected until the agent fixes the drift — a raw colour instead of a token, a component used the wrong way, spacing off the scale. That is the system working as designed. Let the agent fix it inside the system; the corrected version will look more consistent than the first attempt.
Can I use AI Canvas components in a project that already has a design system?
Yes. The standalone components and effects are made to fit any design system, and the icons work anywhere React works. You can adopt the pieces without adopting Andromeda Pro, and add the full token system later if you want the consistency guarantee across the whole product.
Final Thoughts
AI Canvas solves the problem most people discover only after their agent has built ten screens: the agent is fast, but without a system it is inconsistent. Andromeda Pro gives it tokens to follow, the AI Brain gives it a rulebook to read, and the done-gate gives it a check it cannot skip. The free MIT components and the free Line icons mean you can learn the whole workflow for nothing, and the MCP connection means you can use the agent you already pay for. The launch offer — 40 percent off Lifetime with the code ProductHunt until November 30, 2026 — is worth knowing about, but it is not a reason to rush: try the free layer first, build two or three screens, and let the consistency of the results decide whether Pro earns a place in your workflow.
The bigger lesson is about how to work with AI agents in general. A better prompt helps for one screen. A system helps for every screen after that. AI Canvas is the first tool in this space built around that idea, and for anyone whose agent builds interfaces every day, it is the most useful launch of the week.
Explore More Free AI Tools
Want to keep building with free AI tools? Try the AI Title Generator, Meta Description Generator, AI Rewriter and Keyword Density Checker at aitoolsteps.com — free tools that help you write, polish and check the content your new designs will carry.