

You ship a new feature on Friday. On Monday, a user reports that the login button stopped working — a bug your last change introduced without anyone noticing. That is a regression. It is the most embarrassing kind of bug in software: something that used to work, and now does not. Learning how to use TestSprite AI stops that story before it starts.
TestSprite AI exists to catch exactly that. It is an AI testing agent. It reads what your app is supposed to do, writes end-to-end tests for it, and runs them in real browsers. When something breaks, it tells you with screenshots and a suggested fix. You do not write test scripts. You describe your app in plain English, and the agent does the testing.
This beginner guide shows you how to use TestSprite AI from a free account to your first passing test suite, your first fixed bug, and a pull-request gate that stops broken code from ever reaching production. The free plan costs $0 and includes 150 credits a month, which is enough to learn the whole workflow properly.
Step 1: What TestSprite AI Is (and Why Beginners Should Care)
TestSprite is an AI testing agent and automation platform built for the age of AI-written code. Your team — or your coding agent, such as Claude Code or Cursor — writes the code. TestSprite verifies it independently against what your product should do, with evidence at every step.
Traditional testing forces you to write and maintain test scripts by hand. TestSprite flips that around: you tell it what the app should do in your own words, or you point it at your product requirements document (PRD) and tickets, and it writes the tests itself. It then runs them against your live, running app — frontend and backend — in real browsers and against live APIs.
That matters for beginners for three reasons. First, there is no test framework to learn: no Selenium setup, no Cypress configuration, no Playwright boilerplate. Second, every failure comes back as a clear report instead of a cryptic stack trace. Third, the free plan is genuinely usable, so you can learn the full loop without a credit card.
TestSprite 4.0, launched on Product Hunt on November 19, 2026, is the newest version. Its headline idea is memory: the testing agent remembers what your app should do and checks all of it, every time you change something. A test expectation only changes when you approve it, so a failing check can never be quietly rewritten to pass.
Step 2: How TestSprite 4.0 Works — the Autonomous Test Loop
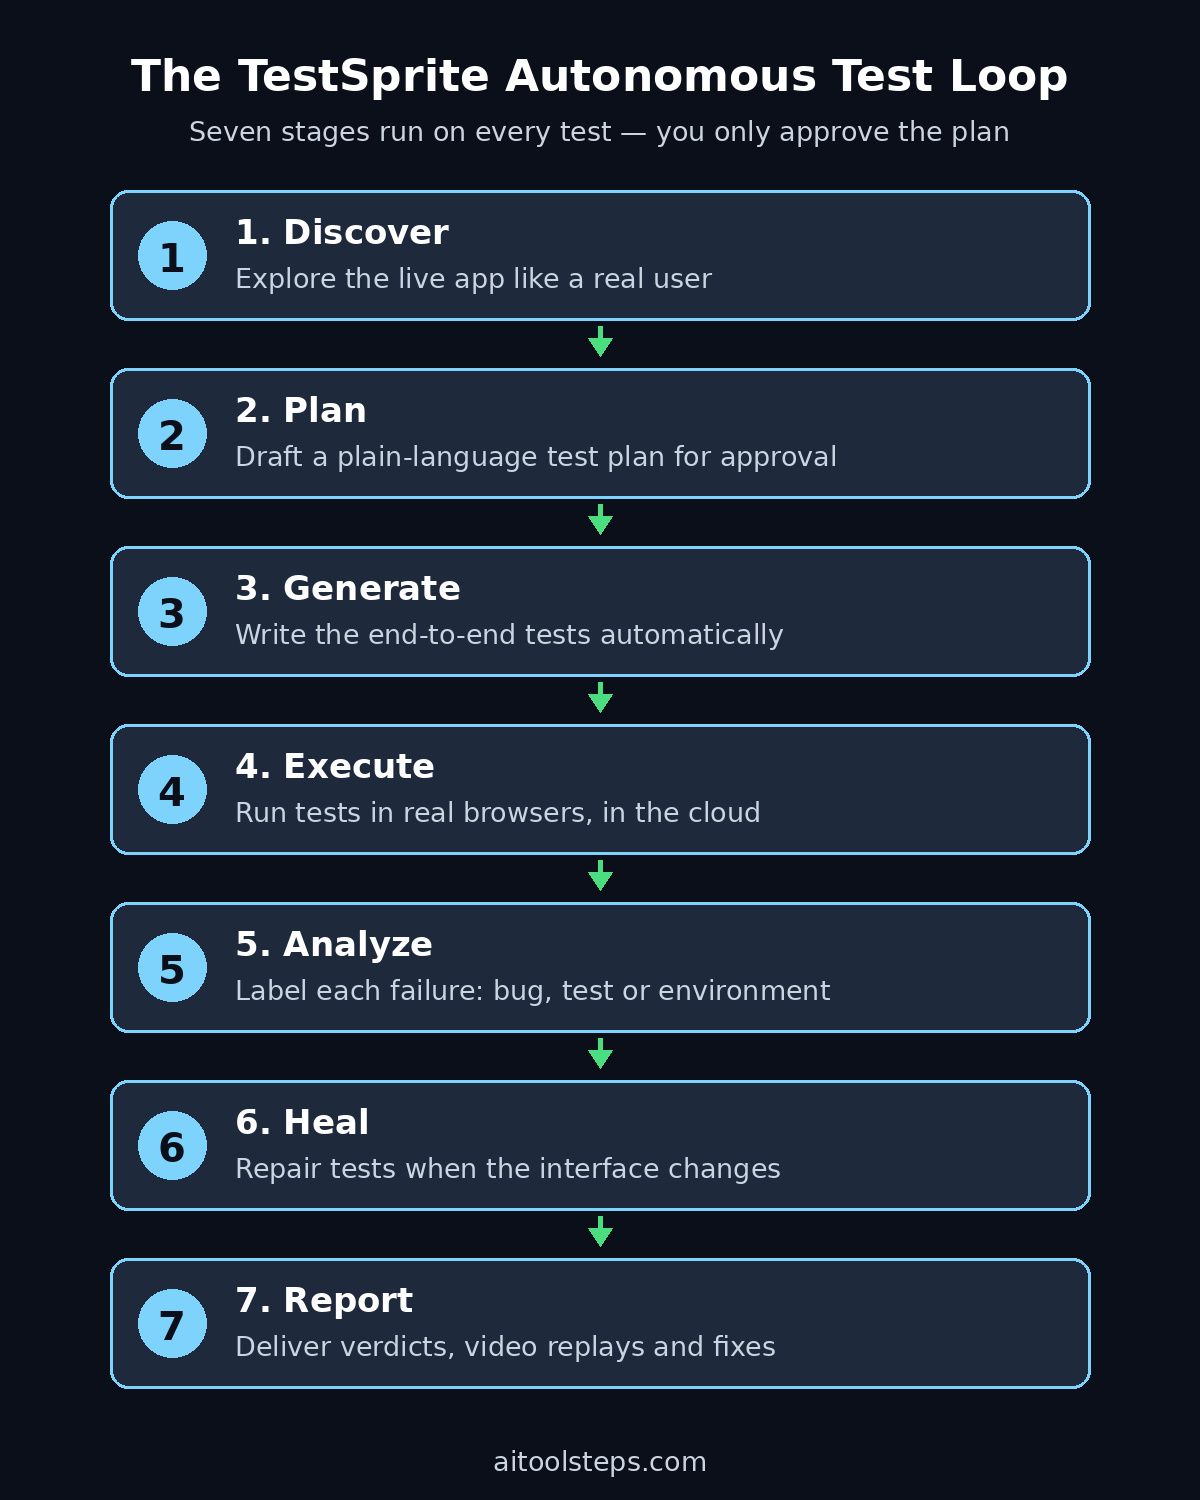
Before you click anything, it helps to understand the loop TestSprite runs on every test. The agent follows seven stages: discover, plan, generate, execute, analyze, heal, and report.
First comes discovery. TestSprite explores your running application the way a real user would. It clicks through pages, fills in forms, and calls APIs. Next, the plan stage drafts a test plan in plain language, stating what each test expects. Then the generate stage writes the actual end-to-end tests. After that, TestSprite executes them in secure ephemeral cloud sandboxes, using real browsers and live data.
When a test fails, the analyze stage kicks in. TestSprite works out whether the failure is a real bug, a test problem, or an environment issue. It then attaches a root-cause hypothesis. In the heal stage, it repairs tests that broke only because the interface changed. A moved button or a renamed field no longer means rewriting selectors by hand. Finally, the report stage delivers one clear result per run, with video replays of every session.
You can reach TestSprite from four places, and they all share one suite and one set of results: the browser dashboard for the whole team, a command-line interface (CLI) for coding agents and CI, an MCP server inside your IDE, and a GitHub gate on every pull request. The CLI is open source under the Apache 2.0 license, which is rare for a tool in this space and a good sign for its longevity. If you also need to test AI agents themselves, not just apps, our StateWeave AI guide shows how to test an agent on working clones of Slack, Gmail, and Shopify before it touches real data.
Step 3: Create Your Free TestSprite AI Account
Start at testsprite.com and create a free account with your email or a Google sign-in. There is no credit card required for the free plan, and setup takes about two minutes.
The free plan gives you 150 credits a month, one environment, 30 days of run history, the full autonomous test loop, agent chat, the CLI, the IDE plugin through MCP, GitHub pull-request auto-testing on one repository, and Slack notifications. That is the whole core product, not a watered-down demo.
Once you are inside, you will see the dashboard: projects on the left, recent runs in the middle, and your remaining credits at the top. Take a minute to look around before creating anything. The two places you will use most are Projects, where your apps live, and Runs, where every test result lands with its verdict, video, and trigger.
One practical note: credits are spent per test activity, and the pricing page does not publish exactly what a single run costs — uploading a requirements document costs 0.5 credits, while an API spec is free. Treat your first month as a learning budget: run small suites, watch what each run costs, and scale up only when you know your burn rate.
Step 4: Set Up Your First TestSprite AI Project
Click to create a new project and give it a name that matches your app — for example, “My Shop Checkout” or “Portfolio Site”. TestSprite will ask for the URL of your running application. This is important: TestSprite tests the live app, not your source code alone.
If your app runs on your own computer, that still works. TestSprite provides a tunnel that lets its cloud reach an app running on localhost, so you can test a local development build without deploying anything. Point the tunnel at your local port, confirm the app loads in the preview, and you are ready.
Next, choose your environment. On the free plan you get one environment, so pick the one you will test most — usually staging, or your local build. You can describe the app in a sentence or two: what it does, who uses it, and which parts matter most. This short description helps the agent explore in the right order instead of wandering through admin pages first.
Step 5: Tell TestSprite What Your App Should Do
When you learn how to use TestSprite AI, this is the step that replaces writing test scripts, and it is where beginners save the most time. TestSprite needs to know what your product should do — and you can tell it in whichever form you already have.
The simplest option is plain words. Type a short description such as: “Users sign up with an email, log in, add items to a cart, check out with a card, and see an order confirmation page. The cart total must update when an item is removed.” That is enough for the agent to start.
If you have better material, use it. Upload a PRD, paste in Jira or Linear tickets, or connect your repository so the agent can read the code for context. The sharper the input, the sharper the tests: a ticket that says “password reset email must arrive within 60 seconds” becomes a test that actually measures that.
Do not worry about being exhaustive on your first run. Start with the five or ten behaviors that would embarrass you most if they broke — login, signup, checkout, payment, and the main page load. You can add more coverage later, and passed tests are kept, so your coverage grows as your app does.
Step 6: Review and Approve the Test Plan
After reading your description, TestSprite drafts a test plan in your workspace. Every test states what it expects in plain language, for example: “Given a logged-in user with two items in the cart, when the user removes one item, then the cart total updates to the price of the remaining item.”
Read this plan carefully — it is the contract everything else is checked against. Edit anything that is wrong, trim tests you do not need, and add anything the agent missed. If something is unclear, the agent asks you in the workspace instead of guessing, which is exactly the behavior you want from a testing tool.
Only approve the plan when it reads correctly. Remember the key rule of TestSprite 4.0: what a test expects only changes when you approve it. That approval step is what keeps the agent honest. A lazy testing tool would quietly rewrite a failing expectation until it passes; TestSprite cannot, because you own the plan.
Step 7: Run Your First End-to-End Test with TestSprite AI
With the plan approved, start your first run from the dashboard. TestSprite spins up a cloud browser, opens your app, and works through the tests like a real user: typing into fields, clicking buttons, solving multi-step login flows — including OTP and SMS simulation where needed — and calling your APIs.
Watch the run live if you can. You will see each test move from queued to running to passed or failed, with a video recording of the session. A small suite of ten tests usually finishes in a few minutes, depending on how much your app does.
When the run finishes, you get a simple verdict per test, plus the full evidence: screenshots at each step, the page structure at the moment anything went wrong, and a replay video. If everything passes, congratulations — you now have a regression suite. The real value comes next: every time you change the code, you re-run the same suite, and anything that used to work but now does not gets caught immediately.
Step 8: Read a Failure Bundle and Fix the Bug
Once you know how to use TestSprite AI, a failed test does not dump a stack trace on you. It returns one failure bundle containing the failing step and its neighbors, screenshots, DOM snapshots, the test source code, a root-cause hypothesis, and a recommended fix. That bundle is the whole point of the tool.
Start with the verdict: is this a real bug, a test problem, or an environment issue? TestSprite labels it for you. A real bug means your app broke. A test problem means the expectation was wrong or the test needs updating. An environment issue means the app was down or the test data was missing.
Next, open the screenshots and the video replay. You will see exactly what the agent saw — the button it clicked, the error message that appeared, the page state at the failure. Compare the expected result with the actual result, which TestSprite shows side by side.
Then read the suggested fix. If you code with an AI assistant such as Claude Code or Cursor, paste the failure bundle straight into it: the bundle is designed so a coding agent can act on it directly, fix the code, and hand the app back to TestSprite for a re-test. That loop — agent writes, TestSprite verifies, agent fixes — is the workflow the tool was built for, and it works just as well if you fix the bug yourself.
Step 9: Connect TestSprite AI to Your IDE with MCP
The browser dashboard is great for the team, but developers live in their editor. TestSprite’s MCP server plugs the testing agent directly into Cursor, VS Code, Windsurf, Trae, GitHub Copilot, Antigravity, and Claude Code, so you can ask for tests and read failures without leaving your code.
Setup is short. Generate an API key from your TestSprite dashboard, then add the MCP server with the command npx @testsprite/testsprite-mcp@latest in your editor’s MCP configuration. You will need Node 22 or later on your machine. Once connected, your coding agent can ask TestSprite to test the project, and the failure bundles come back inline in the editor where you can act on them immediately.
This is also the moment to install the CLI if you like working in the terminal. The CLI installs a verification skill for eight coding agents and lets you trigger runs, check results, and set up the GitHub gate from the command line. Between the MCP server and the CLI, testing stops being a separate chore and becomes part of writing code.
For teams shipping client work, this kind of setup is becoming standard practice. A digital agency that ships websites every week, for example, can wire the same checks into every project — the team at https://www.d365a.com/ works this way, with automated verification running alongside development rather than after it.
Step 10: Gate Pull Requests on GitHub
Testing after merging is too late. When you learn how to use TestSprite AI with GitHub, its integration turns your suite into a merge gate: on every pull request, it re-checks the full suite against that PR’s deployment and posts the result as a comment on the PR, right where the review already happens.
Connect it from the dashboard by linking your GitHub account and choosing a repository. On the free plan you get PR auto-testing on one repository, which is enough to protect your main project. Once it is on, every PR gets a TestSprite check. If the suite passes, the PR is safe to merge. If a test fails, the failure bundle lands in the PR comment, and the author can fix the code before anyone reviews it.
This single step changes how a team works. Reviews stop being about catching broken buttons and start being about design and logic, because the agent already verified the behavior. If you run an agentic workflow where AI agents write most of your code, a gate like this is not optional — it is the only thing standing between an agent’s confident mistake and your production site. The team writing about agentic systems at https://www.agentic-affairs.com/ makes the same point: autonomous agents need independent verification, and a test gate is the cheapest form of it.
Step 11: Schedule Nightly TestSprite AI Regression Runs
Passing tests are only useful if they keep running. On paid plans you can schedule runs hourly, nightly, weekly, or before a release, so silent breaks surface before a demo does — not during it. On the free plan, schedules are not included, but you can still build the habit manually: re-run the suite after every significant change, and always before a release.
A good beginner routine is simple. Run the suite when you finish a feature, when you merge a pull request, and on Friday afternoon before the weekend. Each run is retained with its verdict, video, and trigger, so after a month you have a history that shows exactly when each behavior last passed — evidence that is genuinely useful when a client or a manager asks whether the app is stable.
When you outgrow the free plan, the upgrade path is clear. Starter costs $19 a month for 400 credits, with the first month free, and adds auto-healing tests and schedules. Standard is $39 a month for 800 credits, Pro is $69 for 1,600, and Enterprise starts at $199 a month for larger teams that need SSO, audit logs, and single-tenant deployment. Upgrade when your suite’s monthly cost justifies it — not before.
Step 12: Stretch Your 150 Free TestSprite AI Credits
The free plan’s 150 credits a month go further than they sound if you spend them deliberately. Four habits make the difference.
First, keep your suite focused. Ten sharp tests on your core flows catch more real regressions than fifty tests on edge cases nobody uses. Second, fix the plan before you re-run: a wrong expectation burns credits on every run until you correct it. Third, test against a stable environment — a flaky staging server that times out wastes runs and produces environment failures that teach you nothing. Fourth, batch your changes: run the suite once after a batch of related edits instead of after every single save.
Also remember that some inputs are cheap. Uploading an API specification costs nothing, and a requirements document costs only 0.5 credits, so invest in good inputs — they make every later run more accurate. And use the agent chat in the dashboard: asking TestSprite why a test failed is free, while re-running a suite to find out is not.
TestSprite AI vs the Alternatives
| Feature | TestSprite AI | Manual QA | Traditional Test Automation |
|---|---|---|---|
| Who writes the tests | The AI agent, from plain words or a PRD | A human tester, by hand | A developer, in code |
| Setup time | Minutes, no framework to install | None, but slow per test | Hours to days of framework setup |
| Runs tests in real browsers | Yes, in cloud sandboxes | Yes, by hand | Yes, if configured |
| Failure evidence | Screenshots, video, DOM, root cause, fix | A bug report, if written well | A stack trace |
| Self-healing tests | Yes, repairs tests when the UI changes | Not applicable | No, tests break and need rewrites |
| Pull-request gate | Yes, built in | No | Possible, with CI work |
| Free plan | $0, 150 credits a month | Free, but costs your time | Free tools, expensive in hours |
| Best for | Beginners and AI-assisted teams | Tiny apps and one-off checks | Teams with dedicated QA engineers |
The honest summary is that TestSprite does not replace thinking about quality — it replaces the repetitive labor of writing and maintaining test scripts. You still decide what matters, approve the plan, and judge whether a failure is a real bug. The agent just does the clicking, the checking, and the reporting, tirelessly and the same way every time.
Frequently Asked Questions About TestSprite AI
Is TestSprite AI free?
Yes. TestSprite has a free plan that costs $0 and includes 150 credits a month, one environment, 30 days of run history, the full autonomous test loop, agent chat, the CLI, the IDE plugin through MCP, GitHub pull-request auto-testing on one repository, and Slack notifications. Paid plans start at $19 a month for the Starter plan, which adds 400 credits, auto-healing tests, and scheduled runs.
How do I use TestSprite AI without writing code?
Learning how to use TestSprite AI without writing code is simple. Use the browser dashboard: create a free account, add your app’s URL, describe what the app should do in plain English or upload a PRD, approve the test plan TestSprite drafts, and press run. No code is needed at any step. The CLI and MCP server are optional extras for developers who want testing inside their editor or terminal.
What does TestSprite give me when a test fails?
One failure bundle per failed test. It includes the failing step and its neighboring steps, screenshots, DOM snapshots, the test source, a root-cause hypothesis, and a recommended fix. Sessions can also be replayed as video, so you can watch exactly what the agent did before the failure.
Does TestSprite work with Claude Code and Cursor?
Yes. TestSprite connects to AI coding agents in two ways: an MCP server that plugs into Cursor, VS Code, Windsurf, Trae, GitHub Copilot, Antigravity, and Claude Code, and an open-source CLI that installs a verification skill for eight coding agents. Your coding agent writes the code, then asks TestSprite to verify it independently.
What is TestSprite 4.0?
TestSprite 4.0 is the version launched on Product Hunt on November 19, 2026. Its headline feature is memory: the testing agent remembers what your app should do and checks all of it on every change. Test expectations only change when you approve them, the CLI is open source under Apache 2.0, and the platform now covers the browser dashboard, CLI, MCP server, and GitHub pull-request gate in one suite with one set of results.
Can TestSprite test an app running on my own computer?
Yes. TestSprite provides a tunnel that lets its cloud reach an app running on localhost, so you can test a local development build without deploying it. Point the tunnel at your local port and confirm the app loads, then run your suite against it exactly as you would against a staging URL.
Final Thoughts
The best time to start testing is before your first embarrassing regression, not after it. TestSprite AI makes that easy because it removes the two things that stop beginners from testing: writing test scripts and learning a test framework. You describe what should happen, approve the plan, and let the agent do the repetitive work — then you re-run the same suite on every change and let it catch what humans miss.
Start small: one project, one app URL, five core tests, and the free plan. And if you want a second QA tool in your kit, our Momentic Mo AI guide covers an AI QA engineer that tests web and mobile apps end to end and finds real bugs with video proof. Connect the GitHub gate once the suite is green, plug the MCP server into your editor when you want failures inline, and upgrade to Starter only when your 150 free credits genuinely run out. That is the whole journey, and it takes an afternoon to learn and pays off on every release after it.
Explore More Free AI Tools
Want to keep building your free AI toolkit? Try our other free tools on AI Tool Steps: the AI Title Generator, the Meta Description Generator, the AI Rewriter, and the Keyword Density Checker — all free at https://aitoolsteps.com/. Pair them with your new testing workflow and every guide, landing page, and release note you publish gets the same careful check your code now gets.