

Search has changed. People now ask ChatGPT, Claude, and Perplexity for answers instead of typing keywords into Google. Your website can rank on page one and still lose the click, because the answer came from an AI summary. RankSpot AI is built for this new reality. It is the SEO and AI search execution layer for AI agents: you connect it to Claude or ChatGPT through MCP, and your agent does the SEO work for you. It writes articles based on what already ranks on Google, publishes them, and pitches ranking sites for backlinks from your mailbox.
This guide shows you how to use RankSpot AI from zero. You will set up an account, connect it to your AI assistant in about two minutes, and run your first article through the full loop: read your data, write from what ranks, review and publish, then pitch for backlinks. There is no monthly subscription. You pay $3 per article and $0.004 per prompt check, reading your own data costs nothing, and you start with $1 of credit plus a free article. RankSpot launched on Product Hunt on November 17, 2026, and finished #2 Product of the Day with 426 upvotes.
Step 1: Understand What RankSpot AI Actually Is
Most SEO tools give you data and leave the work to you. RankSpot AI works the other way around. It is an execution layer, which means it does the tasks, not just the reports. The tool plugs into Claude or ChatGPT through MCP, the Model Context Protocol, so your AI assistant can use RankSpot as one of its tools. Once connected, you talk to your assistant in plain language, and it carries out the SEO jobs: checking rankings, drafting articles, publishing them, and sending outreach emails.
Three jobs sit at the core of the product, and they explain why so many beginners are learning how to use RankSpot AI this month. First, it writes articles from what already ranks on Google, in more than 100 languages, so new content is built on proven demand instead of guesswork. Second, it publishes those articles to your site. Third, it pitches the sites that already rank for your topic and asks them for backlinks, using your own mailbox. You can run every client or business from one chat, which makes it useful for freelancers and small agencies as well as for a single website owner.
One point matters for beginners: RankSpot AI does not replace your judgment. It drafts, publishes, and pitches, but you still review the article before it goes live and you still approve the outreach. Think of it as a fast junior SEO assistant that never sleeps, not as a button you press and forget. That mindset keeps your site safe while you learn the workflow.
Step 2: How RankSpot AI Pricing Works — Pay As You Go
Before you connect anything, understand the pricing, because it is different from most SEO tools. There is no monthly subscription. You pay for what you use: $3 per article, $0.004 per prompt check, and reading your own data is free. You start with $1 of credit and a free article, so your first real test costs nothing.
Do the math for a small site. Ten articles a month costs about $30. A classic SEO subscription starts around $99 to $129 a month, before you count the hours you spend doing the work yourself. For a beginner, the pay-as-you-go model has a second advantage: a quiet month costs almost nothing, and a busy month scales with your output. There is no fee for months when you publish nothing.
Prompt checks deserve a quick explanation. A prompt check asks an AI search engine a question and records whether your brand or page shows up in the answer. At $0.004 each, you can run hundreds of checks for a few dollars. That is how you track AI search visibility, the part of SEO that Google Search Console cannot show you. Reading your rankings and visibility data is free, so start there before you spend a cent on articles or checks.
One honest note: prices and free credit amounts can change, because RankSpot AI is brand new. The launch listing is the source of truth. Check the official pricing page before you plan a big content run, and treat the $1 starting credit as a trial, not a permanent allowance.
Step 3: Check What You Need Before You Start
You need four things, and none of them is technical. First, a Claude or ChatGPT account, because RankSpot works through your AI assistant. Either one works; pick the assistant you already use daily. Second, a website you control, with a way to publish articles — WordPress is the most common choice, and this guide assumes you can publish a post. Third, access to the mailbox you want outreach sent from, because backlink pitches go out from your email. Fourth, one topic you want to rank for, ideally something your business already knows well.
Gather three details before you open RankSpot. Write down your website address, the main topic or service you want to rank for, and two or three competitor sites that already rank for it. Your agent will use all three. The website tells it where to publish. The topic tells it what to write. The competitors tell it what already works in your niche.
If you run SEO for clients, add one more item: a separate note for each client with their site, their topics, and their mailbox. RankSpot lets you run every client from one chat, but clean notes stop you from mixing up two businesses. A digital agency with five small clients can keep each one in its own thread and switch between them without reconnecting anything.
Step 4: Create Your RankSpot AI Account and Claim the Free Article
Start on the RankSpot page on Product Hunt and follow the link to the official site. Look for the sign-up button and create your account with the email you use for your website or your business. Use a real work email, not a throwaway address, because outreach emails and publishing confirmations will go to it later.
After sign-up, look for the starting credit in your dashboard. The launch offer is $1 of credit plus one free article. Claim the free article first, before you spend the credit. It is the cheapest way to see the full workflow: your agent will write it, you will review it, and you will publish it. If anything looks wrong, you have learned it on a free article, not a paid one.
Spend five minutes exploring the dashboard before you connect anything. Find where your credit balance lives, where published articles are listed, and where outreach history appears. RankSpot is new, so menus may move in the first weeks, but those three areas are the ones you will open every day. Knowing where they are now saves you hunting later, when you are in the middle of a real campaign.
Step 5: Connect RankSpot AI to Claude or ChatGPT with MCP in 2 Minutes
This is the step that makes everything else work, and it is the fastest one. MCP, the Model Context Protocol, is the standard way AI assistants connect to outside tools. RankSpot gives you an MCP connection, and you add it to Claude or ChatGPT. The whole setup takes about two minutes, with no code to write.
Open RankSpot and find the MCP setup or Connect section. It will show you a connection address or a short setup snippet. Copy it exactly. Then open your AI assistant and go to its settings. In Claude, look for the MCP servers or integrations area. In ChatGPT, look for connected apps or MCP settings. Paste the RankSpot connection details there and save.
Test the connection before you do anything else. Ask your assistant a simple question, such as “What can you do with RankSpot?” or “Show me my RankSpot data.” If it answers with your real rankings or your credit balance, the connection works. If it says it cannot reach RankSpot, check two things: the connection details were pasted without extra spaces, and the assistant app was restarted after you saved the settings. Most MCP issues come from one of those two causes.
A practical tip: keep the MCP connected to one assistant, not both at once, while you are learning. Claude and ChatGPT will both work, but switching between them makes it harder to see which conversation holds your campaign. Pick one, run your first article through it, and only add the second assistant once the workflow feels routine.
Step 6: Ask Your Agent to Read Your Data First — It Is Free
Do not write an article on day one. The first rule of how to use RankSpot AI well is to read before you write. Reading your data is free, and it is the step that makes the writing step work. Ask your assistant to show you what RankSpot already knows about your site: which keywords you rank for, which pages get AI search mentions, and where the gaps are. A gap is a topic your competitors rank for and you do not. Those gaps are your best article ideas, because demand is already proven.
Try three plain-language prompts in your first session. First: “Which keywords does my site rank for, and which ones are close to page one?” Pages sitting at positions 8 to 15 are the quickest wins. Second: “Which topics do my competitors rank for that I do not cover?” Third: “How often does my brand appear in AI search answers for my main topic?” The answers give you a short list of topics worth writing about, ranked by how close you already are to winning them.
Save this list somewhere simple, like a note or a spreadsheet. Write the topic, the closest ranking page, and the competitor who owns the top spot. You will use it in the next step, and you will return to it every month. The free data read is the most underused part of RankSpot AI. Beginners who skip it write articles nobody searches for. Beginners who use it write articles with a real chance to rank.
Step 7: Get Your First Article Written from What Already Ranks
Now you are ready to write. This is the step most people picture when they think about how to use RankSpot AI. Pick one topic from your gap list, ideally a page-one gap where a competitor ranks but you do not. Tell your assistant the topic in plain language and ask it to draft an article based on what already ranks on Google. RankSpot studies the pages that hold the top spots, then builds your article from their structure, their subtopics, and the questions they answer.
Give the Agent a Clear Brief
Give the agent clear instructions in the same message. Name the audience, the length you want, and the tone. A good prompt looks like this: “Write a beginner-friendly article about [topic] for small business owners, about 1,500 words, based on the top-ranking pages. Use simple language, short paragraphs, and practical steps.” The more specific you are, the less editing you will do later. You can also ask for the article in more than 100 languages if your audience reads in another language.
Read the Draft Like an Editor
When the draft arrives, read it as an editor, not as a fan. Check every fact against the sources it used. Fix anything that sounds generic, because AI drafts love filler sentences that say nothing. Add one real example from your own work — a number, a client story, or a mistake you made. That single example is often what separates a page that ranks from a page that reads like every other AI article. This is also the moment to weave in context your readers need, such as how AI automation services can handle the repetitive parts of this workflow once you have more than a few articles to manage.
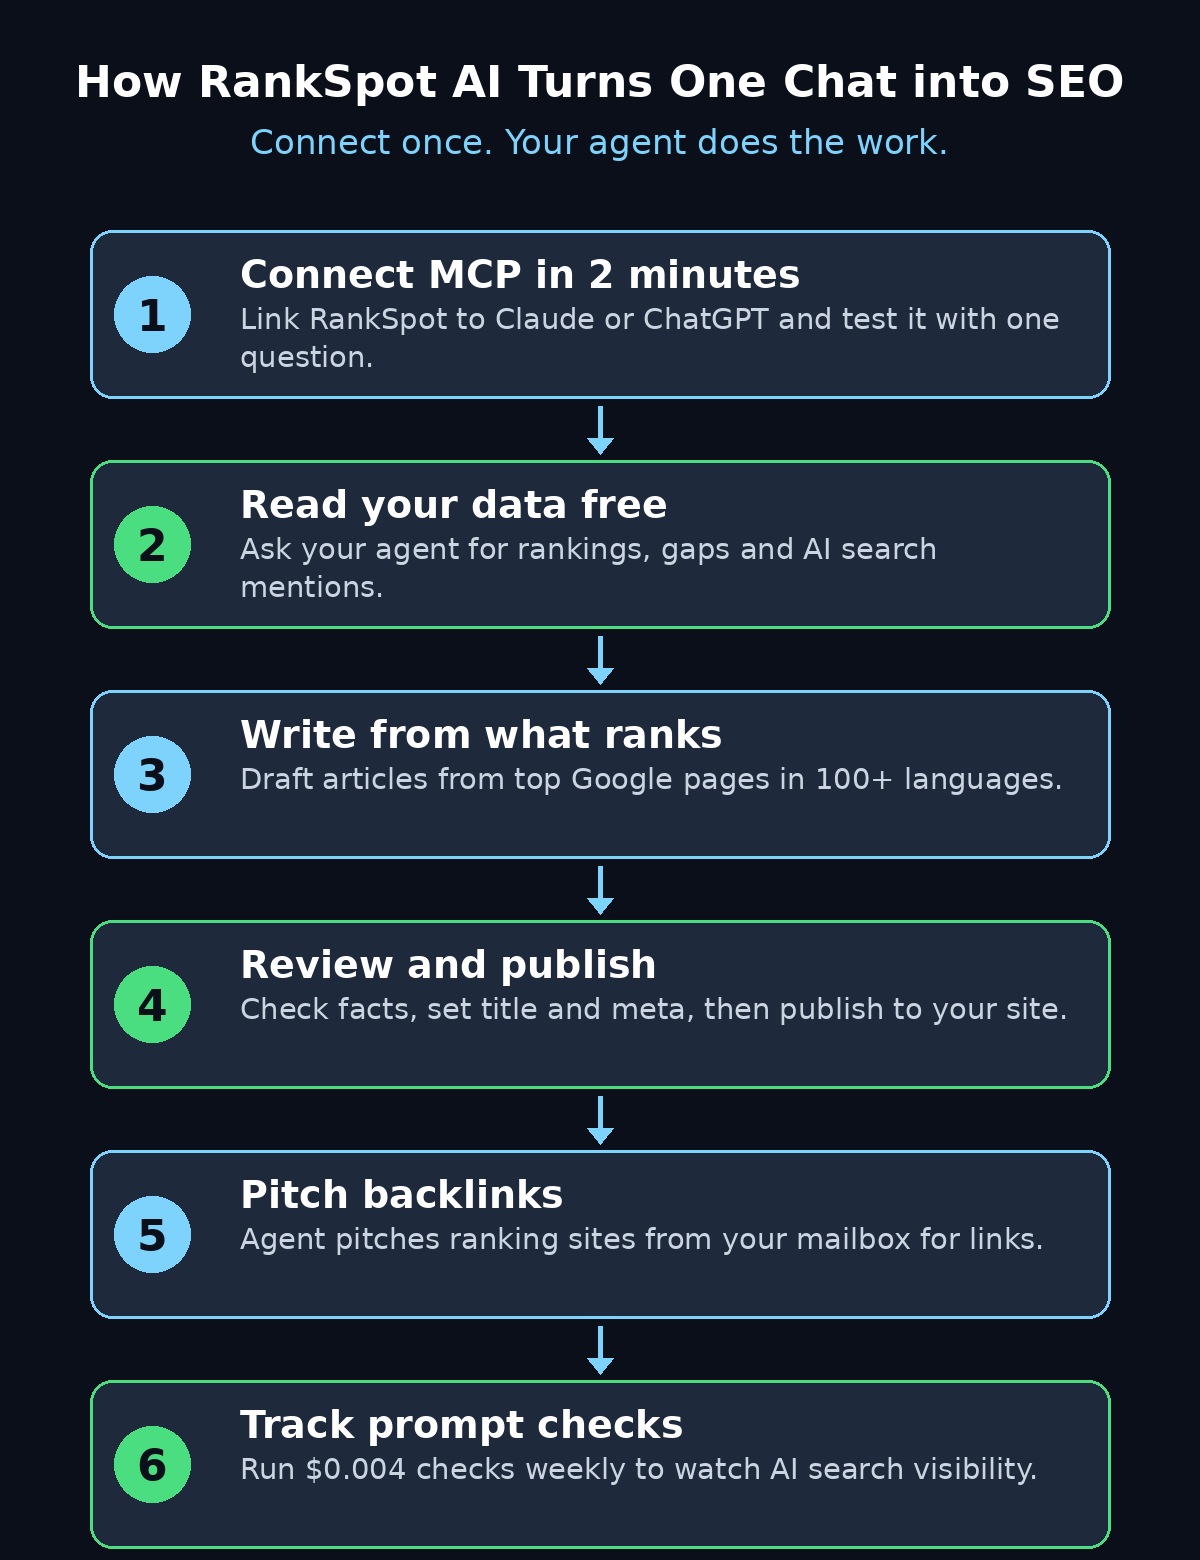
The diagram above shows the full loop: connect MCP, read your data, write from what ranks, review and publish, pitch backlinks, and track prompt checks. Every step after the connection is about verifying before you act, so your site grows on content you have actually read.
Step 8: Review, Edit and Publish the Article
Never publish an AI draft without reading it first. Anyone learning how to use RankSpot AI should treat this review step as non-negotiable. Open the draft and check four things. First, the facts: names, prices, dates, and claims must be correct. AI tools can invent details that sound right, and a wrong price in a published article hurts your credibility. Second, the structure: the article should answer the reader’s question in the first two paragraphs, then work through the steps in order. Third, the voice: cut any sentence that could appear in any article on any topic. Fourth, the links: add one or two links to your own related pages so readers can go deeper.
Once the draft reads well, publish it. RankSpot can publish the article to your site for you, or you can paste it into WordPress yourself. For your first article, publish it yourself. You will see exactly what goes live, and you will catch formatting problems before readers do. After the first two or three articles, switch to letting the agent publish, because by then you will trust the format.
After publishing, do three small jobs that most beginners skip. Set a clear SEO title under 60 characters. Write a meta description under 160 characters that states the benefit. Add one image with a descriptive file name and alt text. These three jobs take five minutes, and they are the difference between an article that ranks and an article that sits unread. Check the live page once in a normal browser, not just in the editor, so you see what readers actually see.
Step 9: Let the Agent Pitch Backlinks from Your Mailbox
Publishing is half the job. The outreach half is where how to use RankSpot AI gets interesting for small businesses. A new article with no links pointing to it ranks slowly, if it ranks at all. RankSpot pitches the sites that already rank for your topic and asks them to link to your article. The pitches go out from your mailbox, so replies land in your inbox, not in a tool you forget to check.
Before the first pitch goes out, set two rules with your assistant. First, only pitch sites that are genuinely relevant to your article. A link from a random directory is worth less than a link from one site your readers trust. Second, keep every pitch short and specific. A good pitch names the site owner’s article, says what your article adds, and asks for the link in one sentence. Long, flattering emails get deleted. Short, honest ones get answered.
Read the first five pitches before they are sent. Check the site name, the recipient, and the reason your article deserves the link. If a pitch feels like spam, rewrite the instruction and try again. Outreach is the one place where a bad AI habit can damage your reputation, because a real person reads it. Once the first five look good, let the agent run the rest, and check your inbox daily for replies. Answer every reply within a day. A fast, friendly reply turns a maybe into a link.
Step 10: Run Every Client or Business from One Chat
This step matters most for freelancers and agencies. RankSpot lets you run every client or business from one chat, which means you do not open a new dashboard for each site. Start a separate conversation thread for each client, and give the agent that client’s site, topics, and mailbox at the start of the thread. The assistant keeps the context separate, so client A’s articles never get published to client B’s site.
Set a simple weekly rhythm for each client. Monday: read the data and pick one gap topic. Tuesday: draft the article and review it. Wednesday: publish and send the pitches. Friday: run prompt checks and note any ranking movement. One article a week per client costs about $12 a month in article fees, plus a few dollars of prompt checks. That is a price you can quote to a client without a spreadsheet.
Keep one rule for multi-client work: never mix mailboxes. Pitches for client A must come from client A’s mailbox, with client A’s name on them. If a client has not given you mailbox access yet, pause their outreach and run the writing step only. Outreach from the wrong mailbox is the fastest way to lose a client and damage two reputations at once.
Step 11: Track Results with Prompt Checks
Rankings on Google are only half the picture now. Prompt checks are the part of how to use RankSpot AI that most beginners overlook. The other half is AI search: when someone asks ChatGPT or Perplexity a question in your niche, does your brand appear in the answer? RankSpot measures this with prompt checks. Each check costs $0.004, so a weekly batch of 50 checks costs about 20 cents.
Pick ten questions your customers actually ask, in their own words. Run the same ten questions every week. Record whether your brand appears, and whether the answer links to your site. Over a month, you will see a trend that Google Search Console cannot show you: your AI search visibility rising as your articles go live and your backlinks grow. If a question never mentions you after four weeks, that topic needs a better article or a stronger link, not more checks.
Pair prompt checks with the free ranking data. When a page climbs on Google and your brand starts appearing in AI answers for the same topic, the two channels are reinforcing each other. When they disagree — ranking well on Google but invisible in AI answers — the article probably answers the keyword but not the question behind it. Rewrite the intro to answer the question directly, in the first two sentences, and check again next week.
Step 12: Common Beginner Mistakes to Avoid
Four mistakes undo most beginners, and all four are easy to avoid. Keep this list beside you while you learn how to use RankSpot AI. The first is publishing without reading. An AI draft can contain a wrong fact, a broken promise, or a sentence that contradicts your own service. Read every article once, out loud if you can. Your ears catch awkward phrasing your eyes skip.
The second mistake is writing about topics nobody searches for. The free data read in Step 6 exists to stop this. If the data shows no demand and no gap, pick another topic. Your time is worth more than a beautifully written article nobody will ever find.
The third mistake is spammy outreach. Pitching a hundred sites with the same generic email burns your domain’s reputation and gets you marked as spam. Pitch ten relevant sites with a personal email instead. Ten good pitches beat a hundred bad ones, every single time.
The fourth mistake is expecting results in a week. SEO compounds slowly. A new article usually needs four to eight weeks to find its ranking, and backlinks take time to get answered. Judge RankSpot after two months of steady weekly publishing, not after two articles. If you stop after the first week, you paid for the learning and skipped the payoff.
RankSpot AI vs Traditional SEO Tools vs Doing It Manually
RankSpot AI is not the only way to do SEO, and the right choice depends on your budget and your time. Here is how the three paths compare for a beginner with one small website.
| Feature | RankSpot AI | Traditional SEO subscription | Doing it manually |
|---|---|---|---|
| Monthly cost to start | $0 subscription; $3 per article | $99 to $129 per month | $0, but hours of your time |
| Who does the work | Your AI agent, through MCP | You, using the tool’s data | You, end to end |
| Article writing | Built in, from ranking pages | Not included | You write every word |
| Publishing | Agent publishes for you | You publish yourself | You publish yourself |
| Backlink outreach | Agent pitches from your mailbox | You find and email prospects | You find and email prospects |
| AI search tracking | Prompt checks at $0.004 each | Often an extra paid add-on | Manual, one question at a time |
| Languages | 100+ languages | Usually English-first | Only the languages you speak |
| Best for | Beginners who want execution done | Experienced SEOs who like control | Zero budget and plenty of time |
| Watch out for | Review every draft before publishing | High fixed cost in quiet months | Slow, and easy to stall completely |
For a beginner who wants articles published and links pitched without learning a complex dashboard, RankSpot AI is the easiest starting point. If you enjoy the analysis and want full control over every detail, a traditional subscription may suit you better. If your budget is zero and you have more time than money, the manual path works — but set a weekly schedule, because manual SEO dies the moment you get busy.
Frequently Asked Questions About RankSpot AI
Is RankSpot AI really free to start?
Yes. There is no subscription, reading your own data is free, and you start with $1 of credit plus a free article. You only pay when you use it: $3 per article and $0.004 per prompt check. A small site publishing a few articles a month can run on a few dollars. Check the official pricing page before a big run, because launch offers can change.
Do I need Claude or ChatGPT to use RankSpot AI?
Yes. RankSpot works through your AI assistant, connected by MCP. You need a Claude or a ChatGPT account, and the connection takes about two minutes. Pick the assistant you already use every day. You do not need to know what MCP stands for or how it works under the hood — you paste the connection details once, test it with one question, and then you just chat.
Which languages can RankSpot AI write in?
More than 100 languages, according to the launch listing. The article is built from what already ranks on Google in your target language, so the research step works in that language too. If your audience reads in Urdu, Spanish, or any other language, ask for the draft in that language and review it with a native speaker before publishing.
Does RankSpot AI work with WordPress?
RankSpot publishes articles to your site, and WordPress is the most common setup for small business sites. For your first article, publish it yourself from WordPress so you can check the formatting on the live page. Once the format looks right, let the agent publish the next ones. If your site runs on another platform, check the publishing options in the RankSpot dashboard before you commit to a workflow.
Is the backlink outreach spammy?
It is only as good as the instructions you give it. RankSpot pitches from your mailbox, so a bad pitch reaches a real person with your name on it. Read the first five pitches before they go out, keep them short and specific, and only pitch sites that are genuinely relevant. Ten personal pitches beat a hundred generic ones, and they protect your domain’s reputation.
Can I use RankSpot AI for client work as an agency?
Yes. You can run every client or business from one chat, with a separate thread for each client. Keep each client’s site, topics, and mailbox in its own thread, and never mix mailboxes. At $3 an article, the cost is easy to quote to a client, and the weekly rhythm in Step 10 keeps several small accounts moving without a big team.
Final Thoughts
SEO used to mean dashboards, keyword lists, and hours of manual work. The full answer to how to use RankSpot AI is simpler than that old workflow: describe what you want, let your agent execute, and review everything before it goes live. RankSpot AI changes the shape of that work: you describe what you want in plain language, and your AI assistant does the execution — reading your data, writing from what ranks, publishing, and pitching for links. The launch numbers show the idea struck a chord: #2 Product of the Day on November 17, 2026, with 426 upvotes and 120 comments. But a good launch is not a good result. Your result comes from the routine: one gap topic a week, one reviewed article, a few honest pitches, and a weekly prompt check.
Start small and stay honest with yourself. Claim the free article, connect the MCP, and read your data before you write anything. Review the first draft like an editor, publish it yourself, and read the first five pitches before they go out. If the article climbs and your brand starts appearing in AI answers, you have a system worth scaling. That is how to use RankSpot AI the right way — as a fast assistant you supervise, not a button you press and forget.
Explore More Free AI Tools
Want more free AI tools that save you time and money? Try the AI Title Generator to write click-worthy headlines for your new articles, the Meta Description Generator to craft search snippets that earn the click, the AI Rewriter to refresh old pages in seconds, and the Keyword Density Checker to keep your RankSpot drafts on topic. All four are free on AIToolSteps — no sign-up needed.