

Every developer has felt the same frustration: you ask your AI coding assistant to build a beautiful interface, and it writes hundreds of lines of custom CSS and JavaScript from scratch. The result looks acceptable, but it is slow to build, hard to maintain, and different every single time. You end up with a project full of one-off buttons, cards, and chat windows that nobody can reuse. Kokonut UI AI exists to fix exactly that problem. It is a free, open-source library of more than 100 React components built specifically for coding agents, so your AI assistant installs polished, tested interface pieces instead of inventing them.
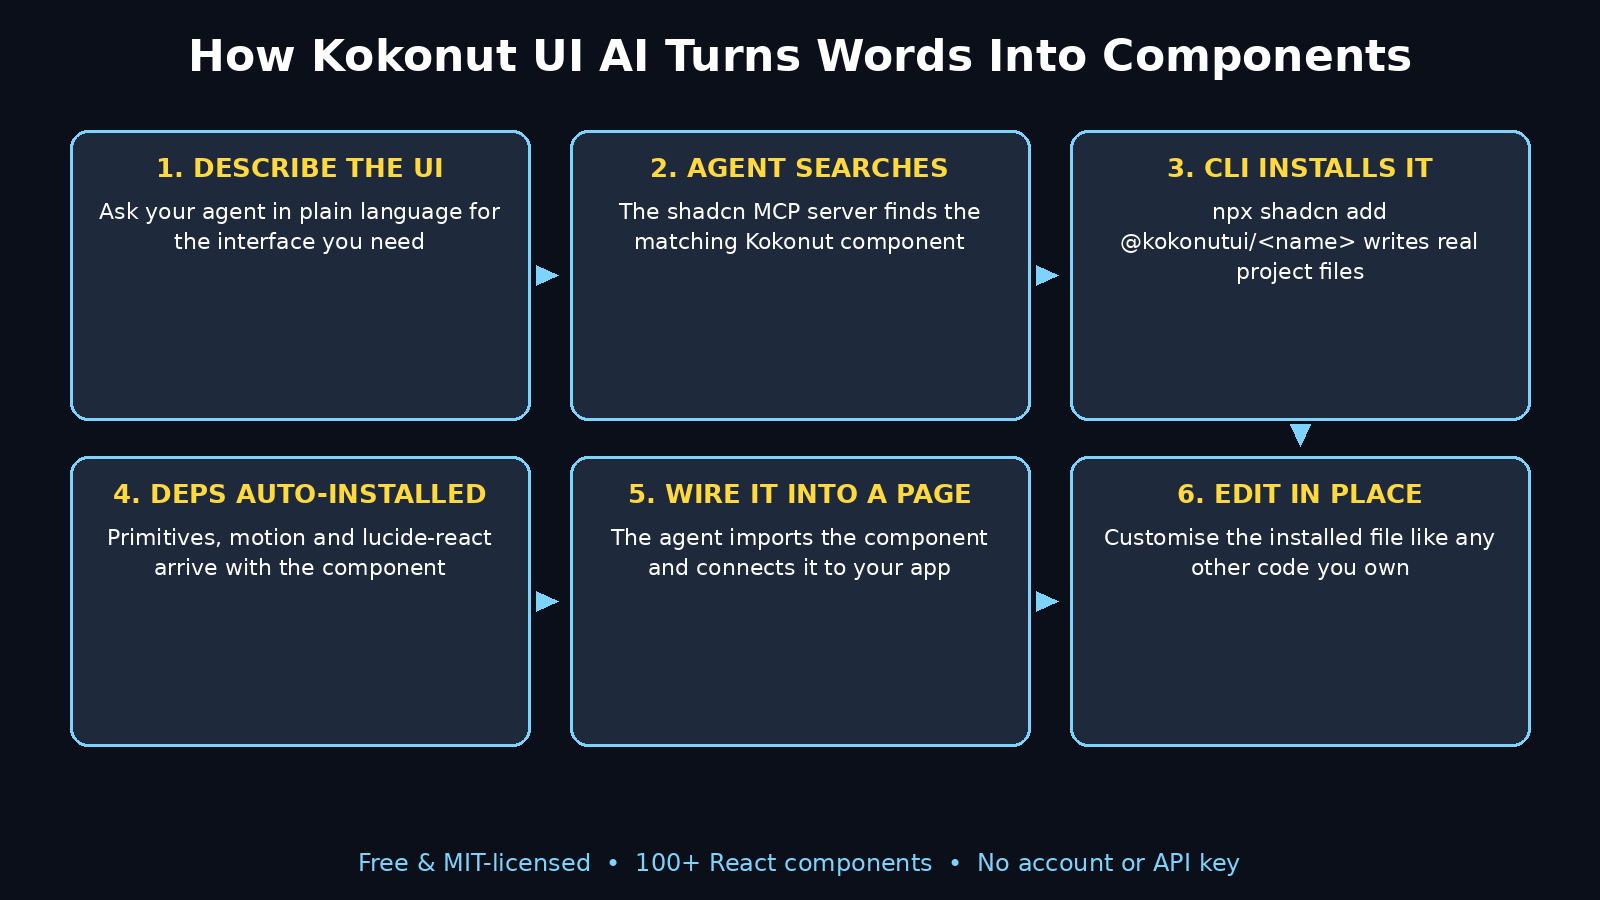
Kokonut UI is a shadcn/ui registry, which means it plugs into the workflow developers already use. You do not paste code from a website. You describe what you need in plain language, your agent finds the right component, and the shadcn CLI installs it into your project with all of its dependencies. The component becomes your own code, sitting in your project folder, ready to edit like any other file. And because the whole library is MIT-licensed and free, you can use it in personal projects, client work, and commercial products without paying anything or asking for permission.
In this beginner-friendly guide, you will learn how to use Kokonut UI AI from zero: setting up a project, adding the registry, connecting your AI agent through MCP, installing your first component with a single prompt, and customising the result. You do not need design skills, and you do not need to be a React expert. If you can run a terminal command and describe what you want in plain English, you can use Kokonut UI. It launched on Product Hunt on November 14, 2026, where it reached number 7 Product of the Day, and it is already becoming a favourite among developers who build with AI agents every day.
Step 1: Understand What Kokonut UI AI Actually Is
Kokonut UI is a collection of more than 100 React components designed for modern web apps, with a special focus on the parts AI products need most. The latest release added 65 new components and rebuilt 34 existing ones, led by AI chat parts: tool call displays, tool approval cards, diff review panels, and citation blocks. Those are the exact interface pieces that are painful to build by hand and that every AI chat app needs — the visual elements that show what the agent is doing, ask you to approve an action, or show what changed in a file.
The key idea is that Kokonut UI is built for agents, not just for humans. Every docs page is available as Markdown, there is an llms.txt index that lists every component, and a Copy Markdown button sits at the top of each page. That means your coding agent can read the documentation directly, without a browser, and install exactly the component you described. You stay in control, and the agent does the mechanical work.
Three facts matter for beginners. First, Kokonut UI components are styled with Tailwind CSS v4, so they fit naturally into a modern React project. Second, components are installed as source code in your project, not as a locked dependency — you own them and can change anything. Third, there is a separate paid product called Kokonut UI Pro with extra sections and a private registry, but everything in this guide uses the free public library, which needs no account and no API key.
Step 2: Check What You Need Before You Start
Before you install anything, make sure your computer and project are ready. You need Node.js installed, because the shadcn CLI runs on it. You need a React project — Next.js is the most common choice — with Tailwind CSS v4 set up, because Kokonut UI components are styled with Tailwind. And you need an AI coding tool that can run the shadcn CLI: Claude Code, Cursor, VS Code with an agent, or Codex all work.
- Node.js: Any recent LTS version works. If you can run
node --versionin your terminal and see a version number, you are ready. - A React project with Tailwind v4: If you are starting fresh, create a Next.js app and follow the Tailwind v4 setup. If you already have a project, confirm Tailwind v4 is installed before adding components.
- An AI coding agent: Claude Code is the best-documented option, but Cursor, VS Code, and Codex all work the same way, because they all speak the Model Context Protocol (MCP).
- No account needed: The free Kokonut UI registry needs no sign-up, no API key, and no credit card. You can start installing components in minutes.
If you have never used an AI coding assistant before, our guide to Claude AI is a good place to start, because the same prompting habits apply here: describe the outcome you want, not the code you think it needs.
Step 3: Set Up Your Project with shadcn and Tailwind
Kokonut UI sits on top of shadcn/ui, so your project needs the standard shadcn setup first. If your project already uses shadcn/ui, skip this step. If it does not, initialise it with the shadcn CLI, which walks you through the choices: the style, the base colour, and where your components should live. Accept the defaults unless you have a reason to change them, because Kokonut UI expects the standard layout.
The one file that matters most is components.json at the root of your project. It tells the shadcn CLI where to put components, which aliases your imports use, and which registries are available. Kokonut UI is added to this file as a registry under the @kokonutui namespace, which is what lets the CLI — and your agent — install components by name. You will do that in the next step, and after that the setup is done once and never needs repeating.
Take a minute to run your project after the shadcn setup and confirm it still builds. If the dev server starts and the page loads, your foundation is solid. Fixing a broken Tailwind or shadcn setup now is far easier than debugging it later, when a component install fails and you cannot tell whether the problem is the component or the project.
Step 4: Add the Kokonut UI Registry to components.json
This is the step that connects your project to the Kokonut UI library. Open components.json and add the @kokonutui namespace to the registries section, pointing at the public Kokonut UI registry. You only do this once per project. From then on, every component in the library is one command away.
With the registry in place, you can install any component by hand with a single command:
npx shadcn@latest add @kokonutui/<name>
Replace <name> with the component you want. The CLI writes the component to components/kokonutui/<name>.tsx and installs its dependencies automatically — the shadcn/ui primitives it builds on, like button or textarea, and the npm packages it needs, like motion for animations or lucide-react for icons. You never have to chase down a missing dependency yourself.
Try it once by hand before you hand the job to your agent. Pick a simple component, run the command, and watch the files appear in your project. That one manual install teaches you where components live and what the CLI does, which makes everything your agent does later easy to understand and check.
Step 5: Connect Your AI Agent with the shadcn MCP Server
Installing components by hand works, but the real power of Kokonut UI is letting your AI agent do it. That connection runs through the shadcn MCP server, which gives your agent tools to list, search, and install components from any registry in your components.json. For Claude Code, one command sets it up:
npx shadcn@latest mcp init --client claude
For any other client that speaks the Model Context Protocol, point it at npx shadcn@latest mcp. Then restart your editor and run /mcp in Claude Code to confirm the shadcn server is connected. If it shows up in the list, your agent can now browse the Kokonut UI registry on its own. This is the same agent-first pattern spreading across the whole AI tools world — if you want to see how far it goes, read about AI automation services and how teams now hand whole workflows to agents instead of doing them by hand.
The MCP connection changes the job completely. Instead of you searching docs, copying code, and fixing imports, you describe the interface you want and the agent finds the component, installs it with its dependencies, and wires it into your page. Learning how to use Kokonut UI AI with an agent starts with this connection: once the server is live, the agent can browse the whole registry for you. You review the result and ask for changes in plain language, the same way you would brief a junior developer.
Step 6: Add the Rules File So Your Agent Uses Kokonut First
An agent with MCP access can install Kokonut UI components, but without guidance it may still build things from scratch out of habit. A short rules file fixes that. For Claude Code, add the guidance to CLAUDE.md in your project root. The file tells your agent three things: this project installs components from Kokonut UI, a shadcn/ui registry set in components.json as @kokonutui; it should check Kokonut UI before building a component from scratch; and it should install with the shadcn CLI, never by pasting code.
That last rule matters more than it sounds. Pasted code drifts out of date, misses dependencies, and breaks when the library updates. Installed components stay consistent, because the CLI writes the real files and installs the real dependencies. The rules file also points your agent at the docs: https://kokonutui.com/llms.txt lists every component, and every docs page is available as Markdown, so the agent can read the exact usage and examples before it installs anything.
Keep the rules file short — a few lines are enough. Agents follow short, clear instructions far better than long policy documents, and you can always add a line later when you notice the agent doing something you would rather it did differently.
Step 7: Install Your First Component with One Prompt
Now the fun part. With the registry added, MCP connected, and the rules file in place, open your agent and describe what you need in plain language. For example: “Add a chat message component with tool call display and a citation block to the dashboard page.” Your agent will search the registry, find the matching components, install them with the shadcn CLI, and edit your page to use them.
Watch what the agent does on this first install. It should run the shadcn CLI command, write files under components/kokonutui/, install any missing npm packages, and import the components into your page. This is the moment when learning how to use Kokonut UI AI clicks into place: you describe, the agent installs, and you review. If it instead pastes a long block of code into your page, stop it and remind it of the rules file — install with the CLI, never paste. One correction now saves you from a project full of pasted code later.
Run your dev server and look at the result in the browser. The component should look polished immediately: proper spacing, readable text, and working interactions. If something looks off — a missing style, a broken layout — check first that Tailwind v4 is set up correctly, because unstyled components almost always mean the Tailwind setup, not the component, is the problem.
Step 8: Use the AI Chat Components
Kokonut UI’s strongest area is its AI chat components, and they are the reason the library is worth learning. Most AI apps need the same five interface pieces, and Kokonut UI ships all of them: chat messages, tool call displays that show what the agent is doing, tool approval cards that let you accept or reject an action, diff review panels that show exactly what changed in a file, and citation blocks that link claims back to their sources.
Build a small demo page that uses all five. Ask your agent for “a chat page with a message list, a tool call indicator, an approval card, a diff review panel, and citations.” Then use the page yourself: send a message, watch the tool call appear, approve or reject it, and read the diff. You will see immediately why these components matter — they turn a bare chat box into an interface people can trust, because every agent action is visible, explainable, and reversible.
These components also save you from the most common beginner mistake in AI app design: hiding the agent’s work. Users trust an AI assistant far more when they can see what it did and why. If you build client-facing AI tools for a living, that trust is the product — and it is one reason a digital agency can ship AI features faster with a component library like this instead of designing every screen from a blank page.
Step 9: Customise Components in Place
Installed Kokonut UI components are your code, not a black box. When a component is almost right but not quite — the wrong colour, too much padding, a missing prop — open the file in components/kokonutui/ and edit it directly. Change the Tailwind classes, adjust the layout, or add the behaviour you need. There is no wrapper to fight and no config file to learn; the component is a normal React file in your project.
That is the biggest difference between a registry like Kokonut UI and a traditional component library installed from npm. With npm, the component lives in node_modules and you cannot change it without forking the package. With Kokonut UI, the component lives in your codebase from the first install, so customisation is just editing a file. Keep your edits small and deliberate, though: the more you change, the harder it is to replace the component with a newer version later. Change what your design needs, and leave the rest alone.
A good habit is to install first, look at the result, and only then edit. Many beginners edit before they have seen the default, and end up undoing work the component already did well. Let the component show you its default state, then shape it to your design.
Step 10: Build a Full Page by Describing It
Once you trust single components, try a whole page. Once you know how to use Kokonut UI AI for single components, a full page is the natural next step. Describe the page you want in one paragraph: the layout, the sections, and the components each section needs. For example: “Build a pricing page with three tiers, a feature comparison table, an FAQ accordion, and a sticky call-to-action bar.” Your agent will break the request into components, install each one from Kokonut UI, and assemble the page.
Review the page section by section, not all at once. Check the pricing cards first, then the table, then the FAQ. Ask for changes in plain language — “make the middle tier stand out” or “add a badge that says Most Popular” — and let the agent edit the installed components. Because every piece is real project code, each change is small and reviewable, and you can stop at any point with a working page.
This is also the moment to test on a real phone. Open the page on your mobile browser and check that cards stack cleanly, text stays readable, and buttons are easy to tap. Kokonut UI components are responsive by design, but your page layout is your responsibility, and a quick mobile check catches the layout mistakes that look fine on a wide monitor.
Step 11: Fix the Common Problems
Four problems cover almost every beginner failure with Kokonut UI. First, the agent pastes code instead of installing: remind it of the rules file and ask it to install with the shadcn CLI. Second, the component looks unstyled: check your Tailwind v4 setup, because the component’s classes only work when Tailwind is processing them. Third, the MCP server does not appear in Claude Code: restart the editor after running the init command, then run /mcp to verify the connection. Fourth, an install fails with a registry error: confirm the @kokonutui namespace is in your components.json and that you typed the component name correctly.
If you see an error about a paid component, you have probably asked for a Kokonut UI Pro item. Pro is a separate private registry that needs an API key, and its components will not install from the free registry. Stick to the public library while you are learning, and only consider Pro when you have a specific paid section in mind and are ready to manage an API key.
When you are stuck, the docs are your best friend. Every page on kokonutui.com is available as Markdown, so you can copy a page and paste it into any AI chat for a precise answer, or hand your agent the llms.txt index and ask it to find the component that fits your need. The docs are written for agents as much as for humans, which is exactly why this library works so well with them.
Kokonut UI vs Other Ways to Build Interfaces
| Approach | Cost to start | Speed for a beginner | Customisation | Best for |
|---|---|---|---|---|
| Kokonut UI (free registry) | Free, MIT licence | Fast — agent installs in minutes | Full — components are your code | AI apps and agent-built interfaces |
| Building from scratch | Free | Slow — every piece hand-written | Total, but expensive in time | Unique designs nothing else covers |
| shadcn/ui alone | Free | Medium — solid basics, no AI chat parts | Full — same install-as-code model | General apps without AI features |
| Traditional npm UI kit | Free or paid | Fast to start | Limited — code locked in node_modules | Teams that accept the kit’s look |
| Hiring a designer | Paid | Slowest — brief, wait, revise | Total | Brand-critical flagship products |
The table makes the trade-off clear. Kokonut UI wins when you are building with an AI agent and need AI-specific interface pieces fast, with full freedom to edit them afterwards. It loses only when you need a completely unique design that no component library can provide — and even then, installing a close component and customising it is usually faster than starting from a blank file.
Frequently Asked Questions
Is Kokonut UI really free?
Yes. The public Kokonut UI library is free under the MIT licence, with more than 100 React components you can use in personal, client, and commercial projects. There is no account, no API key, and no credit card step for the free registry. Kokonut UI Pro is a separate paid product with extra sections and a private registry, but nothing in this guide needs it.
Do I need to know React to use Kokonut UI?
You need a basic understanding of a React project — how to run it and where files live — but you do not need to be an expert. Your AI agent does the installing and wiring; your job is to describe what you want and review the result. If you can use Claude Code or Cursor, you can use Kokonut UI.
How is Kokonut UI different from shadcn/ui?
Kokonut UI is built on shadcn/ui and uses the same install-as-code model, but it adds a much larger catalogue, including AI chat components like tool calls, approvals, diff review, and citations that shadcn/ui does not ship. Think of shadcn/ui as the foundation and Kokonut UI as the extra floors built on top of it, designed for AI apps.
Can I use Kokonut UI with Cursor or VS Code?
Yes. Any editor that speaks the Model Context Protocol works: connect the shadcn MCP server by pointing it at npx shadcn@latest mcp, add the registry to your components.json, and ask your agent in plain language. Claude Code, Cursor, VS Code, and Codex are all documented on the Kokonut UI agents page.
What happens to my components if Kokonut UI disappears?
Nothing. Installed components are files in your project, with their dependencies in your package.json. They keep working even if the registry goes offline, because your project no longer needs the registry after installation. You only need the registry when you install something new.
Final Thoughts
Kokonut UI AI solves a problem every developer building with AI agents has felt: the agent is fast at writing code but slow at designing interfaces, and hand-built UI does not scale. A free registry of more than 100 polished React components, installed by your agent through MCP in minutes, changes that equation. You describe the interface, the agent installs the pieces, and you edit real code in your own project when you want something different. Now you know how to use Kokonut UI AI from setup to a finished page.
Start small. Set up one project, connect the MCP server, add the rules file, and install a single chat component. Once you have seen that loop work, build a full page the same way. The habit you are building is the important part: check the library first, install instead of pasting, and customise only what your design actually needs. That habit will save you hours on every AI app you build from here on.
Explore More Free AI Tools
If you liked this guide, try our other free tools at AI Tool Steps: the AI Title Generator writes headlines that get clicked, the Meta Description Generator crafts search snippets under 160 characters, the AI Rewriter refreshes old content in a new voice, and the Keyword Density Checker shows whether your focus keyword appears often enough. They are all free, and they all work in your browser with no sign-up.