

Your AI coding agent just built a working app in an afternoon. The code runs perfectly on your laptop — and then you hit the wall every vibe coder knows: deploying it. A real deployment means a cloud account, a database, a cache, HTTPS certificates, environment variables, and a bill that keeps running even when nobody visits the app. That last step, the one between “it works on my machine” and “here is the live link,” is where most side projects quietly die. Ownkube AI was built to remove that wall completely. Launched as Ownkube Compute on Product Hunt on November 10, 2026, where it took the number one spot, Ownkube lets you paste a single line into Claude Code, Cursor, or Codex — and your agent deploys the whole app for you, database and cache included, on a live HTTPS address.
In this beginner-friendly guide, you will learn how to use Ownkube AI from zero: what it is, who it is for, how to set up your account, how to connect your coding agent, how to deploy your first app with one prompt, how to add a managed Postgres database, how to read logs and roll back a bad deploy, and how to control your spending. No cloud experience is needed and no AWS account is required — if you can chat with an AI coding agent, you can ship a live app with Ownkube AI.
Step 1: Understand What Ownkube AI Actually Does
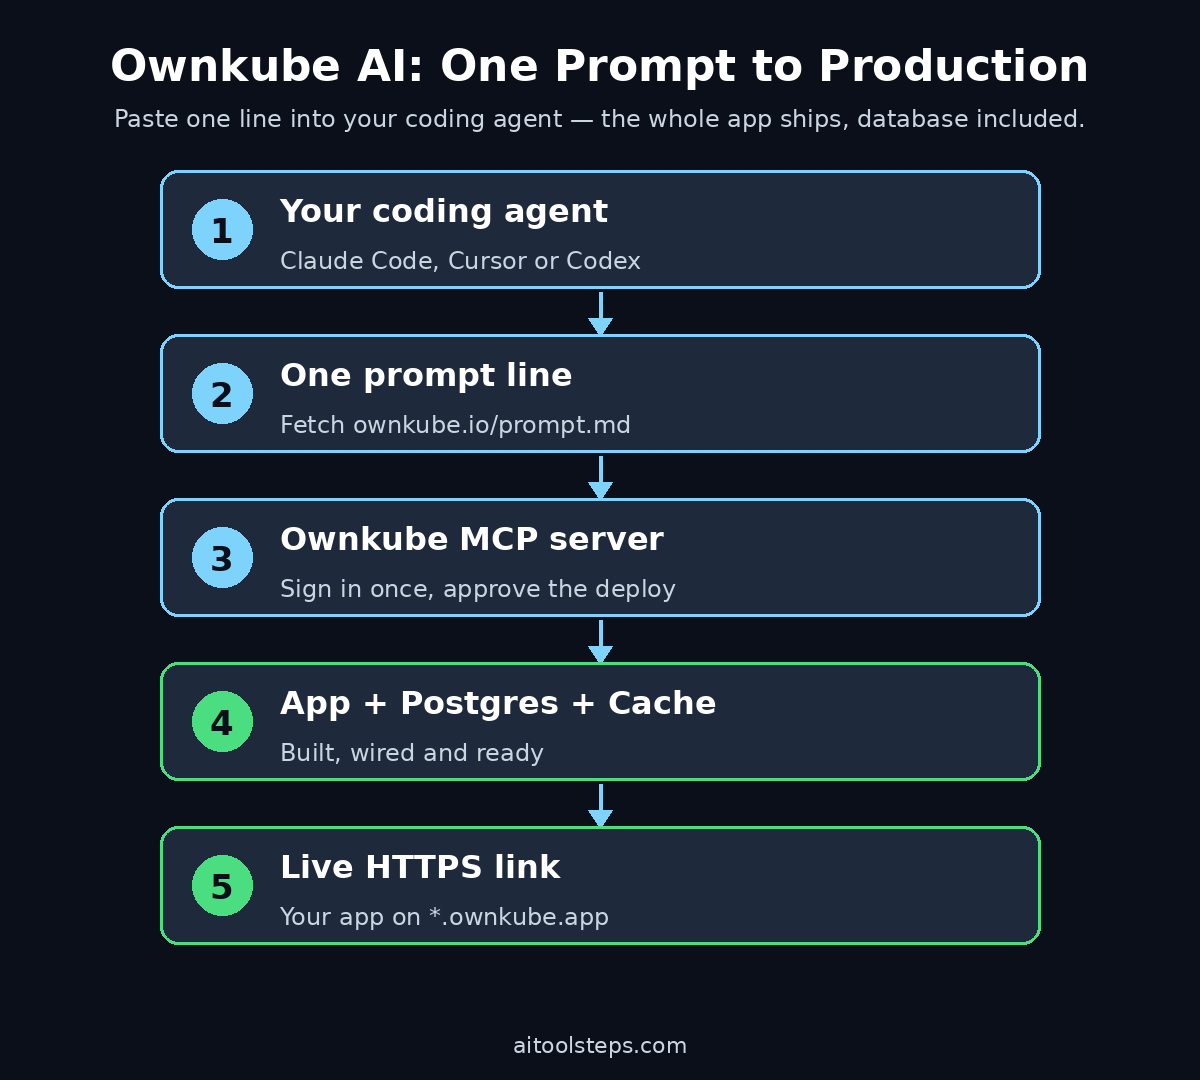
Ownkube AI is a developer platform that turns an AI coding session into a live deployment. The idea is simple: coding agents such as Claude Code, Cursor, and Codex are now very good at writing apps, but they cannot put those apps on the internet by themselves. Ownkube gives your agent the tools to do the last step — build the app, attach a database, issue an HTTPS address, and keep it running — without you ever opening a cloud console.
Here is the problem it solves. A production app needs more than code. It needs a server to run on, a Postgres database that does not disappear when the server restarts, a cache for speed, TLS certificates so the browser shows a padlock, logs so you can see what broke, and a way to roll back when a new version misbehaves. Setting all of that up on a traditional cloud takes hours of clicking through consoles and reading documentation, and it usually ends with a monthly bill for resources you barely use.
What You Get With Ownkube AI
Ownkube AI packages all of that into one platform:
- One-prompt deploys. Paste one line into your coding agent and it deploys the repository through Ownkube’s MCP server. You sign in once in your browser and approve the deploy — there is no API key to copy and paste.
- Managed Postgres and cache included. Your app gets a real managed Postgres database and a Valkey-compatible cache, wired in automatically, so you never configure a database server yourself.
- Free HTTPS on your own address. Every app gets a live address on
*.ownkube.appwith TLS issued automatically. No load balancer or certificate to set up by hand. - Per-minute billing from a prepaid wallet. You top up from $5, apps draw the wallet down by the minute for what they actually use, and an idle app costs almost nothing. Credit you top up never expires, and you can set a monthly cap that pauses apps when it is reached.
- Any language, any framework. If it runs in Docker, it runs on Ownkube — web apps, background workers, cron jobs, databases, and caches, in any language.
The team behind Ownkube started from a different angle than most hosts. Their original product let developers ship the same app into a customer’s own AWS account with no rewrite, so an indie developer could unlock an enterprise contract that required the software to run in the client’s cloud. Ownkube Compute adds the other half: apps and databases that run on compute Ownkube manages, so you can deploy before you ever open a cloud console.
Step 2: Check If Ownkube AI Fits Your Project
Ownkube AI is a great fit for a specific kind of builder, and a poor fit for others. A quick check now saves you a wasted setup later.
Ownkube AI is made for you if:
- You build apps with an AI coding agent such as Claude Code, Cursor, or Codex, and you want the agent to deploy them too.
- You are shipping a side project, a client demo, or a small product and you want a live link in minutes, not a weekend of cloud setup.
- Your app needs a real database — user accounts, saved data, orders — and you do not want to run Postgres yourself.
- You want usage-based billing, so a quiet hobby app costs almost nothing instead of a fixed monthly server bill.
- You sell software to clients who sometimes ask for the app inside their own AWS account — Ownkube deploys the same app there with no rewrite.
Ownkube AI is probably not the right pick if you need a static personal blog (a static host is cheaper), if your app must run in a specific data center with compliance paperwork, or if you already have a large team running complex infrastructure on a major cloud. For everyone building with coding agents, though, it is one of the fastest paths from code to a live URL in 2026.
If you run a digital agency that ships small apps and demos for clients, this model is especially useful: one prompt takes a prototype live for a client to click through, and the same app can later move into the client’s own AWS account when the contract requires it.
Step 3: Create Your Ownkube Account and Top Up $5
Everything starts at ownkube.io. There is no software to install on your computer to get started, and no cloud account to create first.
- Sign up. Open ownkube.io and create your account. Sign in happens in the browser with OAuth — there is no API key to copy anywhere in this flow.
- Open the dashboard. Your apps, databases, and caches live in the dashboard at app.ownkube.io, side by side, with logs and metrics built in.
- Top up your wallet. Ownkube bills from a prepaid wallet, with top-ups from $5. Personal is $5 a month and Team is $20 a month, and each loads that amount as wallet credit. Usage is billed per minute from the wallet, and unused credit never expires.
- Pick a region. Compute runs in two regions, Mumbai and Germany. Pick the one closest to your users — Germany for European visitors, Mumbai for South Asian visitors.
- Set a spending cap early. Before your first deploy, set a monthly cap in the dashboard. When the cap is reached, apps pause instead of running up a surprise bill. This one setting is the difference between a calm hobby project and an unpleasant invoice.
That is the whole account setup. There are no IAM roles, no VPCs, no security groups, and no YAML files to write before you can ship something.
Step 4: Connect Your Coding Agent to Ownkube AI
The magic of Ownkube AI is the connection between your coding agent and the platform. Your agent gets the whole platform as tools through an MCP server, so it can deploy, read logs, and roll back without you leaving your editor.
Ownkube works with Claude Code, Cursor, Codex, and any agent that supports MCP. The setup is the same idea in each one:
- Add the Ownkube MCP server to your agent. Follow the setup instructions on ownkube.io for your agent — the server exposes deployment tools to the agent, including creating apps, attaching databases, and reading logs.
- Sign in once. A browser tab opens and you sign in to Ownkube. There is no API key to copy into a config file, which also means there is no secret to leak into a repository by accident.
- Approve each deploy. Your agent proposes the deploy and you approve it. The agent does the work, but you stay in control — nothing ships without your say-so.
Once connected, your agent can also use the update_deployment tool to change settings such as autoscaling, and it can read your app’s logs when something breaks. That turns debugging from “open five browser tabs” into “ask the agent what the logs say.”
Teams that already use AI automation services to run agent workflows will recognize the pattern immediately: the agent is not just writing code any more, it is operating the infrastructure too, with a human approving each step.
Step 5: Deploy Your First App With One Prompt
This is the step the whole product is built around, and it genuinely takes one line. Open the repository of the app your agent built — a web app, an API, a small tool — and paste this into Claude Code, Cursor, or Codex:
Fetch https://ownkube.io/prompt.md and follow it to deploy this repo on Ownkube.
Here is what happens next, in order:
- Your agent reads the deploy instructions. The prompt file tells the agent exactly how to deploy on Ownkube, so you do not have to explain the platform yourself.
- You sign in and approve. A browser tab opens for sign-in if needed, and you approve the deploy. The agent then deploys the app through the MCP server.
- Ownkube builds the app. If your repo has a Dockerfile, Ownkube builds the image from it. If it has no Dockerfile, the automatic build detects the language — Python, for example — and builds an image for you.
- You get a live HTTPS address. Ownkube allocates a hostname on
*.ownkube.appand issues TLS automatically. Your app is live at that address within minutes.
If you prefer the command line, Ownkube also ships an okctl CLI. From your project directory, okctl up --name my-app --port 8000 builds and deploys the current directory, and running it again ships the next version. The dashboard also lets you connect a GitHub or GitLab repo so every push deploys automatically.
For a first test, use a tiny app — a “hello world” page or the demo your agent already built. Seeing the full loop work once, from prompt to live link, makes every later deploy feel routine.
Step 6: Add a Managed Postgres Database
Most real apps need to remember things: user accounts, saved items, form submissions. That is what the managed Postgres database is for, and Ownkube wires it in without you touching a database server.
- Create the database from the dashboard. Go to New, then Database, then Postgres. Ownkube provisions a managed Postgres database next to your app.
- Or ask your agent. In the same chat where you deployed, ask the agent to add a Postgres database to the app. It uses the MCP tools to create it and connect it.
- Point your app at it. Your app reads the connection from its environment — usually a
DATABASE_URLvariable. In a Django app, for example, you pointDATABASE_URLat the managed database with a library like dj-database-url. - Run migrations as a job. Create a Job deployment from the same repository with a command such as
python manage.py migrate --noinputand no schedule, so migrations run once per release instead of on every container start.
A practical example: if your agent built a Django app, swap the development server for Gunicorn, serve static files with WhiteNoise, add the managed Postgres database, and run migrate as a one-off job. Ownkube covers all four without a cloud account or hand-written YAML. The same pattern works for FastAPI — run Gunicorn with Uvicorn workers, set configuration through environment variables, and add a health check endpoint so Ownkube knows the app is alive.
Step 7: Add a Cache and Environment Variables
Once the app and database are live, two more pieces make it feel like a real product: a cache and proper configuration.
- Add a Valkey cache. Ownkube offers a Valkey-compatible cache alongside your app and database. Attach it the same way you attached Postgres — from the dashboard or through your agent — and use it for sessions, rate limiting, and anything you read far more often than you write.
- Set environment variables in the dashboard. API keys, database URLs, and feature flags belong in environment variables, never hard-coded in your repository. Set them in the dashboard or through your agent, then redeploy so the app picks them up.
- Keep secrets out of git. Because Ownkube signs you in with OAuth and has no API key to copy, there is one less secret to leak — but your own app’s keys still need the same care. If a key ever appears in a commit, rotate it immediately.
- Use a Dockerfile for control. A Dockerfile gives you control over the language version, system packages, and build steps such as collecting static files. For simpler apps without native dependencies, the automatic build is enough.
With the app, database, cache, and environment variables in place, you have everything a real production app needs — builds, databases, logs, and rollbacks in one dashboard.
Step 8: Read Logs, Roll Back and Fix a Failed Deploy
Deploys sometimes fail, and that is normal. What matters is how fast you can see what happened and undo it. Ownkube keeps logs and metrics in the same dashboard as your app, and your agent can read them too.
- Check the build log first. Most failures are build failures: a missing dependency, a wrong start command, or a Dockerfile step that failed. The build log names the exact step.
- Ask your agent to read the runtime logs. If the app builds but crashes or returns errors, ask your agent to fetch the logs through the MCP server. It can usually spot the cause — a missing environment variable is the classic one — and fix it in the same session.
- Roll back from the dashboard. If a new version misbehaves in production, roll back to the previous deployment instead of debugging live. Rollbacks are built in, so a bad release is a one-click undo, not an emergency.
- Verify the health check. Add a simple health check endpoint to your app so Ownkube can tell a healthy deployment from a broken one. For a FastAPI app, a
/healthroute that returns 200 is enough.
A good habit: after every deploy, open the live URL yourself and click through the main flow once. Agents are fast, but your own eyes catch the broken button that logs never mention.
Step 9: Set a Spending Cap and Turn On Autoscaling
Per-minute billing is cheap for quiet apps, but you should still set guardrails before real users arrive.
- Confirm your monthly cap. Set the cap in the dashboard so apps pause when spending reaches it. Because idle apps cost almost nothing, a $5 top-up goes a long way for a hobby project — but the cap is what makes that a guarantee instead of a hope.
- Watch the dashboard metrics. Logs and metrics are included, so check CPU and memory after your first real traffic. If the app is constantly near its limit, it needs more resources; if it is idle all day, it needs fewer.
- Turn on horizontal autoscaling for uneven traffic. When traffic spikes — a Product Hunt launch, a viral post — Ownkube can add instances under load and scale back down when it is quiet. Turn it on through your coding agent with the
update_deploymentMCP tool or through the API, with a minimum and maximum replica count and a CPU target such as 70 percent. - Remember the wallet never expires. Credit you top up never expires, so there is no pressure to use it up. Top up $5, ship the app, and let the balance sit until traffic arrives.
Step 10: Ship the Same App to a Customer’s AWS Account
This is the feature Ownkube started with, and it is the one that turns a side project into a business. Some customers — especially larger companies — will not use software that runs in someone else’s cloud. They want the app inside their own AWS account, under their own security rules. Normally that means rewriting the deployment from scratch. With Ownkube, you deploy the same app there with no rewrite.
- Keep the same repository. The app, the Dockerfile, and the configuration do not change. Ownkube handles the difference between its own managed compute and the customer’s AWS account.
- Deploy into the customer’s cloud. From the same project, target the customer’s AWS account. Logs and metrics are included there too, so you can still support the app after it moves.
- Use it to unlock enterprise contracts. “It runs in your own AWS account” removes the most common objection in enterprise sales calls. For freelancers and small agencies, that single sentence can be the difference between a lost deal and a signed contract.
- Start on Ownkube Compute, move when ready. The sensible path is to launch on Ownkube’s managed compute first — it takes minutes — and move into the customer’s cloud only when a contract asks for it. You never pay the migration cost up front.
That two-sided model is what makes Ownkube AI different from a plain host: it is a cloud for personal software on one side, and a deployment tool for client work on the other.
Ownkube AI vs Other Ways to Deploy
How does Ownkube AI compare with the other ways beginners usually deploy an app? The table below keeps it simple.
| Option | How you deploy | Database included | How you pay | Best for |
|---|---|---|---|---|
| Ownkube AI | One prompt to your coding agent, or the okctl CLI | Yes — managed Postgres + Valkey cache | Prepaid wallet, billed per minute from $5 | Agent-built apps you want live in minutes |
| Vercel / Netlify | Git push or dashboard import | Separate add-on, extra setup | Monthly plan or usage tiers | Frontend sites and serverless apps |
| Render / Railway | Git push or dashboard | Yes, as a paid add-on service | Monthly per-service pricing | Small full-stack apps with a dashboard |
| AWS directly | Console, CLI, or infrastructure code | Yes, but you configure it yourself | Pay per resource, always-on costs | Large teams with cloud expertise |
| Your own VPS | SSH, install everything by hand | You install and maintain it | Fixed monthly server cost | Developers who want full control |
The honest summary: if your app is a static site, a simpler host is fine. If your app was written by a coding agent and needs a database, Ownkube AI removes the most steps between finished code and a live link — and it is the only option in this list that can also drop the same app into a customer’s AWS account with no rewrite.
Frequently Asked Questions
Is Ownkube AI free?
There is no monthly subscription to start. You top up a prepaid wallet from $5 and apps are billed per minute for what they actually use, so an idle app costs almost nothing. Top-up credit never expires, and you can set a monthly cap that pauses apps when it is reached. Personal is $5 a month and Team is $20 a month, each loading that amount as wallet credit.
Do I need an AWS account to use Ownkube AI?
No. On Ownkube Compute, your apps and databases run on compute that Ownkube manages, so you can deploy before you ever open a cloud console. You only touch AWS when a customer asks for the app inside their own AWS account — and even then, Ownkube deploys the same app there with no rewrite.
Which coding agents work with Ownkube AI?
Claude Code, Cursor, and Codex are the headline options, and any agent with MCP support can connect. Paste the line Fetch https://ownkube.io/prompt.md and follow it to deploy this repo on Ownkube into your agent, sign in once in the browser, and approve the deploy.
What can I deploy on Ownkube AI?
Web apps, background workers, cron jobs, Postgres databases, and Valkey caches, in any language — if it runs in Docker, it runs on Ownkube. Connect a GitHub or GitLab repo to deploy on every push, or deploy a container image you already built.
Can I move my app off Ownkube later?
Yes. Your code stays in your own repository, your data stays in standard Postgres, and a Dockerfile-based app can be deployed anywhere that runs containers. Ownkube also supports the reverse move — deploying the same app into your own or a customer’s AWS account — so you are never locked into one place to run it.
Where do my apps run?
Ownkube Compute runs in two regions: Mumbai and Germany. Pick the region closest to your users when you create the app, and check the dashboard metrics if you are unsure which one your visitors actually come from.
Final Thoughts
Ownkube AI solves the least glamorous problem in the age of AI coding: the last mile between finished code and a live link. Coding agents can already write an app in an afternoon, and Ownkube lets the same agent ship it — database, cache, HTTPS, logs, and rollbacks included — with a single prompt and a $5 wallet top-up. The per-minute billing means a quiet side project costs almost nothing, the spending cap means it can never surprise you, and the bring-your-own-cloud option means the same app can grow into client and enterprise work without a rewrite.
If you have an app sitting on your laptop right now that only you have ever seen, today is a good day to ship it. Connect your agent, paste the one line, approve the deploy, and send someone the link. That feeling — your app, live, on a real address, minutes after you decided to ship it — is exactly what Ownkube AI is for. Start small, set your cap, and let the agent do the deploying while you get back to building.
Explore More Free AI Tools
Want to keep building with free AI tools? Try the AI Title Generator to name your next launch, the Meta Description Generator to write search snippets that earn clicks, the AI Rewriter to polish your app’s landing page copy, and the Keyword Density Checker to keep your pages SEO-friendly. Every tool is free, and every guide on AI Tool Steps walks you through it step by step.