
What Is AutoDirector AI?
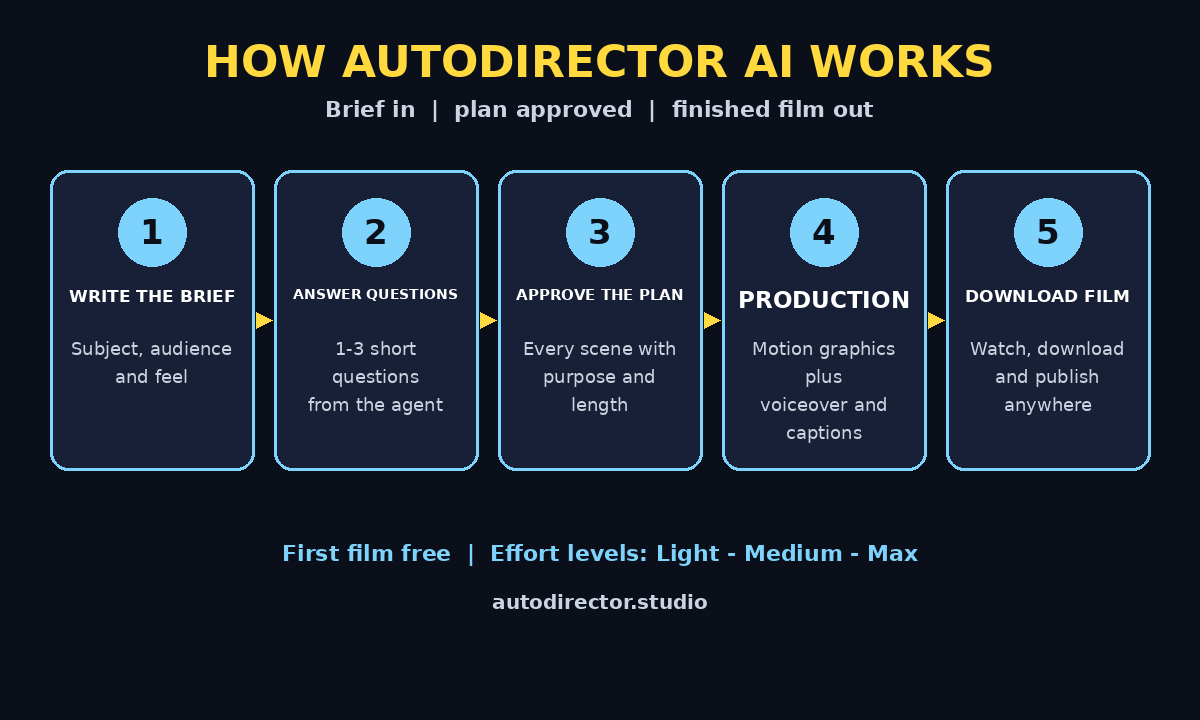
AutoDirector AI is a free-to-start AI video studio that turns a written brief into a finished film. You describe the video you want, answer one to three short questions, review a scene-by-scene plan, and approve it — only then does production begin. It launched on Product Hunt on November 9, 2026, and your first film is free.
Unlike prompt-only video generators that hand you a single clip and leave you to assemble the rest, AutoDirector works like a small production studio. It plans your scenes, fills gaps with motion graphics, adds optional voiceover and captions, and delivers a finished video you can watch in your workspace and download. You can make product videos, animated explainers, brand stories, and short social videos — no camera, no editing timeline, and no video-editing experience required.
This guide shows you how to use AutoDirector AI from your first brief to your first download, step by step, so your first film comes out looking like it was planned by a professional — because, in a way, it was.
Step 1: Open AutoDirector and Create Your Free Account
Start by visiting autodirector.studio in your browser. The home page shows a simple prompt box with the line “Describe the film you want to make” and a sample brief to spark ideas. Click through to sign in or create an account — you will need to be signed in before you can add your own footage or start a production.
Before you write anything, decide what your film is for. AutoDirector asks you to state three things up front: the subject, the audience, and the feel. A clear answer here saves you revision rounds later. For example, instead of “a video about my shop,” try “a 30-second product video for busy parents, warm and upbeat, showing how our lunchbox keeps food hot until school lunch.”
- Subject: what the film is about, in one sentence.
- Audience: who is watching, and what you want them to do next.
- Feel: the mood — playful, serious, luxurious, friendly, dramatic.
Your first film is free, so this is the perfect moment to experiment. If you are learning how to use AutoDirector AI for the first time, pick a low-stakes idea for your first run — a short social clip rather than your big launch video — and learn the workflow before you spend credits on the real thing.
Step 2: Write a Clear Brief for AutoDirector AI
The brief is the most important thing you will write in this entire process. AutoDirector builds everything from it, so a vague brief gives you a vague film. Write your brief the way you would explain the video to a human director: what happens, in what order, and how it should feel.
A good brief has four ingredients. First, the goal: what should the viewer think, feel, or do after watching? Second, the story in two or three sentences — a beginning, a middle, and an ending. Third, the visuals you already have in mind, such as a product shot, a logo moment, or a before-and-after. Fourth, the tone and pace: fast and punchy for social media, slow and confident for a brand story.
The site itself shows how specific a brief can be. Its demo brief reads: “Light a black hole’s disk and let gravity bend it over the top and under the shadow, then land: Where light bends.” Notice how it describes a visual, a movement, and a landing line. You do not need poetry — but you do need specifics.
- Keep it to three to five sentences for a short social video.
- Name the product, place, or person exactly as it should appear on screen.
- State the call to action: visit a website, try a free trial, follow the page.
- Mention anything you do NOT want, such as a colour, a claim, or a style.
If you run a small business and the brief is part of a bigger launch, a digital agency can help you turn one finished film into a full campaign — but for the film itself, AutoDirector and a good brief are all you need.
Step 3: Answer the Agent’s One to Three Questions
Before writing your plan, the AutoDirector agent asks one to three short questions it needs answered. These are not a quiz — they are the gaps in your brief. Typical questions are who the film is for, whether you want narration, and what length or format fits your platform.
Answer each one honestly and simply. If you are unsure, pick the option closest to your goal; you can still edit the plan afterward. This question round is one of AutoDirector’s biggest advantages over one-shot video generators: it catches misunderstandings before any footage is made, instead of after you have already spent credits.
Think of it as the director’s pre-production meeting. A human studio would ask the same questions across a week of emails. Here it takes less than a minute, and the answers go straight into the plan. Answering well is a quiet but important part of how to use AutoDirector AI — it catches misunderstandings before any footage is made, instead of after you have spent credits.
Step 4: Review and Edit the AutoDirector AI Scene Plan
After your answers, AutoDirector writes a plan that lists every scene with its purpose and length. This is your control point — nothing is produced until you approve it. Read the plan slowly, scene by scene, and ask three questions about each one:
- Does this scene earn its place? Every scene should move the story or the sale forward. Cut anything that only fills time.
- Is the order right? The hook belongs in the first three seconds, the proof in the middle, and the call to action at the end.
- Is anything missing? A product close-up, a price, a logo moment, or a line you promised in the brief.
You can edit the plan directly or ask for a rewrite of a single scene. Do not rush this step. Fixing a sentence in the plan is free; fixing a finished film costs time and credits. If a scene feels wrong, say so in plain words — “make scene two shorter and funnier” works better than a technical instruction.
Once the plan reads the way you want, approve it. Production starts only after your approval, so there are no surprise renders and no wasted credits.
Step 5: Pick Your AutoDirector AI Effort Level — Light, Medium, or Max
Before production, you choose an effort level for the same agent: Light, Medium, or Max. A higher level spends more thought and more self-review on each scene. These are not separate plans or payment tiers — they are how much care the agent takes over the same film.
Here is a simple way to choose:
- Light: quick drafts, social experiments, and first tests of an idea. Fast and cheap on credits.
- Medium: the everyday choice for product videos and explainers you actually plan to publish.
- Max: your hero video — a launch film, a brand story, or anything where quality matters more than speed.
For your very first film, Medium is the sweet spot. It gives you a real sense of what the studio can do without over-investing in an idea you are still testing. Save Max for the film you have already proven with a Light or Medium draft. Choosing the right level is a small but important part of how to use AutoDirector AI for a publish-ready result.
Step 6: Add Your Own Footage, Images, or Music to AutoDirector AI (Optional)
AutoDirector works with or without your own material. If you upload nothing, the film is built entirely from motion graphics. If you do upload, you can add supported images, videos, and music in the composer after signing in.
Your own footage makes the biggest difference to realism. A real product shot, a real workspace, or a real customer moment beats any generated visual for trust. Upload your best material and let the motion graphics fill the gaps between your clips.
Two rules to remember. First, you must have the rights to use anything you upload — use your own photos and videos, or properly licensed stock. Second, uploaded video clips play muted: the film’s sound comes from its music and narration, not from your clip’s original audio. Plan around that — if a clip’s spoken words matter, turn them into narration text instead.
- Product photos work best on clean, bright backgrounds.
- Short clips (a few seconds each) cut together better than one long take.
- Your logo as an image file helps the studio place your brand consistently.
- Music you upload should match the mood you named in your brief.
Step 7: Turn Voiceover and Captions On or Off
Voiceover is available as a managed option in the composer, but it is off by default — you choose whether your film speaks. Captions follow the produced narration, so when voiceover is on, viewers can follow along with the words on screen.
For most beginners, turning voiceover on is the right call. A calm, clear narration carries an explainer or a product video, and captions make it watchable with the sound off — which is how most people scroll through social feeds. Check the available languages and voice options shown before you start, and pick the one that matches your audience.
If your film is a music-led brand piece or a visual mood film, leave the voiceover off and let the music and motion do the work. Either way, decide before production: changing your mind afterward means a new render.
Step 8: Approve AutoDirector AI Production and Let It Build
With the plan approved, the effort level set, your materials uploaded, and the voiceover choice made, you start production. This is the moment AutoDirector does the heavy work: it builds each scene from your plan, assembles the motion graphics and your footage, mixes in the music and narration, and renders the finished video.
You do not need to watch it render. The film appears in your workspace when it is ready, and the whole point of the plan-approve workflow is that you already know what is coming — the production step executes the plan you signed off on.
Production usage varies with your brief, its length, your production settings, and the work required, and credits pay for production services. That is why the planning steps matter so much: a tight plan means a clean first render and fewer paid revisions.
Step 9: Review, Revise, and Request Changes
Watch your finished film from start to finish, ideally twice — once for the story and once for the details. Check the spelling of any on-screen text, the pacing of each scene, the volume balance between music and narration, and whether your product or logo appears clearly.
If something is off, revise it. The studio process includes revisions, and a specific note gets a better fix than a vague one. Compare these two requests: “make it better” gives the agent nothing to work with, while “scene three is two seconds too long, cut the last line, and make the music quieter under the voiceover” tells it exactly what to change.
Keep a short checklist for every review:
- Is the hook clear in the first three seconds?
- Does every scene match the plan you approved?
- Is all on-screen text spelled correctly?
- Does the call to action appear at the end?
- Would you share this video yourself?
If the answer to that last question is no, do not publish it — revise it. Reviewing carefully is how to use AutoDirector AI without wasting credits on avoidable re-renders, and one more revision round is always cheaper than a video that makes your brand look careless.
Step 10: Download and Publish Your Finished AutoDirector AI Film
When the film is right, watch it in your workspace and download it. You now own a finished video file you can publish anywhere: your website, YouTube, TikTok, Instagram, Facebook, or LinkedIn. Cut it to the right shape for each platform — a vertical version for Reels and Shorts, a square version for the feed, a wide version for YouTube — and write a caption that repeats the call to action from your brief.
Keep Publishing After Your First AutoDirector AI Film
Do not stop at one video. The fastest way to improve is to make your second film the same week, while the workflow is fresh. Reuse what worked — your brief structure, your effort level, your music choice — and change one thing, such as a stronger hook or a tighter plan. Small experiments compound quickly, and by your third or fourth film you will know exactly how to brief the studio for the result you want.
Teams that publish regularly often pair a tool like this with the wider world of agentic AI — AI agents that research, plan, and produce work with less hand-holding every month. AutoDirector is a good first taste of that shift: you direct, the agent produces.
| Method | Skill needed | Time to first film | Scene plan review | Own footage | Cost to start |
|---|---|---|---|---|---|
| AutoDirector AI | None — write a brief | One sitting | Yes, approve before production | Yes, optional | First film free |
| Traditional video editor | Months of practice | Days to weeks | You plan it yourself | You shoot it yourself | Software + camera costs |
| Prompt-only video generator | Prompt writing | Minutes per clip | No — one clip at a time | Usually no | Free tier, then credits |
| Hiring a video studio | None — you brief them | One to two weeks | Yes, over email rounds | Yes, they film it | Hundreds to thousands |
The table makes the trade-off clear. AutoDirector is not a replacement for a professional studio on a flagship brand film, and it is not a toy clip generator either. It sits in the middle: studio-style planning and review, at the speed and price of an AI tool. For product videos, explainers, and social content, that middle ground is exactly where most beginners should start.
Frequently Asked Questions
Is AutoDirector AI free?
Your first film is free. After that, credits pay for AutoDirector production services, and usage varies with your brief, its length, production settings, and the work required. Review the current plans and credit terms on the site before purchasing anything.
Do I need video editing experience to use AutoDirector AI?
No. You write a brief in plain words, answer one to three short questions, and approve a scene plan. There is no timeline to learn, no keyframes, and no rendering settings to understand. If you can describe a video to a friend, you can brief AutoDirector.
Can I use my own footage, images, and music in AutoDirector?
Yes. After signing in, you can add supported images, videos, and music in the composer. You must have the rights to use anything you upload. Note that uploaded video clips play muted — the film’s sound comes from its music and narration — and without uploads the film is built entirely from motion graphics.
What kinds of videos can I make with AutoDirector AI?
Product videos, animated explainers, brand stories, and short social videos. Start from a written brief, choose your production settings, and review the result in your workspace. The results depend on your brief, the materials you provide, and the supported production capabilities.
What is the difference between Light, Medium, and Max effort levels?
They are effort levels for the same agent, chosen per film before you start. A higher level spends more thought and more self-review on each scene. They are not separate plans or payment tiers. Use Light for quick drafts, Medium for everyday publishing, and Max for your most important films.
Can I edit the scene plan before anything is made?
Yes — and you should. The plan lists every scene with its purpose and length. You can edit it directly, ask for a rewrite, or approve it. Production starts only after you approve, so nothing is made until you say so.
Final Thoughts
AutoDirector AI is one of the most beginner-friendly video tools to launch in November 2026, and the reason is its workflow, not its effects. The brief, the questions, and the scene plan turn video-making from a technical skill into a communication skill: if you can explain what you want, the studio can build it. Your first film is free, so the cost of learning is zero — the only thing you risk is an afternoon.
Start small, approve the plan carefully, pick Medium effort for your first real film, and publish it. Once you know how to use AutoDirector AI, the next step is simply to make your second film. Then make another one. Video is no longer the hardest content format to produce; it is now one of the fastest, and the creators who learn that first will have the biggest advantage. Your next film is one brief away.
Explore More Free AI Tools
Want more free AI tools to grow your content? Try the AI Title Generator, Meta Description Generator, AI Rewriter, and Keyword Density Checker — free tools from AI Tool Steps to help you write, polish, and rank your content faster.