

Video editing has always been the slow part of making content. You write a script, record a clip, then spend hours inside After Effects or CapCut cutting, timing, and fixing small details. Most beginners never finish a video because the editing takes longer than the idea. YouArt Desktop App AI changes that job. It is an AI creative teammate that lives on your computer. You describe the video you want in plain words, and it opens your editing apps and does the work for you.
YouArt launched on Product Hunt on November 12, 2026, and finished the day as the #2 Product of the Day with 306 upvotes. The idea is simple but different from most AI video tools. Instead of generating a finished clip in a browser tab, it works as an agent on your own machine. It pulls your local files and context from Slack, Gmail, and GitHub onto one canvas. Then it uses computer use to operate After Effects, CapCut, and Blender directly, the same apps a human editor would open. You bring your own API keys, and smart routing sends every shot to the cheapest provider. In this beginner-friendly guide, you will learn how to use YouArt from the first download to your first finished video.
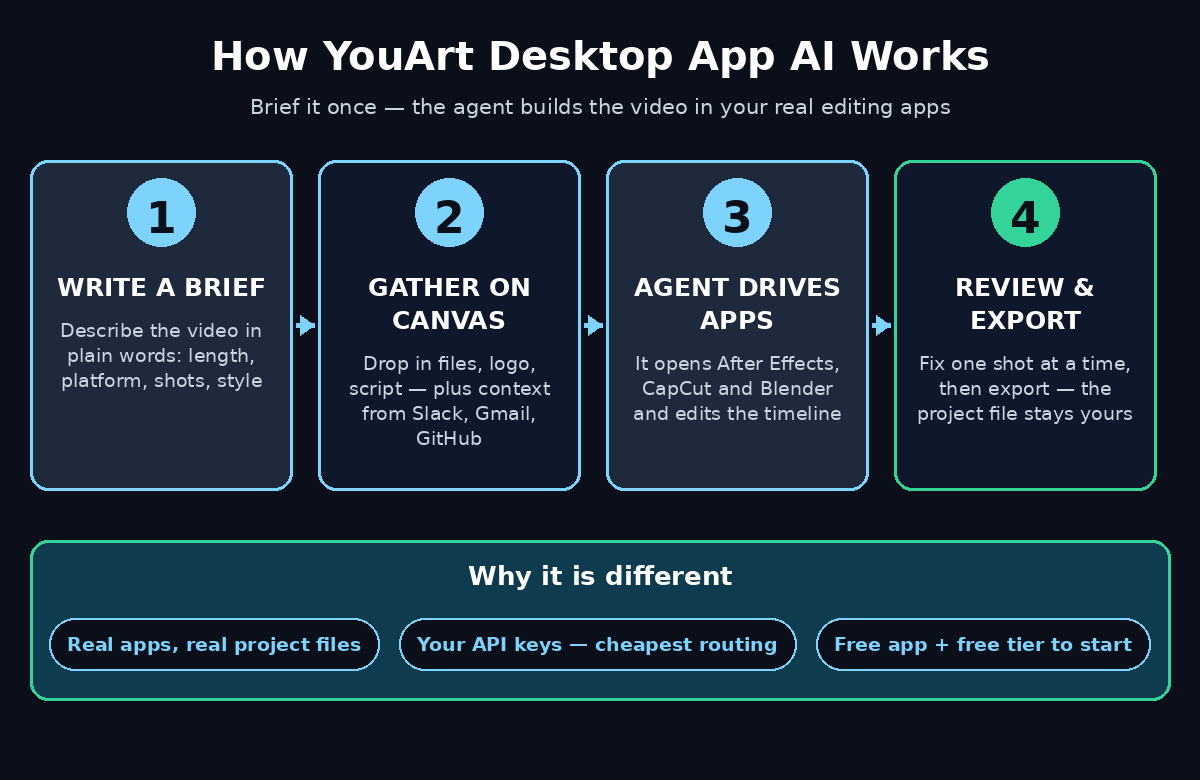
Step 1: Understand What YouArt Desktop App AI Actually Does
YouArt is not a video generator website. It is a desktop app that acts like a creative teammate sitting next to you. You give it a brief in normal language, such as “make a 30-second product video for my handmade soap, upbeat music, text on screen”. It breaks that brief into shots, picks the right tool for each shot, and then drives the real software on your computer to build them.
The key difference is the agent-first approach. Most AI video tools hide the work inside a black box. YouArt shows you the canvas, the plan, and every step it takes. You can watch it open CapCut, place a clip on the timeline, add a caption, and move on to the next shot. If a step looks wrong, you stop it, fix the instruction, and run it again. That control is what makes it useful for beginners who are still learning how editing works.
- One canvas for everything: your files, your brief, and your context live in one place, so the agent never has to guess what you meant.
- Real apps, not a fake editor: it operates After Effects, CapCut, and Blender, so your project stays in tools you already know.
- Your keys, your costs: you connect your own API keys, and smart routing picks the cheapest provider for each shot.
- Desktop-first: the app lives on your computer, next to your files, instead of in a browser tab you have to keep open.
Think of it as hiring a junior editor who never gets tired. You still decide the idea, the style, and the final cut. YouArt handles the clicking, the dragging, and the repetitive steps in between.
Step 2: Download and Install YouArt Desktop App AI
Getting started takes only a few minutes. The app is free to download, and you do not need a credit card to install it. Open the official YouArt website and look for the desktop app download. Always download from the official site or the official Product Hunt listing. Copycat downloads appear for every popular AI tool, and a fake installer is the fastest way to lose your files.
- Pick your system: the desktop app is built for Mac and Windows. Download the installer that matches your computer.
- Run the installer: open the downloaded file and follow the normal install steps for your system. It takes about a minute on most machines.
- Open the app: when it first opens, you will see a welcome screen and a blank canvas. That canvas is your workspace for every project.
- Create your account: sign in or create a free account so your projects and settings save. The free tier on the YouArt platform includes 40 credits and 8 images a month, which is enough to test the workflow before you spend anything.
Before you start your first project, check that the apps YouArt Desktop App AI will drive are installed. If you want it to work in After Effects, CapCut, or Blender, those apps need to be on your computer and licensed. The agent can only operate software that is actually there. If you only have CapCut, start with CapCut. You can add the other apps later.
Step 3: Connect Your Own API Keys in YouArt Desktop App AI
YouArt runs on the AI providers you already use. Instead of charging you a monthly fee for its own models, it lets you bring your own API keys. This is the part beginners skip, and then they wonder why nothing generates. Spend five minutes here and the rest of the guide works smoothly.
Open the settings or connections panel in the app and look for the API keys section. Add the key for the provider you want to use for image or video generation. If you already have an OpenAI, Anthropic, or Google account with API access, you can copy a key from that provider’s dashboard. Paste it into the app and save it. The app stores your keys locally on your computer.
- Start with one key: you only need one provider to make your first video. Add more later when you want to compare prices or quality.
- Set a spending limit: most providers let you set a monthly cap on your API account. Set a small cap, such as $5 or $10, while you learn.
- Check smart routing: with more than one key connected, YouArt Desktop App AI routes each shot to the cheapest provider that can do the job. You do not need to choose a model for every shot yourself.
- Keep keys private: never paste an API key into a chat, a screenshot, or a shared document. Treat it like a password.
If you have no API key yet, start with the free tier on the YouArt platform. The free credits let you try image and video generation without a key. When you are ready for bigger projects, add your own key and let smart routing keep the cost down.
Step 4: Bring Your Files and Context onto One Canvas
A good video starts with good material, and YouArt is built around that idea. The canvas is where you gather everything the agent needs before it starts working. Drag your local files onto the canvas: product photos, a logo, a voice recording, a clip you shot on your phone, or a document with the script. The agent reads them and uses them in the video.
The canvas also pulls context from the apps you already use. Connect Slack, Gmail, or GitHub, and the app can pull the right thread, email, or file into the project. A marketing team can pull the launch notes from Slack. Developers can pull the release notes from GitHub. Freelancers can pull the client brief straight from Gmail. The agent works with real context instead of a vague prompt.
- Add your brand files first: logo, brand colors, and product photos. The agent will reuse them across every shot, so the video looks consistent.
- Add the script or brief: paste your script as a text file or type it on the canvas. Short, clear sentences work best.
- Connect one app at a time: start with the app that holds your most useful material. Add the others when you need them.
- Name your canvas: give the project a clear name, such as “Soap launch video – November”, so you can find it again later.
For a small business, this canvas is where the real time saving happens. A digital agency that makes client videos every week can keep one canvas per client, with the brand files and the latest brief always in place. The agent starts each new video from that canvas instead of from zero.
Step 5: Give YouArt Desktop App AI Your First Video Brief
Now write the brief. This is the most important skill in the whole guide. The agent follows your words closely, so a clear brief gives you a clear video. A vague brief gives you a vague video, and you will spend your time fixing it.
Write your brief like you are telling a human editor what to make. Include the length, the audience, the style, and the key message. For example: “Make a 30-second video for Instagram Reels. It is for a handmade soap brand. Start with the soap on a wooden table, then show hands washing with foam, then show the price and the website. Upbeat music. Big text on screen for each step.” That brief has a length, a platform, a subject, three shots, and a style. The agent can plan from it.
- Say the length first: “30 seconds” or “one minute” sets the number of shots the agent will plan.
- Name the platform: a vertical video for Reels needs different framing from a wide video for YouTube.
- List the shots in order: three or four shots are enough for a first video. The agent fills in the transitions.
- State the text on screen: write the exact words for captions, so the agent does not invent its own wording.
Keep your first brief small. One product, one message, under a minute. A short first project teaches you how the agent plans, how long each step takes, and where you need to step in. Big projects can wait until you trust the workflow.
Step 6: Let the Agent Drive After Effects, CapCut, and Blender
This is the step that makes YouArt Desktop App AI different. When you run your brief, YouArt does not render a video in the cloud and hand you a file. It opens the real editing apps on your computer and operates them. It places clips on a timeline in CapCut, adds a title in After Effects, or sets up a 3D scene in Blender. You can watch each action happen on your screen.
Pick the Right App for Each Shot
Each app has a job. CapCut is the fastest choice for simple cuts, captions, and social videos. After Effects is the choice for motion graphics, animated titles, and polished effects. Blender is the choice for 3D shots, product spins, and scenes that do not exist in real life. The agent picks the app that fits each shot, based on your brief. You can also tell it which app to use for a specific shot if you have a preference.
- Watch the first run: do not walk away while the agent works. Watch how it opens each app and what it changes, so you learn the workflow.
- Let it finish one shot: wait for a shot to complete before you judge it. Half-finished timelines always look wrong.
- Check the timeline: open the project in CapCut or After Effects yourself. The agent saves a real project file you can edit by hand.
- Fix one thing at a time: if a caption is wrong, tell the agent to fix only that caption. Small corrections are faster than re-running the whole video.
The project files stay yours. Because the app works inside real apps, you can open the same project tomorrow, change one clip by hand, and export it again. You are never locked into a format only the AI can open. For teams that use AI automation services to speed up production, that open project file is the feature that matters most.
Step 7: Review, Fix, and Re-run Shots with Smart Routing in YouArt Desktop App AI
Your first version will not be perfect. That is normal. The review step is where a beginner becomes a good user of the app. Play the video from start to finish and write down every problem you see: a caption with the wrong word, a shot that lasts too long, a transition that feels rushed, or a color that does not match your brand.
Fix the problems one by one. Tell the agent exactly what to change, in plain words. “Make the second shot two seconds shorter.” “Change the caption to ‘Free shipping this week’.” “Use the blue background from the brand file, not the green one.” Clear instructions get clear fixes. Vague instructions, like “make it better”, waste your credits and your time.
Smart routing helps here too. If a shot needs to be re-generated, the app sends it to the cheapest provider that can do that shot well. A simple image shot goes to a cheap image model. A complex video shot goes to a stronger video model, such as Veo 3.1 or Sora 2. You do not need to learn the price list of every model. The routing does that job for you.
- Review with sound on: music and voice problems only show up when you listen, not when you watch silently.
- Check every caption: read each word on screen. AI-generated text is the most common place for a spelling mistake.
- Re-run only the broken shot: regenerating one shot costs far less than regenerating the whole video.
- Save a version before big changes: keep a copy of the version you liked, so a bad fix never destroys a good cut.
Step 8: Export Your Finished Video
When the video looks right, export it. Because YouArt builds the video inside real editing apps, you export from the app that holds the final timeline. In CapCut, that means the normal export button with your chosen resolution and frame rate. In After Effects, it means adding the composition to the render queue. The agent can start the export for you, or you can click it yourself.
Pick the export settings for the platform where the video will live. For Instagram Reels, TikTok, and YouTube Shorts, export vertical video at 1080 by 1920. YouTube needs horizontal video at 1920 by 1080. A website hero video works best as a smaller file with a lower bitrate, which loads faster and still looks sharp. Export once per platform instead of uploading one file everywhere.
- Export a master copy first: save the highest quality version on your computer before you make platform-specific copies.
- Check the exported file: play the exported video once, from start to finish, before you upload it anywhere.
- Keep the project file: the CapCut, After Effects, or Blender project is your source of truth. Keep it with the canvas.
- Name files clearly: “soap-launch-reels-1080×1920.mp4” is easier to find later than “final-v2.mp4”.
Do not delete the canvas after export. The canvas holds your brand files, your brief, and the plan. Your next video for the same product starts from that canvas, and the agent will already know your style, your files, and your settings.
Step 9: Use It for Images and Social Content Too
Video is the headline feature, but the app also handles images and social content. The same canvas and the same agent can build a product photo, a thumbnail, or a set of social posts. If you already have the brand files on the canvas, an image takes minutes instead of a new setup.
The YouArt platform behind the app includes leading image and video models such as Nano Banana, Seedream, Sora 2, Veo 3.1, and Wan. That means one brief can produce a hero image for your website, a thumbnail for your video, and three social posts in the same style. The agent keeps the colors, the product, and the wording consistent across all of them, which is the hard part of making content by hand.
- Start with the thumbnail: after your video is done, ask for a thumbnail in the same style. It reuses the brand files already on the canvas.
- Make a social set: one brief can produce a square post, a story, and a banner, all from the same product photo.
- Try a template: the platform includes free professional templates for quick starts. A template is a good way to learn what a strong brief looks like.
- Keep the style guide on the canvas: brand colors and fonts on the canvas keep every image on brand, even when you change the brief.
For a beginner, images are also the cheapest way to practice. An image costs fewer credits than a video shot, and it teaches you how the agent reads your brief. Practice with images first, then spend your credits on video.
Step 10: Build a Repeatable Creative Workflow
One video is a demo. A workflow is a business asset. The real value of the app shows up on your fifth video, when the setup is already done and each new video takes a fraction of the first one. Build that workflow now, while the first project is fresh.
Save a Template for Each Video Type
Save a canvas template for each kind of video you make. A product launch template holds your logo, your brand colors, and a brief structure you reuse. A tutorial template holds your intro shot, your caption style, and your outro. When a new video starts, duplicate the template, swap in the new product photo and the new script, and run it. The agent already knows the rest.
- Write your brief template: keep a short document with your standard brief structure: length, platform, shots, style, captions. Fill in the blanks for each new video.
- Review as a team: share the canvas with a teammate for a second pair of eyes before export. A fresh viewer catches the spelling mistake you stopped seeing.
- Track what each video costs: note the credits or API spend per video. You will quickly learn which shots are cheap and which ones are worth the price.
- Improve one thing per video: better captions this week, better music next week. Small gains compound faster than one big redesign.
Keep Your Templates and Brand Files Organized
Templates only help if you can find them. Keep one folder per client or product, with the canvas, the brand files, and the exported videos together. Name every canvas the same way, and archive finished projects instead of deleting them. A year from now, that archive is your portfolio and your training data for the next brief. Good organization is the quiet skill that separates a creator who posts every week from one who posts once and stops.
| Tool | Best for | Learning curve | Cost model |
|---|---|---|---|
| YouArt Desktop App AI | Full videos built by an agent in real apps | Low — brief in plain words | Free app + your own API keys, smart routing picks cheapest |
| CapCut alone | Quick social cuts and captions by hand | Low | Free with paid extras |
| After Effects alone | Motion graphics and polished effects | High — needs real editing skill | Subscription |
| Blender alone | 3D scenes and product spins | High — needs 3D skill | Free, open source |
| Hiring an editor | Hands-off finished videos | None — but needs clear briefs | Per video, highest cost |
Frequently Asked Questions About YouArt Desktop App AI
Is YouArt Desktop App AI really free?
The desktop app is free to download, and the YouArt platform has a free tier with 40 credits and 8 images a month. Video generation uses your own API keys or credits, so your cost depends on how much you generate. Start on the free tier, set a small spending cap on your API account, and check the pricing page before you commit to a paid plan. Prices change often.
Does YouArt Desktop App AI work on Windows and Mac?
Yes. The desktop app is built for Mac and Windows computers. It works best on a machine that already runs After Effects, CapCut, or Blender, because the agent operates those apps directly. Check the official download page for the system requirements before you install.
Do I need API keys to use YouArt Desktop App AI?
You need at least one API key, or free YouArt credits, to generate images and video. The app itself does not include free unlimited generation. Add one key to start, set a spending limit on your provider account, and let smart routing pick the cheapest provider for each shot.
Can YouArt Desktop App AI replace After Effects or CapCut?
No, and that is the point. YouArt Desktop App AI does not replace those apps. It operates them for you. The project stays a real CapCut, After Effects, or Blender file, so you can open it and edit it by hand any time. The agent removes the repetitive clicking. You keep the control.
Is my work private in YouArt Desktop App AI?
Your files and your API keys live on your own computer, and the canvas keeps your project in one place. The agent sends your brief and your generation requests to the providers you connected, which is how the images and video are made. Do not put passwords, private client data, or unreleased material in a brief unless you trust the provider you connected.
What makes YouArt Desktop App AI different from other AI video tools?
Most AI video tools generate a finished clip in a browser and hand you a file you cannot edit. YouArt Desktop App AI works as an agent on your computer, inside the real editing apps. It pulls context from Slack, Gmail, and GitHub onto one canvas, plans the shots, and drives After Effects, CapCut, and Blender to build them. You get an editable project file, not just a video file.
Final Thoughts
YouArt is the most practical kind of AI tool: it does not ask you to learn a new editor, and it does not lock your work into a format you cannot open. It meets you where you already work, on your own computer, inside the apps you already have. You write a clear brief, gather your files on one canvas, and let the agent handle the repetitive steps. You keep the creative decisions and the final cut.
Start small. Download the app, connect one API key, and make a 30-second video for one product. Watch how the agent plans the shots and drives CapCut or After Effects. Fix one thing, re-run one shot, and export it. Your second video will take half the time, and your fifth will feel routine. That is the real promise of an AI creative teammate: not a magic video button, but a workflow that gets faster every time you use it. Try it this week, and see how much of your editing time it gives back.
Explore More Free AI Tools
Want more free tools to speed up your content workflow? Try the AI Title Generator to write catchy headlines for your next video, the Meta Description Generator to write search snippets that earn clicks, the AI Rewriter to polish your scripts and briefs, and the Keyword Density Checker to keep your articles and video descriptions on topic. All four are free on AIToolSteps, and they pair well with YouArt when you plan your next video.