

Editing a short video used to mean opening a timeline, dragging clips into place, trimming frame by frame, and hoping the music landed on the right beat. For most beginners, that is exactly where the project died — half-finished, sitting in a drafts folder, never posted. Templify AI is a new iPhone app built to remove that wall. It launched on Product Hunt on November 13, 2026, finished the day as the number one Product of the Day with 391 upvotes and 95 comments, and it calls itself a “powerful content editor for people who aren’t editors.” The idea is simple: instead of a timeline, you pick a designer template, drop in your clips and photos, and the app’s AI handles the cuts, the transitions, the captions and the music timing. In this beginner guide you will learn exactly how to use Templify AI, from your first download to your first finished Reel, TikTok or YouTube Short — no editing experience needed.
If you have never edited a video before, you are in the right place. You do not need a laptop, a subscription to a desktop editor, or any idea what a keyframe is. You need an iPhone, the clips already sitting in your camera roll, and about twenty minutes. By the end of this guide, you will have a repeatable routine that turns raw footage into polished, ready-to-post content in minutes instead of hours.
Step 1: Understand What Templify AI Actually Does
Before you open the app, it helps to understand what makes Templify AI different from a normal video editor. Most mobile editors — CapCut, InShot, VN — give you a small timeline on a small screen and ask you to do the same job a desktop editor does, only with your thumbs. Templify AI flips the workflow around: the template does the editing, and you do the choosing.
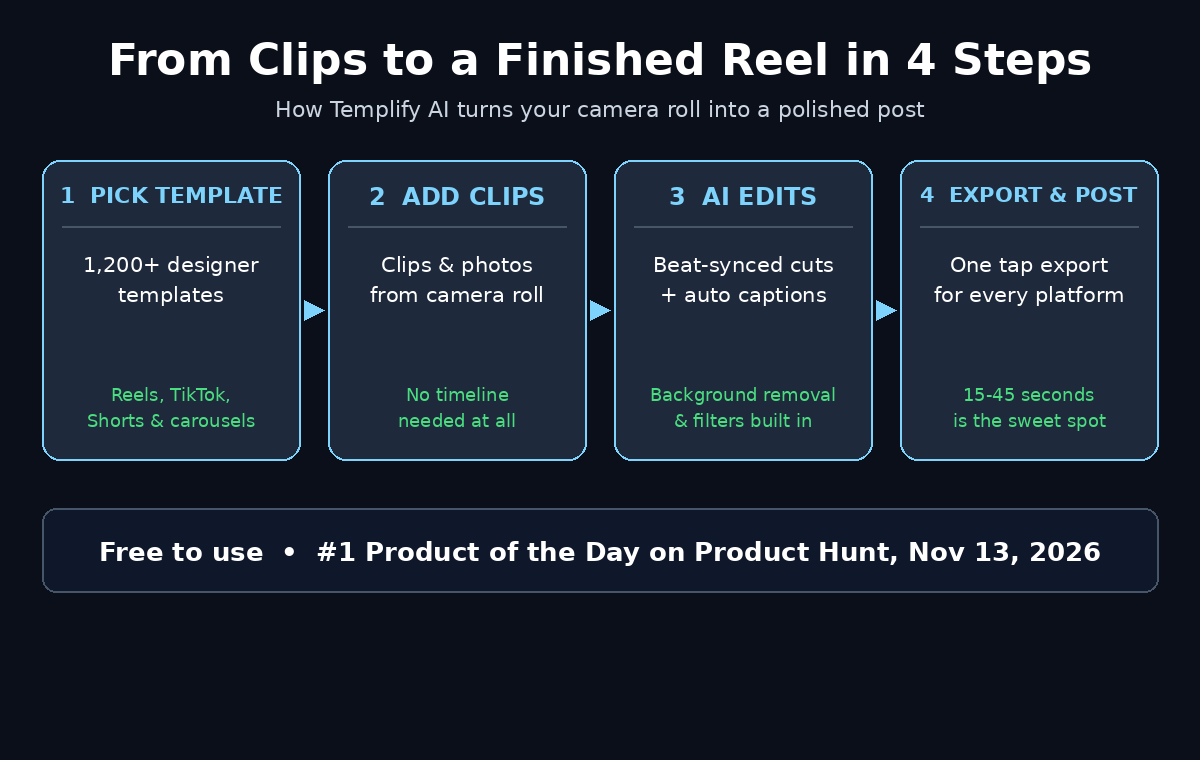
The app is an all-in-one video, photo and carousel editor for iPhone, built around more than 1,200 designer templates. Each template is a finished edit — the pacing, the transitions, the text placement and the music timing are already decided by a designer. Your job is to pick the template that fits your platform and your mood, add your own clips and photos, and let the app assemble the result. The headline features are:
- 1,200+ designer templates for Reels, TikToks, YouTube Shorts and photo carousels.
- AI video editing that cuts and arranges your clips to fit the template’s rhythm.
- Beat-synced transitions that land each cut on the music, automatically.
- Auto captions that transcribe your voice and style the words for the screen.
- Background removal for photos and clips, without a green screen.
- Filters and an AI Studio for extra polish, ideas and variations.
- No timeline needed — the whole edit happens through templates and taps.
The practical payoff is simple: the hardest part of short-form video — the edit — stops being a skill you have to learn and becomes a choice you make in seconds. That matters most for small businesses, creators and anyone posting for a shop, a service or a side project. If you work with a digital agency that runs your social content, Templify AI also gives them a fast way to turn your raw phone footage into on-brand posts without booking an editor for every clip.
Step 2: Download Templify AI and Set Up Your First Project
Templify AI is an iPhone app, so everything starts in the App Store. Open the App Store on your iPhone, search for “Templify AI” and install it. The app is free to use, with an optional Pro subscription for extra templates and features — start on the free version and only consider Pro once you know which features you actually use every week.
When you open the app for the first time, it will ask for permission to access your photos and videos. Grant full access to your photo library, or at least to the albums you film in, because the whole workflow is built on pulling clips straight from your camera roll. It may also ask about notifications — say yes if you want reminders about new templates, and no if you prefer a quiet phone. Neither choice affects the editor.
Before your first project, do one small piece of housekeeping that will save you time in every edit after it:
- Film or gather your clips first. A template needs material. Three to eight short clips of 2–5 seconds each are enough for most Reels and Shorts.
- Keep one folder or album for “to edit” clips. Scrolling through a thousand camera-roll photos to find the right three clips is the slowest part of mobile editing.
- Record with the sound on. Even if you plan to replace the audio with music, the app uses your original audio for auto captions, so a clear voice recording matters.
- Shoot vertical. Reels, TikToks and Shorts are vertical formats. Horizontal footage will be cropped, and you will lose the edges of the frame.
Once the app is installed and your clips are ready, tap the create button — usually a large plus or “New Project” control on the home screen — and you are ready for the most important choice in the whole workflow: the template.
Step 3: Pick a Template That Matches Your Platform
The template library is the heart of Templify AI, and picking well is a skill worth learning. Open the template browser and filter by what you are making: a Reel, a TikTok, a YouTube Short, or a photo carousel. Each template shows a short preview of the finished style — the pace, the text animations, the way the music hits. Watch two or three previews before you commit, because the template decides the feel of the whole video.
Choose by platform first, because each one rewards a slightly different rhythm:
- Instagram Reels: clean, fast, polished. Pick templates with big readable text and a strong first two seconds — Reels are judged almost instantly.
- TikTok: raw, energetic, trend-led. Pick templates with quick cuts and beat drops, and leave room for a spoken hook.
- YouTube Shorts: clear and punchy. Pick templates that keep the subject centred and the captions large, since many Shorts viewers watch without sound.
- Photo carousels: calm and swipeable. Pick templates with consistent frames and one idea per slide, so each swipe earns the next one.
Beginners make two mistakes here. The first is picking the flashiest template instead of the one that fits the footage — a high-energy dance template will fight a quiet product video, and both will lose. The second is spending twenty minutes browsing. Give yourself a three-minute limit: preview five templates, pick the one that feels closest, and start. You can swap templates later without re-uploading your clips, so a good-enough choice now beats a perfect choice never made. As your library of finished posts grows, you will notice which templates your audience responds to — save those as favourites and build your own small rotation of five or six proven styles.
Step 4: Add Your Clips and Photos (No Timeline Needed)
Once you have a template, the app asks for your media. Tap to add clips and photos from your camera roll, in the order you want them to appear. This is the step that replaces the timeline: instead of dragging clips along a track, you simply choose the order, and the template decides how long each clip stays on screen and how it moves into the next one.
A few habits make this step work far better:
- Lead with your strongest clip. The first two seconds decide whether someone keeps watching. Put the most interesting, most surprising or most beautiful clip first.
- Mix wide and close shots. A wide establishing clip, then a close detail, then a human reaction — that variety keeps the eye engaged without any extra editing.
- Use fewer clips than you think. Five good clips beat twelve mediocre ones. Extra clips dilute the pace and make the edit feel restless.
- Mix photos into video templates. A still photo held for a beat can act as a pause in a fast edit, and it is a natural place for a text callout or a price.
- Check the crop. Because the output is vertical, the app may crop the sides of horizontal footage. Preview each clip and adjust the framing so faces and products stay in the safe centre of the frame.
After you add your media, the app assembles a first draft automatically. Watch it once all the way through before you touch anything. Most beginners are surprised how finished the draft already looks — the template’s pacing and transitions do most of the work, and the remaining steps are polish, not repair.
Step 5: Let AI Edit: Beat-Synced Transitions and Auto Cuts
This is where Templify AI earns its name. The app’s AI editing analyses your clips and the template’s music, then places each cut so it lands on the beat. A transition that hits the beat feels professional; one that lands half a second late feels amateur, and most beginners never learn to fix it by hand. Here it happens by default.
After the first draft is assembled, try these adjustments in order:
- Swap the music first. The template ships with a track, but the app’s music library lets you change it. Pick a track whose energy matches your content — calm for a tutorial, driving for a product reveal — and the cuts will re-sync to the new beat automatically.
- Reorder, don’t re-trim. If a clip feels too long or too short, try moving it to a different position before you reach for trimming controls. A clip that drags in the middle often works perfectly as the closing shot.
- Change the transition style once. Templates offer a few transition families — hard cuts, slides, zooms, glitch. Pick one and stay consistent through the whole video; mixing three styles in fifteen seconds looks like a mistake.
- Watch it with the sound on, then off. Sound-on tells you whether the beats land. Sound-off tells you whether the visuals alone carry the story, which matters because many viewers watch muted.
The honest limit here is control. Templify AI trades the fine-grained control of a timeline editor for speed, and that is the right trade for a beginner. If you ever need frame-perfect cuts for a client project, that is the moment to open a timeline editor. For daily Reels, TikToks and Shorts, the AI edit is the whole point — let it do the job it was built for.
Step 6: Add Auto Captions That People Actually Read
Most short-form video is watched without sound, at least at first. Captions are not an accessibility extra — they are how the video gets watched at all. Templify AI’s auto captions transcribe the spoken audio in your clips and place styled words on screen, timed to the voice.
To get captions right, follow this order:
- Generate the captions, then read them. Auto transcription is good, but names, product words and accents can trip it up. Fix any wrong word before you style anything — a misspelled product name in a caption is worse than no caption.
- Pick a style with strong contrast. White text with a dark outline or a solid background bar reads on any footage. Thin coloured text over a busy background disappears.
- Keep each caption to a few words. One short phrase per screen is the rule. A wall of text forces the viewer to read instead of watch, and they will do neither.
- Put a text hook in the first two seconds. Even if nobody speaks yet, an opening line on screen — a question, a promise, a number — tells the viewer why to stay.
- Check the safe zone. Keep captions away from the very bottom of the frame, where the platform’s own buttons and captions cover them, and away from the top, where the profile bar sits.
One practical tip: record your voiceover or talking clip in a quiet room, close to the phone. The cleaner the audio going in, the cleaner the captions coming out — and the same audio makes the whole video feel more professional, even for viewers who do listen with sound.
Step 7: Remove Backgrounds and Polish With Filters
Templify AI’s background removal is the feature most beginners underestimate. It separates the subject of a photo or clip from its background without a green screen, which opens up two everyday tricks: a clean product shot with the clutter gone, and a cut-out subject you can place over a template background or a brand colour.
Use it where it earns its keep, and skip it where it does not:
- Product photos: remove a messy desk or street background so the product is the only thing in the frame. One clean shot sells better than five busy ones.
- Talking-head clips: a plain background keeps the focus on the speaker. If the room behind you is distracting, removal plus a soft solid colour is a quick fix.
- Carousel covers: a cut-out subject over a bold template background makes a thumb-stopping first slide.
- Do not overuse it. Removing the background from every clip makes the video feel artificial. Real locations add context and trust — a workshop, a kitchen, a street. Keep the background when it tells part of the story.
After background work, finish with filters — but lightly. Pick one filter for the whole video and keep it subtle. A consistent, gentle grade across every clip looks intentional; a different heavy filter on each clip looks like an accident. If your clips were shot in different light, a single mild filter is also the fastest way to make them feel like they belong in the same video. Check the result on your phone at arm’s length, in daylight, before you export — that is how your audience will see it.
Step 8: Use AI Studio for Hooks, Ideas and Variations
The AI Studio is Templify AI’s idea engine. When you know what you want to say but not how to start, it can suggest hooks, captions and variations on your draft — different openings for the same clips, different text overlays, different ways to frame the same product. Treat it as a brainstorming partner, not a writer you obey.
A practical way to use it:
- Ask for three hooks, pick one. “Give me three opening lines for a video about…” — then choose the one that sounds like you, and rewrite it in your own words.
- Generate variations, not replacements. One set of clips can become three different posts — a tip version, a story version, a before-and-after version. Variations let you test what your audience actually likes without filming three times.
- Keep your voice in the final text. AI suggestions are a starting point. If a line sounds like a slogan you would never say, your audience will feel it too. Edit every suggestion until it sounds like something you would say out loud.
- Save what works. When a hook or caption style performs well, save it as a note for your next video. Your best ideas are the ones you have already tested.
This is also where a wider content workflow helps. If you run a small business or a content channel, a AI automation services partner can connect tools like Templify AI into a repeatable pipeline — film once, generate variations, schedule across platforms — so the AI Studio’s output becomes a system instead of a one-off experiment.
Step 9: Export for Reels, TikTok and Shorts the Right Way
Export is a small step with an outsized effect. A good edit exported with the wrong settings still looks bad on the platform, and the platform will compress your video again on upload — so start from the best quality the app offers.
Before you tap export, run this checklist:
- Match the platform. Export for the platform you will post to first. If you plan to cross-post the same video, export once at the highest quality and reuse that file, rather than exporting a compressed copy of a compressed copy.
- Watch the full export once. Check the beginning, the middle and the end. Look for a frozen frame, a caption typo you missed, a transition that glitched, or audio that drops out.
- Check the file size and length. Very long exports take longer to upload and are more likely to stall on a weak connection. For a Reel or Short, fifteen to forty-five seconds is the sweet spot for most beginners.
- Keep the original project. Do not delete the project from the app after exporting. Platforms change, trends change, and the same edit with a new hook or a new song is a free second post next week.
- Post natively, not as a re-upload of a re-upload. Upload the exported file directly to each platform from your camera roll. Screen-recording a posted video to repost it degrades quality every time.
When you upload, write the caption while the video is fresh in your mind. One clear sentence about what the video shows, one question that invites a comment, and two or three relevant hashtags are enough. The caption is not the place to repeat everything the video already said.
Step 10: Build a Weekly Posting Routine With Templify AI
One good video is a nice accident. Three a week, every week, is a channel. Templify AI’s real value shows up when it becomes a routine, because the template workflow is fast enough to sustain — most edits take fifteen to twenty minutes once you know your favourite templates.
A beginner routine that actually sticks:
- Film in one batch. Once a week, film four or five short clips in one session — same location, same outfit, different topics. Batching removes the daily “what do I film?” friction.
- Edit in one sitting. Open the app, pick one template style for the week, and edit all four videos back to back. The second edit is always faster than the first.
- Post on a fixed schedule. Three posts a week on fixed days beats seven posts one week and none the next. Consistency is what the algorithms and your audience both reward.
- Review once a week. Look at which video held viewers longest and which one earned comments. That is your data. Make more of what worked, and retire the templates that did not.
- Keep a “template rotation” of five favourites. Five proven templates, rotated weekly, give your feed a consistent look without becoming repetitive.
After a month of this routine, you will have twelve or more finished posts, a clear sense of which templates and hooks work for your audience, and an editing habit that costs less than an hour a week. That is the compounding effect the app is designed for — not one viral video, but a steady stream of good ones. If you want to scale that routine into a full content operation, a digital agency can take the same templates and turn them into a managed posting calendar across every platform you use.
Templify AI vs CapCut vs Canva vs InShot
Templify AI is not the only mobile editor, so it helps to know where it sits. The right tool depends on what you value most — speed, control, design, or simplicity.
| Feature | Templify AI | CapCut | Canva | InShot |
|---|---|---|---|---|
| Main idea | Template-first editing, no timeline | Timeline editor with templates | Design-first, video as one feature | Simple timeline editor |
| Templates | 1,200+ designer templates | Large template library | Very large design templates | Modest template set |
| Learning curve | Very low — pick and add clips | Medium — timeline skills needed | Low for design, medium for video | Low |
| Beat-synced cuts | Automatic, built into templates | Manual or auto-beat tools | Manual timing | Manual trimming |
| Auto captions | Yes, styled automatically | Yes, with manual styling | Yes, basic styling | Yes, basic styling |
| Background removal | Yes, photos and clips | Yes, on many plans | Yes, on paid plans | Yes, on paid plans |
| Best for | Beginners who want fast, polished posts | Creators who want full control | Brands needing design + video together | Quick simple edits |
| Price | Free, optional Pro subscription | Free, optional Pro subscription | Free, optional Pro subscription | Free, optional Pro subscription |
The honest summary: choose Templify AI when speed and a polished result matter more than frame-by-frame control. Choose CapCut when you want to learn real editing and control every cut yourself. Choose Canva when your video is one part of a wider design system — posts, stories, presentations and thumbnails together. Many creators end up using two: Templify AI for the daily quick posts, and a timeline editor for the occasional project that deserves the extra hours.
Common Beginner Mistakes With Templify AI
Most bad results with Templify AI come from the same few habits. Fix these and your videos will look better than most of what is posted every day.
- Using too many clips. Twelve clips in a twenty-second video is visual noise. Five strong clips, well ordered, always win.
- Picking a template for the music, not the content. A great song on the wrong template still produces a confusing video. Match the template to the footage first, then change the music.
- Skipping the caption check. Auto captions are good, not perfect. One wrong word — especially a product name or a price — can confuse viewers or embarrass a business.
- Over-filtering. A different heavy filter on every clip makes the video feel random. One light filter, applied to everything, looks professional.
- Exporting and posting without watching once. Always watch the exported file end to end. A glitch you catch now costs thirty seconds; a glitch your audience catches costs credibility.
- Posting the same video everywhere, unchanged. The same file works on Reels, TikTok and Shorts, but the caption, the hashtags and the posting time should fit each platform. A copy-paste caption across all three is a missed opportunity.
- Deleting the project after posting. Keep the project. A new hook, a new song or a new caption turns yesterday’s edit into next week’s post for free.
Frequently Asked Questions About Templify AI
Is Templify AI free?
Yes, Templify AI is free to use, with an optional Pro subscription for extra templates and features. The free version covers the core workflow — templates, AI editing, auto captions, background removal and export — so start free and only upgrade once you know which Pro features you would actually use every week.
Do I need video editing experience to use Templify AI?
No. That is the point of the app. There is no timeline to learn: you pick a designer template, add your clips and photos, and the app handles the cuts, the transitions and the music timing. If you can pick photos from your camera roll, you can finish a video in Templify AI.
What can I make with Templify AI?
Short vertical videos for Instagram Reels, TikTok and YouTube Shorts, plus photo carousels and collages. With more than 1,200 designer templates, the same app covers product showcases, tutorials, before-and-after posts, testimonials, event recaps and everyday creator content.
Is Templify AI available on Android?
Templify AI launched as an iPhone app. Check the Google Play Store for the latest availability if you use Android, and in the meantime the workflow in this guide — template-first editing, auto captions, beat-synced cuts — is the same idea to look for in any Android editor you choose.
How is Templify AI different from CapCut?
CapCut is a timeline editor that gives you full control over every cut, and that control takes time to learn. Templify AI removes the timeline entirely: the template decides the pacing and the transitions, and you decide the clips, the music and the words. It is faster for daily posts, while CapCut is better when a project needs frame-by-frame control.
Will my videos have a watermark?
Check the export screen before you post, because watermark rules can differ between the free version and Pro. If a watermark appears on free exports, that is a normal trade-off of a free plan — and one of the first things to weigh if you are considering Pro for business posts.
Final Thoughts
Templify AI solves the problem that stops most beginners from posting video at all: the edit. By replacing the timeline with more than 1,200 designer templates, automatic beat-synced cuts, auto captions and one-tap background removal, it turns a job that used to take an evening into a twenty-minute routine on your phone. The app earned its number one Product of the Day spot on November 13, 2026 for exactly that reason — it is built for people who are not editors, and it respects their time.
Start small: install the free app, film five short clips, pick one template, and post your first video today. Then do it again twice more this week, with the same template style, and watch which one your audience responds to. That loop — film, template, post, review — is the whole skill, and it is one you can build in a single week. And if you are building a wider content system around it, a digital agency partner can help you turn a working routine into a managed calendar, while AI automation services can connect your filming, editing and scheduling into one pipeline that runs without daily effort.
Explore More Free AI Tools
Want to keep building your AI toolkit? Try our free tools: AI Title Generator, Meta Description Generator, AI Rewriter, and Keyword Density Checker — all free on AIToolSteps.