

Your AI agent just signed up for a new tool, and the tool sent a verification code — to your personal Gmail. Now your agent is stuck, your inbox is full of codes you never asked for, and if the agent ever replies to a customer, it does so as you. That is the problem OpenMail AI solves, and it launched on Product Hunt on November 4, 2026.
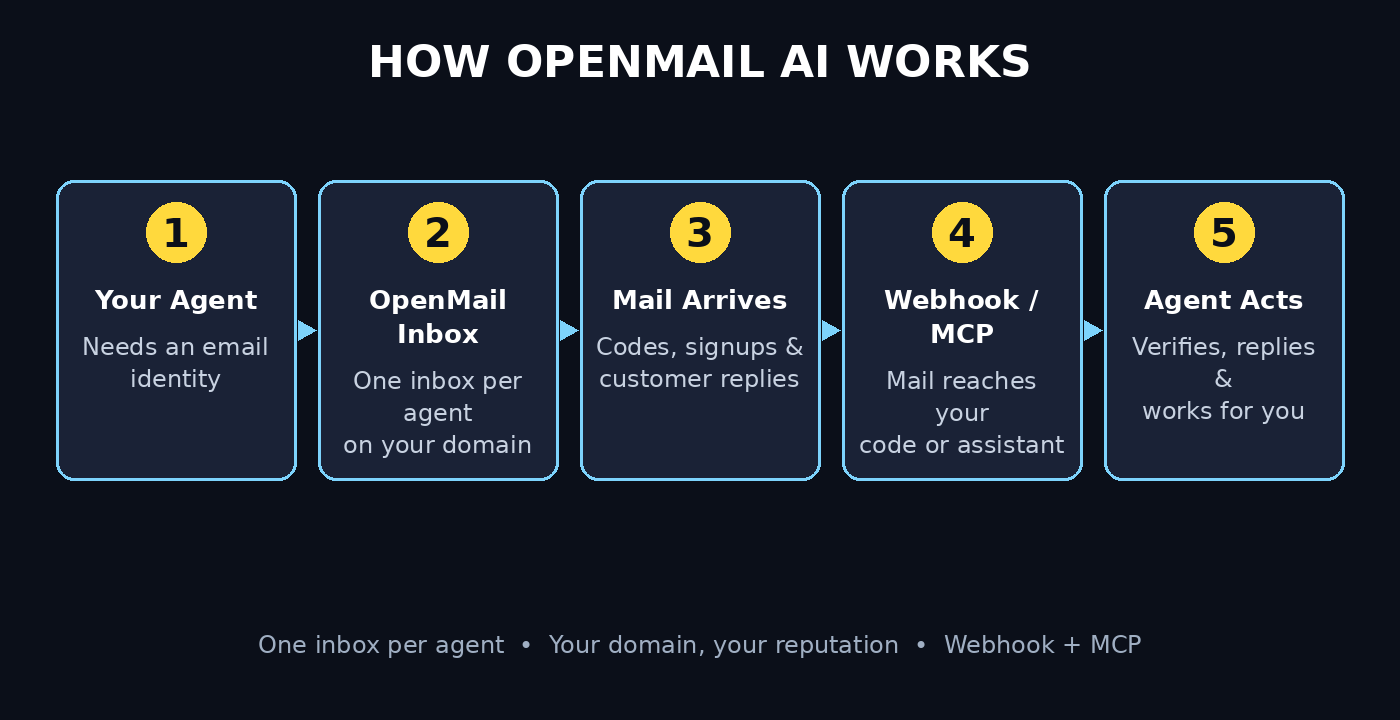
OpenMail AI gives every AI agent its own email inbox on your own domain, with its own sending reputation. Your support agent gets support@yourcompany.com. Your research agent gets research@yourcompany.com. Each one can sign up for tools, receive verification codes, and reply to customers — without ever touching your personal inbox.
In this beginner-friendly guide, you will learn exactly how to use OpenMail AI: what it is, why agents need their own email identity, how to create your first agent inbox, how to connect it to your AI assistant through its hosted MCP server, and how to keep everything safe. You do not need to be a developer to follow along, and you do not need a credit card to start exploring it.
Step 1: Understand What OpenMail AI Actually Is
OpenMail AI is an email service built for AI agents. In plain terms, it is a way to give software — not people — a real email address that can send and receive mail.
Here is the idea in one sentence: instead of your AI agent borrowing your Gmail account or sharing one sending pool with strangers, OpenMail gives each agent its own inbox on your domain, created with a single API call.
That matters more than it sounds. Email providers judge senders by reputation. When hundreds of unrelated agents share one sending pool and one of them sends spam, every sender in that pool can get flagged. OpenMail separates that risk: each agent has its own inbox and its own reputation, so one bad actor cannot burn everyone else.
OpenMail is a new tool — it launched on Product Hunt on November 4, 2026 — so expect the interface and pricing to evolve in the first weeks. Treat the official site and the Product Hunt launch page as the source of truth for the latest details, and check the pricing page inside your account before you build a workflow your business depends on.
Step 2: Understand Why AI Agents Need Their Own Email Identity
Before you set anything up, it helps to see the three jobs an agent inbox actually does. Most beginners only think of the first one.
Signing up for tools. AI agents increasingly sign up for other tools on your behalf: a research tool, a data source, a dashboard. Every signup asks for an email address and usually sends a verification code. Without its own inbox, the agent either cannot finish the signup or it uses your personal email, and the code lands in your inbox at 2 a.m.
Receiving verification codes. This is the use case OpenMail talks about most. When an agent has its own inbox, the verification code arrives in that inbox, and your code or your assistant can read it and finish the signup automatically — no human in the loop.
Replying to customers. A support agent that replies from your personal Gmail looks unprofessional and confusing. An agent replying from support@yourcompany.com looks like a normal member of your team, and customers can reply back to the same address.
There is a fourth, quieter benefit: separation. When every agent has its own address, you can see exactly which agent sent what, turn one agent off without touching the others, and keep your personal email completely out of your automation. If you run a small business and want help thinking through which agent should own which inbox, a digital agency that works with AI automation every day can help you map it out before you wire anything up.
Step 3: Create Your Free OpenMail Account
Start at the Product Hunt launch page for OpenMail and follow the launch link to the official website. Always use the official site from the launch listing, because copycat sites appear around every popular AI launch.
Create your account with your work email address. Use the same email you use for your domain and your AI tools if possible, because it makes connecting a domain smoother later. At launch, OpenMail is presented as a tool you can try without a big upfront commitment, but pricing and free limits can change in launch week — check the pricing page on the official site before you scale past a test inbox.
Once you are inside the dashboard, take two minutes to look around. You should see a place to manage inboxes, a place to connect a domain, and a place to find your API credentials. You do not need to touch the API yet. The first job is the domain, which is Step 4.
Step 4: Connect Your Domain
An agent inbox only feels real when it lives on your domain. An address like agent@yourcompany.com is trusted by customers and by other tools; an address on a shared domain is not.
In the OpenMail dashboard, find the domain settings and add the domain you own. OpenMail will show you a small set of DNS records to add at your domain registrar — the records that prove you own the domain and that let mail flow to OpenMail instead of somewhere else. Add them exactly as shown, then wait for verification. DNS changes can take a few minutes or a few hours to spread across the internet, so do not panic if verification is not instant.
Practical tips for this step:
- Use a subdomain for testing first, such as agents.yourcompany.com, so your main company email is never touched while you learn.
- Keep a note of which DNS records you added and where, so you can remove or change them later.
- If your domain is managed by someone else — a web host, an IT person, or a team that handles AI automation services for your business — send them the exact records OpenMail shows you rather than describing them from memory.
Once the domain shows as verified, you are ready to create inboxes on it.
Step 5: Create Your First Agent Inbox
This is the core of OpenMail, and it is deliberately simple: one API call creates one inbox.
In the dashboard, create a new inbox and give it a clear name and address. Name it after the job, not the model — support@, research@, billing@, or outreach@ — because you will have several of these and the name is how you will tell them apart later.
A good first inbox is a support agent. It is the easiest to test: you can send it an email yourself, watch it arrive, and reply to it, all without involving a customer. A research agent inbox is a good second one, because it shows you how verification codes flow in when the agent signs up for a tool.
For each inbox, decide three things before you create it:
- Who is it for? One agent, one inbox. Never share an inbox between two agents.
- What may it send? A support agent may reply to customers. A research agent probably should not send mail at all.
- Who watches it? Someone — you or your code — should be able to see what arrives, at least while you are learning.
Write these decisions down. When you have five agents and five inboxes, the notes are what stop you from guessing.
Step 6: Connect OpenMail to Your AI Assistant with MCP
OpenMail ships with a hosted MCP server, which is the fastest way to connect it to an AI assistant you already use.
MCP stands for Model Context Protocol, an open standard that lets AI assistants connect to outside tools and data. A hosted MCP server means the server runs on OpenMail’s own infrastructure — you do not install anything on your computer or self-host a server. You add the server to your assistant once, and then you can ask the assistant about your email in plain English.
In the OpenMail dashboard, find the MCP connection details. Copy them, then add the server in your assistant of choice — Claude, ChatGPT, or another MCP-compatible assistant. The exact clicks differ by assistant, so follow the connection guide OpenMail shows you for the one you use.
Once connected, try a simple test: ask your assistant to list the inboxes you created. If it can see them, the connection works. Then try asking it to check a specific inbox for new mail. You are not automating anything yet — you are proving the pipe works before you trust it with real work. If you already use MCP tools for other parts of your stack, such as the marketing MCP setup in our Orphex MCP guide, the pattern will feel familiar: connect once, ask in plain English, check the answer.
Step 7: Let Your Agent Receive Verification Codes
This is the workflow most beginners come to OpenMail for, so test it carefully with a throwaway signup before you trust it with anything important.
Pick a free tool your agent needs — a research site, a free trial, a dashboard — and let the agent sign up using its own OpenMail address. The tool will send a verification code to that inbox. Incoming mail reaches your code over a webhook or a WebSocket connection, and attachments arrive as text, so your system can read the code and hand it back to the agent.
Walk through it once by hand first:
- Send a test email to the agent inbox from your own address and confirm it arrives.
- Trigger a real verification email from a tool signup and watch it land in the inbox.
- Read the code out of the message and complete the signup yourself, so you know what the agent will see.
Only then let the agent do the loop on its own. And set a rule from day one: the agent may use verification codes to finish signups you approved, but it may not sign up for paid tools or hand over payment details. That boundary is yours to set — OpenMail gives the agent an identity, but you decide what that identity is allowed to do.
Step 8: Let Your Agent Reply to Customers
A support inbox earns its keep when the agent can answer a real customer email and the customer can reply.
Start with a narrow test. Send the support inbox a question from a second email address you control — the kind of question customers actually ask, such as a pricing question or a delivery question. Let the agent draft a reply, read the draft yourself, and send it only when you are happy with it. Check the reply in your test inbox: does it come from the right address, does it look professional, and does the reply-to address work?
Once the draft quality is good, decide how much freedom the agent gets:
- Draft only. The agent writes replies, a human sends them. Safest starting point.
- Auto-reply to simple questions. The agent answers FAQs and order-status questions on its own.
- Full auto-reply. Only when you trust the drafts and you have a way to review what was sent.
Keep a human in the loop for refunds, complaints, and anything involving money, at least for the first month. Customers forgive a slow answer; they do not forgive a wrong refund. If you want a second pair of eyes on how your agent talks to customers, the team at a digital agency that builds AI support workflows can review your reply templates before they go live.
Step 9: Automate Incoming Mail with Webhooks
Reading email by hand does not scale, and OpenMail is built for the moment you stop doing that. Incoming mail can reach your code over a webhook or a WebSocket, so your system reacts the second a message arrives instead of polling an inbox every few minutes.
In simple terms, a webhook is an address you give OpenMail that says “when mail arrives, send it here.” Your code receives the message, decides what to do — extract a code, file a ticket, draft a reply — and acts on it.
A beginner-friendly first automation is a code extractor: when a verification email arrives, pull the code out and store it where your agent can read it. A second one is a triage rule: when a customer email arrives in the support inbox, create a task in your helpdesk or send your team a summary. Start with one automation, watch it run for a week, and only then add the next.
Two warnings from people who have done this before. First, log everything your automation does for the first month — every code extracted, every reply drafted — so you can see mistakes before customers do. Second, never let a webhook reply to mail automatically without a filter: a loop where two auto-responders email each other is funny exactly once.
Step 10: Set Rules, Limits and Sending Reputation Safely
Giving an agent an email identity is powerful, and power needs guardrails. This final step is the one that protects your domain’s reputation.
One inbox per agent, always. Sharing an inbox between agents makes it impossible to know who sent what, and one careless agent can damage the reputation of the address the others depend on.
Start with low volume. Send a few messages a day from a new inbox, not hundreds. Email providers trust new senders slowly, and a sudden burst from a brand-new address looks like spam.
Watch bounces and complaints. If messages start bouncing or landing in spam, stop and find out why before sending more. A short pause costs you a day; a burned domain costs you months.
Keep humans on the sensitive actions. Password resets, payment changes, and account deletions should never be fully automatic. The agent can prepare them, but a person should approve them.
Review the inboxes weekly. Open each inbox once a week, read what came in, and check what went out. You will catch misrouted mail, confused auto-replies, and signups you forgot about — the small messes that become big ones if nobody looks.
OpenMail gives each agent its own sending reputation, which is a real advantage over a shared pool — but your domain’s reputation is still yours. Treat it like a credit score: easy to damage, slow to rebuild.
OpenMail AI vs Other Ways to Give Agents Email
| Option | What the agent gets | Sending reputation | Setup effort |
|---|---|---|---|
| OpenMail AI | Its own inbox on your domain | Separate per agent | Low — one API call per inbox |
| Your personal Gmail | Your identity and your inbox | Shared with you | None, but risky |
| Shared sending pool | A pooled address | Shared with strangers | Low, but one bad actor flags everyone |
| Agent Inbox tools | Its own email/Slack/Telegram handle | Separate per agent | Medium — see our Agent Inbox guide |
| Building it yourself | Full control | Yours to manage | High — servers, DNS, spam filters |
OpenMail sits in the middle: more separation than Gmail or a shared pool, less work than building your own mail server. If you only need one agent to receive the occasional code, a simpler tool may be enough. If you plan to run several agents that talk to customers and sign up for tools, the per-agent inbox is the point.
Frequently Asked Questions About OpenMail AI
Is OpenMail AI free to use?
OpenMail launched on Product Hunt on November 4, 2026, as a developer-focused tool you can try without a big upfront commitment. Free limits and paid plans can change quickly in launch week, so check the pricing page on the official site — reached from the Product Hunt launch listing — before you build a workflow your business depends on.
Does OpenMail AI replace my Gmail?
No. OpenMail is for your AI agents, not for you. You keep your Gmail for your own mail. OpenMail gives each agent its own address on your domain so agent mail and human mail never mix.
What is the MCP server in OpenMail for?
The hosted MCP server connects OpenMail to AI assistants such as Claude and ChatGPT. Once connected, you can ask your assistant about your agent inboxes in plain English — for example, to list inboxes or check for new mail — without writing code or running your own server.
Can my agent receive verification codes with OpenMail?
Yes, that is one of its main use cases. When a tool sends a verification code to the agent’s OpenMail address, the message arrives in that inbox, and your code can read it over a webhook or WebSocket and pass the code back to the agent to finish the signup.
Is it safe to let an AI agent send email?
It is safe when you set boundaries: one inbox per agent, low volume at first, human approval for refunds and payments, and a weekly review of what each inbox sent and received. The risk is not the inbox — it is giving an agent unlimited freedom with no one watching.
How is OpenMail different from Agent Inbox?
Both give agents their own identity, but they cover different ground. Agent Inbox gives your agent an email address plus Slack and Telegram handles and pauses tasks for human approval. OpenMail focuses on email identity on your own domain, with per-agent sending reputation and a hosted MCP server. Many teams use them for different agents rather than choosing one for everything.
Final Thoughts
OpenMail AI solves a small problem that becomes a big one the moment your agents start working for real: they need an email identity of their own. A shared Gmail account or a pooled sending address works until the first verification code lands in your inbox at midnight, or the first customer reply goes out under your name.
Give each agent its own inbox on your domain, connect it to your assistant through the MCP server, test verification codes and replies by hand first, and set the guardrails before you automate. Do that, and your agents can sign up for tools, receive codes, and talk to customers without ever borrowing your identity.
Because OpenMail is only days old, expect changes — new features, pricing updates, and early bugs. Start with one test inbox, watch it for a week, and scale to more agents only when the first one behaves. That is the whole beginner strategy: one inbox, one agent, one week of watching.
Explore More Free AI Tools
Want to keep building your free AI toolkit? Try the AI Title Generator, Meta Description Generator, AI Rewriter, and Keyword Density Checker — all free on AIToolSteps. And if you want your agents to work with live marketing data too, read our Orphex MCP guide next.