

Every new hire remembers their first week. Too often, what they remember is confusion: a pile of PDFs in an email thread, a login that nobody set up, a buddy who was on holiday, and a manager who assumed someone else had explained the important parts. The company, meanwhile, remembers the same week as a cost — a slow start, a frustrated hire, and sometimes a resignation before the probation period ends. If you want to know how to use Kevor AI to fix that, this guide walks you through it step by step, even if you have never used an AI tool for HR before.
Kevor AI is an AI-powered onboarding analysis platform built for HR teams and People Operations. You upload your existing onboarding documents, and Kevor analyses them into a structured, visual workspace where you can see every stage, task, and dependency of your onboarding process — and, more importantly, the gaps, friction points, and risks hiding inside it. Kevor opened its private beta on November 9, 2026, and participation is completely free during the beta period, which runs until December 21, 2026. In this beginner-friendly guide, you will learn exactly how to use Kevor AI: how to apply for the beta, which documents to upload, how to read its AI insights, and how to turn its recommendations into a better first week for every new hire.
Step 1: Understand What Kevor AI Actually Is
Kevor AI is not a chatbot and not another HR system that asks you to rebuild your onboarding from scratch. It is an analysis tool: it takes the onboarding process you already have — scattered across documents, checklists, and emails — and turns it into one clear picture you can actually work with.
What Kevor AI Does for Your HR Team
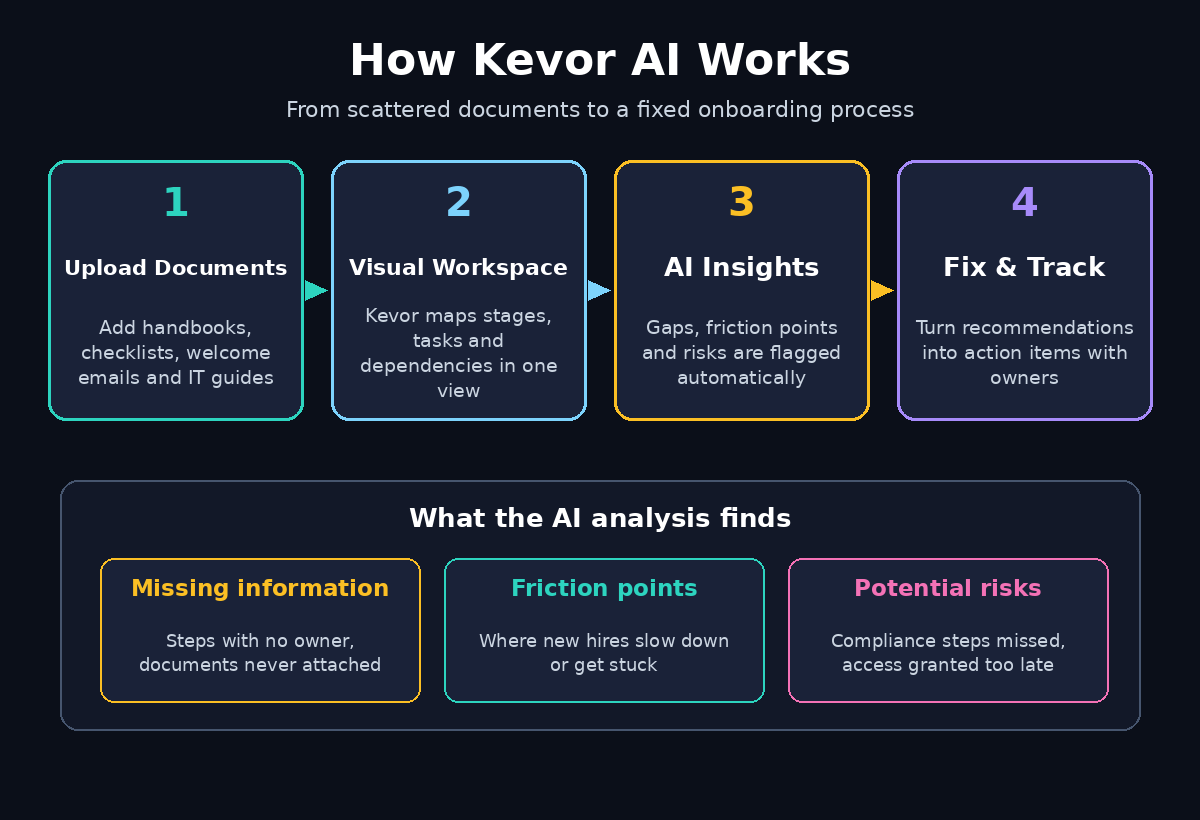
Here is what happens when you use Kevor AI:
- It reads your existing documents. Upload the onboarding materials you already use — handbooks, checklists, welcome emails, IT setup guides — and Kevor analyses them instead of asking you to type everything into a new system.
- It builds a visual workspace. Your onboarding process becomes a structured map of stages, tasks, and dependencies, so you can see the whole journey from offer letter to fully productive employee in one place.
- It finds what is missing. Kevor flags missing information, unclear ownership, and steps that depend on something nobody has scheduled — the gaps that usually only surface when a new hire gets stuck.
- It spots friction and risk. The AI highlights friction points where new hires slow down or get confused, and potential risks such as compliance steps with no owner or security access granted too late.
- It gives you recommendations you can act on. Every insight comes with a suggested fix, and you can turn those recommendations into trackable action items with owners and deadlines.
The big idea is simple: most onboarding problems are invisible because the process lives in five different places. Once it is mapped in one workspace, the problems are obvious — and fixable. If you work with a digital agency or any growing team that hires regularly, that visibility is worth more than another checklist template, because it shows you the process you actually run, not the one you think you run.
Step 2: Apply for the Free Private Beta at kevor.app
Kevor is in private beta, which means you apply for access rather than signing up instantly. The beta runs from November 9 to December 21, 2026, and participation is completely free during this period. The first group of beta users has already been approved, and applications are still open.
- Open kevor.app. Go to the official Kevor website in your browser and look for the beta application form.
- Apply with your work email. Use the email you actually check, because beta approval and access details will go there. A work email also tells the Kevor team you are a real HR or People Operations user.
- Say what you do. If the form asks about your role or team size, answer honestly: whether you run HR for a small company, manage People Operations, or handle onboarding for one department. Kevor is built for HR professionals and People Operations teams, so describe your onboarding workload in plain words.
- Watch for your approval email. Beta approvals are given in groups, so check your inbox — and your spam folder — after applying. When your access arrives, follow the link in the email to set up your account.
- Check the current status on the site. Beta dates, availability, and any pricing after the beta can change, so read the current information on kevor.app before you plan around it.
While you wait for approval, use the time well: gather the documents in Step 3, so you can upload them the moment your workspace opens.
Step 3: Gather Your Onboarding Documents
Kevor analyses the documents you already have, so the quality of its output depends on the quality of what you feed it. Spend twenty minutes collecting everything a new hire currently receives or that your team currently follows. Do not tidy it up first — the mess is exactly what Kevor is meant to find.
- The offer and pre-boarding pack. Offer letters, contracts, welcome emails, and anything sent between the signed offer and day one.
- The employee handbook and policies. The handbook, code of conduct, leave policy, and any policy documents a new hire is expected to read.
- Day-one and first-week checklists. Any checklist used by HR, IT, or the hiring manager — including the informal one in someone’s notebook, if you can get a copy of it.
- IT and access setup instructions. Account creation steps, laptop setup, software logins, and security training requirements.
- Role-specific training material. The guides, videos, or documents a new hire in a particular role is given in their first month.
- Buddy and manager guides. Anything that tells a buddy or a hiring manager what they are supposed to do during onboarding.
Two practical tips before you upload anything. First, remove or redact sensitive personal data — Kevor needs your process, not an individual employee’s salary or private details, so upload templates and process documents rather than a real person’s filled-in forms. Second, note which documents are current and which are out of date; Kevor will help you spot contradictions, but knowing the state of your own files helps you judge its findings.
Step 4: Upload Your Documents to Kevor AI
Once your beta access is live, the first real step inside Kevor is the upload. This is deliberately simple — no templates to fill in, no fields to map, no onboarding of the onboarding tool.
- Sign in to your Kevor workspace. Open kevor.app, sign in with the account from your beta approval, and look for the upload or “add documents” option in your workspace.
- Upload your onboarding documents. Add the files you gathered in Step 3. Upload them in one batch if the workspace allows it, so Kevor can analyse the whole process together rather than one document at a time.
- Wait for the analysis. Kevor reads the documents and builds your structured workspace. Give it a few minutes, especially on the first upload — it is doing the heavy reading you would otherwise spend a day on.
- Check that everything was read. Skim the workspace and confirm that each of your documents is represented. If a file did not upload properly, add it again before you trust the analysis.
If you already work with agentic AI tools, the pattern will feel familiar: give the AI the real source material, let it structure it, then check its work. The upload is the only input Kevor needs — everything after this is reading, deciding, and fixing.
Step 5: Explore Your Visual Onboarding Workspace
This is where Kevor earns its place. Instead of a folder of PDFs, you now have a single visual workspace that shows your onboarding process as it actually runs.
- Walk through the stages. Kevor organises your process into stages — for example, pre-boarding, day one, first week, and first month. Read them in order, the way a new hire experiences them.
- Open the tasks inside each stage. Every stage contains tasks: send the laptop, create the email account, schedule the compliance training, introduce the buddy. Check that the tasks match what your team really does, not just what the handbook says.
- Follow the dependencies. Some tasks depend on others — the new hire cannot complete security training until the account exists, and the account cannot exist until IT gets the start date. Kevor maps these dependencies, so you can see the chains that delay everything when one link slips.
- Look for stages with too much — or too little — in them. A day-one stage with thirty tasks is a sign that your first day is overloaded. A first-month stage with two tasks is a sign that new hires are left to drift after week one.
Do this exploration with a colleague if you can. Two people reading the same map will disagree about what really happens on day one — and that disagreement is useful, because it shows you where the documented process and the real process have drifted apart.
Step 6: Read the AI Insights — Gaps, Friction Points and Risks
With the workspace built, Kevor’s AI analysis is the part that saves you the most time. It reviews the whole map and flags three kinds of problems.
Missing Information
These are the holes: a step that is mentioned but never explained, a document that is referenced but never attached, a task with no owner, or a deadline that is never stated. New hires hit these holes hardest, because they have nobody to ask yet and no context to fill in the blanks themselves. Fix missing information first — it is the cheapest problem to solve and the one that causes the most confusion.
Friction Points
Friction points are the places where a new hire slows down or gets stuck: three different forms asking for the same details, a training video that assumes knowledge nobody has taught yet, or a handover that depends on one person who is often on leave. Kevor highlights where the process fights the new hire instead of helping them. Each friction point is a small fix with an outsized effect on how the first week feels.
Potential Risks
Risks are the problems with consequences: a compliance step with no owner, security access granted days late, a probation review that nobody schedules, or a policy the new hire is supposed to follow but was never given. These are the findings to take to your manager first, because they are the ones that can turn into a real incident — a missed legal deadline or a security gap — if they stay unfixed.
Read every insight, but do not accept them blindly. Kevor is analysing documents, not watching your office. If it flags something your team actually handles well in person, mark it as handled and move on. The AI is a second pair of eyes, not the boss.
Step 7: Turn Recommendations into Trackable Action Items
Insights are only useful if they become work. Kevor lets you turn its recommendations into action items you can track — and this is the step that separates a nice report from a better onboarding process.
- Pick the recommendations that matter. Start with the risks, then the missing information, then the friction points. You do not need to fix everything at once; you need to fix the things that hurt new hires most.
- Give every action item an owner. A recommendation without a named person is a wish. Assign each fix to the person who actually owns that part of onboarding — HR, IT, or the hiring manager.
- Set a realistic deadline. Most fixes are small: rewrite a paragraph, attach a missing document, move a task to a different stage. Give each one a date before the next new hire starts, so the fix lands before it is needed again.
- Track them in the workspace. Keep the action items inside Kevor where the team can see them, so the next time you open the workspace, the state of each fix is visible — done, in progress, or still waiting.
A good rule of thumb: if you can close three action items before your next new hire starts, your next onboarding will already feel noticeably smoother. Small, finished fixes beat a long list of planned ones.
Step 8: Fix the Biggest Gap First
Every onboarding process has one gap that causes the most damage. It is usually obvious once the workspace is mapped: the missing IT setup that delays day one, the buddy system that exists on paper but not in practice, or the compliance training that nobody schedules until week three. Fix that one first, before touching anything else.
- Name the gap in one sentence. “New hires wait two days for a laptop” or “Nobody tells new hires who their buddy is.” If you cannot name it in one sentence, you have not found it yet.
- Write the fix in plain language. Who does what, by when, and how will the new hire know it happened? A fix that a new hire cannot see is not a fix.
- Update the document, not just the workspace. Kevor shows you the problem, but the source document is where the fix lives. Update the handbook, the checklist, or the welcome email itself, then re-upload it so the workspace reflects the real process.
- Tell the people involved. The hiring manager, the buddy, and IT need to know the process changed. A fix that only HR knows about will be undone by the next busy week.
This step is where Kevor’s value becomes concrete. The workspace is a map; the fix is the journey. One visible improvement — a laptop ready on day one, a buddy introduced in the first hour — changes how a new hire talks about your company, and they will talk about it.
Step 9: Share the Workspace with Your Team
Onboarding is never one person’s job. HR writes the process, IT sets up the access, managers run the first week, and buddies do the informal work that makes a new hire feel welcome. Kevor’s workspace is most useful when all of them can see it.
- Share the workspace with the people who run onboarding. Give access to the hiring managers, the IT contact, and anyone who owns a stage or a task in the map.
- Walk them through it once. A ten-minute walkthrough — stages, tasks, dependencies, and the three or four fixes you are working on — is enough for most people to understand the workspace and their part in it.
- Agree who owns what. Use the shared view to settle the ownership arguments that usually stay unresolved: who sends the welcome email, who creates the accounts, who schedules the first review. Write the owners into the workspace.
- Use it for the next hire. When the next new hire starts, run their onboarding from the workspace itself. If a task is missing or wrong, fix it there and then — the workspace improves every time it is used.
For a growing team, this shared view is the difference between onboarding that depends on one experienced HR person and onboarding that survives that person being on holiday. The process lives in the workspace, not in one person’s head.
Step 10: Review and Improve Your Onboarding Every Month
Onboarding is not a project you finish; it is a process that drifts. Roles change, tools change, policies change, and the documents quietly go out of date. A monthly review keeps the workspace honest.
- Re-upload changed documents. Whenever a handbook, checklist, or policy changes, upload the new version so Kevor’s analysis reflects the current process.
- Ask the last new hire. The best source of friction points is the person who just lived through the process. Ask them what confused them, what was missing, and what they wish they had known on day one — then check whether Kevor’s workspace already shows it.
- Check your action items. Review the open items from Step 7. Close the finished ones, chase the overdue ones, and add new ones for anything the last hire surfaced.
- Track one number. Pick a simple measure — time to first productive task, or the new hire’s rating of their first week — and watch it month by month. If the number improves, your fixes are working. If it does not, the workspace will show you where to look next.
That monthly loop is the whole point of learning how to use Kevor AI: the first analysis finds the problems, and the regular reviews stop them coming back.
Kevor AI vs Other Ways to Fix Onboarding
Before you commit your team to a new tool, it helps to see how Kevor compares with the ways HR teams usually handle onboarding today. Each approach has a place — the question is which one finds the problems you cannot see.
| Approach | What it does well | Where it falls short | Best for |
|---|---|---|---|
| Kevor AI | Maps your real process from your documents; finds gaps, friction, and risks automatically | Private beta — access by application; new tool, so long-term pricing is not yet set | HR teams that want a clear picture of their onboarding as it actually runs |
| Spreadsheets and checklists | Free, familiar, and easy to start | Shows tasks, not dependencies; gaps stay hidden until a new hire hits them | Tiny teams with one or two hires a year |
| General AI chatbot | Can draft a checklist or rewrite a welcome email quickly | Cannot analyse your whole process or track fixes; you supply all the context every time | One-off documents and drafts |
| Full HR suite | Covers hiring, payroll, and onboarding in one system | Expensive, heavy to set up, and built around its own process rather than yours | Large companies standardising HR across many teams |
The honest comparison is this: a spreadsheet is cheaper and a full HR suite is more complete, but neither one reads your documents and tells you what is missing. Kevor’s job is narrower — find the problems in the process you already have — and for a team that hires regularly, that narrow job is the one that matters most. During the free beta, that analysis costs nothing, which makes it an easy test: upload your documents, read the insights, and judge it on what it finds.
Frequently Asked Questions About Kevor AI
Is Kevor AI free?
Participation in the private beta is completely free. The beta runs from November 9 to December 21, 2026, and applications are still open at kevor.app. Pricing after the beta has not been announced, so check kevor.app for the current plans before you commit to anything long term. Start with the beta, judge it on what it finds in your own documents, and decide later.
How do I get access to Kevor AI?
Apply for the private beta at kevor.app. Fill in the application form with your work email and a short description of your HR or People Operations role. Beta approvals are given in groups, and the first group has already been approved, so watch your inbox — and your spam folder — after applying.
Do I need technical skills to use Kevor AI?
No. Kevor is built for HR professionals and People Operations teams, not for developers. You upload the documents you already have, and Kevor builds the visual workspace and the analysis for you. If you can attach a file to an email, you can use Kevor.
What documents should I upload to Kevor AI?
Upload the documents that describe your onboarding process: offer letters and welcome emails, the employee handbook and policies, day-one and first-week checklists, IT setup instructions, role-specific training material, and any buddy or manager guides. Upload templates and process documents, and remove personal details about individual employees before you upload.
Does Kevor AI replace our HR system?
No. Kevor analyses your onboarding process and helps you fix it; it does not run payroll, store employee records, or replace your HR suite. Think of it as a diagnostic tool: it shows you the gaps, friction points, and risks in the process you already have, and helps you turn the fixes into trackable action items. Your HR system stays where it is.
Who is Kevor AI best for?
Kevor is built for HR professionals, People Operations teams, and anyone who manages employee onboarding — whether you hire a few people a year or a few every month. It is most useful for teams whose onboarding lives in several documents and several people’s heads, because that is where the gaps hide.
Final Thoughts on Kevor AI
Most onboarding problems are not caused by bad intentions. They are caused by a process that nobody can see whole — a checklist here, a handbook there, an email thread somewhere else, and a step that everyone assumes someone else is doing. Kevor AI’s contribution is simple and genuinely useful: it puts the whole process in one visual workspace, reads it carefully, and tells you what is missing, what is slowing new hires down, and what could become a real risk.
The biggest mistake beginners make with a tool like this is treating the first analysis as a report to file away. Do the opposite: pick the biggest gap, fix it before your next new hire starts, and share the workspace with the people who run onboarding with you. By the third or fourth hire, the fixes will have compounded into a first week that feels organised, welcoming, and professional — which is exactly what a new hire should remember. Apply for the free private beta at kevor.app today, upload your documents, and let your own onboarding process be the test: if Kevor finds one gap you did not know about, it has already paid for itself.
Explore More Free AI Tools
Want more free AI tools for your team? Try the AI Title Generator, Meta Description Generator, AI Rewriter, and Keyword Density Checker — free tools on AI Tool Steps to help you write better job posts, welcome emails, and onboarding documents with Kevor AI.