

Every AI assistant you use starts from zero — and Egoist AI Passport is the free tool that finally fixes that. You tell ChatGPT your food allergies, then you have to tell Claude the same thing again. You plan a trip in Gemini, then Perplexity has no idea where you are going. You repeat yourself to every chatbot, every day — and meanwhile, you have no real control over what any of them remembers about you.
Egoist AI Passport fixes both problems at once. It is a free service from Y Combinator-backed startup Egoist Machines that launched on October 7, 2026. It works like a passport for your personal context: the details you share with one AI assistant can travel to another — but only after you approve the move. Nothing is shared behind your back, and you can revoke access or delete data at any time.
In this beginner-friendly guide, you will learn exactly how to use Egoist AI Passport: creating your free passport, connecting ChatGPT, Claude and Gemini, reviewing your inbox, setting permissions, and using real everyday workflows. No technical background needed.
Step 1: Understand What Egoist AI Passport Is
Egoist AI Passport is not another chatbot. It does not answer questions, write emails, or generate images. It sits between you and your AI assistants as a permission layer for your personal data.
Think of it like OAuth — the system that lets you sign in to a website with your Google account. The difference is that instead of logging you in, AI Passport controls which fragments of your digital life each AI tool gets to see, and for how long.
Here is the core idea in plain language:
- You create one passport at ego.ist (the service is also available as an iOS app).
- You connect your AI assistants and everyday apps — ChatGPT, Claude, Gemini, Perplexity, Gmail, Google Calendar, Notion, Slack, Spotify, Strava, and more. The company says it has connectors for over 800 apps.
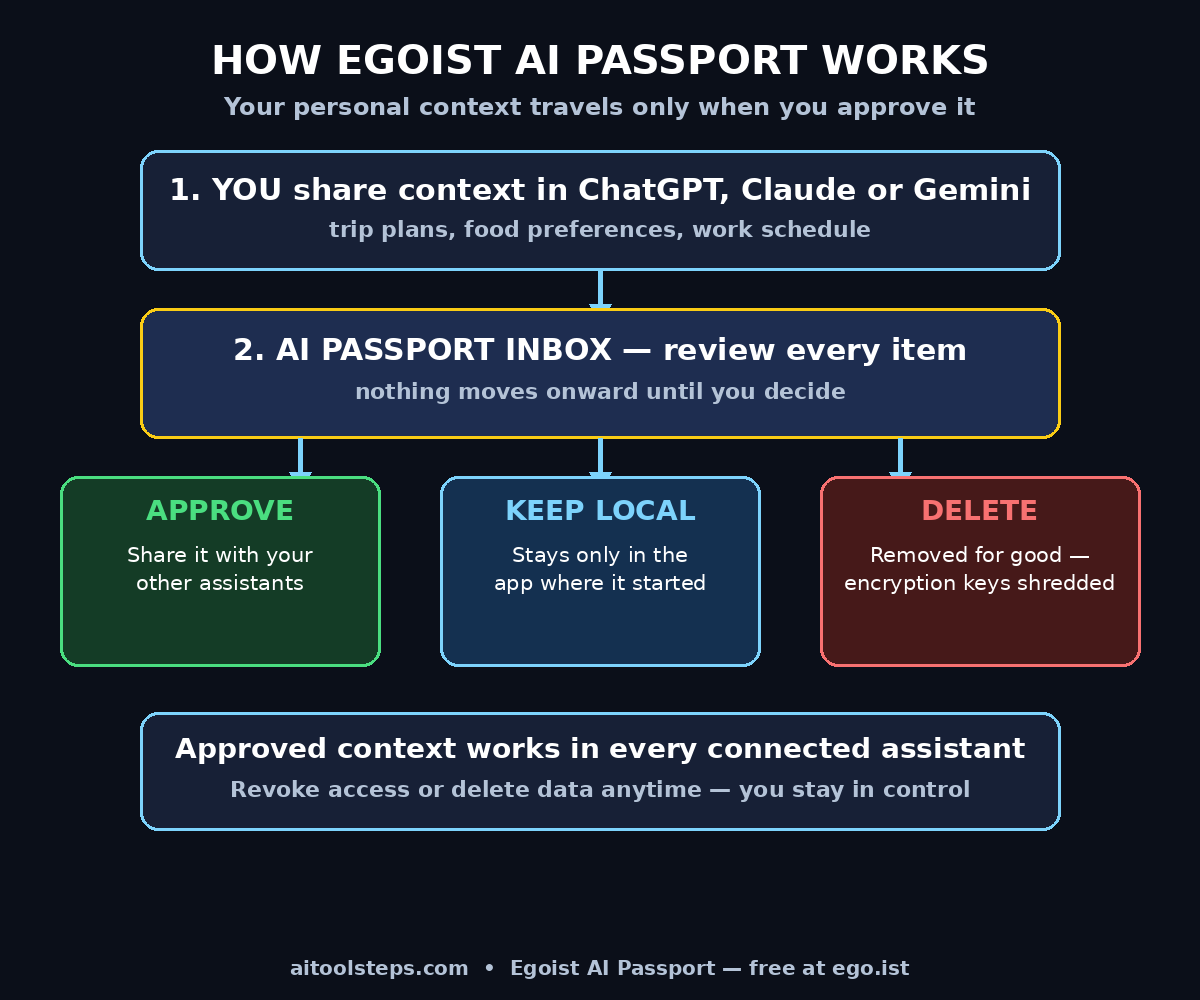
- When you share new information in a connected app — for example, planning a trip or mentioning a food preference — that detail syncs to your personal inbox inside AI Passport.
- You review each item in the inbox and decide: share it with other apps, keep it only in the original app, or delete it completely.
- Connected apps can also request information about you. You can set default answers for routine requests, but sensitive details such as your date of birth are never handed over without your explicit permission.
The company behind it, Egoist Machines, is a two-person startup founded by Erin McGurk and Dr. David Khachaturov. It raised a $3 million seed round with investors including Y Combinator and Goodwater Capital. That backing matters for beginners because it means the free service is funded by venture capital, not by selling your data — the company publicly pledges never to sell your memories, share them with third parties for their own purposes, or use them to train AI models.
Step 2: Create Your Free AI Passport at ego.ist
Getting started with Egoist AI Passport takes about five minutes, and there is no payment step. AI Passport launched as a free service, and the company has not announced a paid tier.
- Open your browser and go to ego.ist, or download the AI Passport app from the Apple App Store on your iPhone.
- Claim your handle. Your handle is your passport identity — pick something simple and memorable, the way you would pick a username.
- Create your account and sign in. You will land on your passport dashboard, which is mostly empty at first. That is normal — your passport fills up as you connect apps and share context.
- Take a minute to look around the dashboard before connecting anything. Find the Inbox, the list of connected apps, and the permissions settings. Knowing where these three areas live will make every later step faster.
One honest note for beginners: this is a young product. It launched in October 2026, so expect the interface to change as the team ships updates. The core flow — connect, review, approve — has stayed the same since launch.
Step 3: Connect ChatGPT, Claude and Gemini First
Your AI assistants are the most valuable connections, so start with them. These are the tools where your context actually lives.
- From the dashboard, open the list of available connections and find ChatGPT first. Connect it and approve the permission request so AI Passport can receive the context you share there.
- Repeat the process for Claude, then Gemini, then Perplexity if you use it. The service also lists Muse among its supported assistants.
- Connect only the assistants you actually use. Every connection is a door into your passport, and a tidy passport is easier to manage than one with twenty half-used apps.
- After connecting, do a quick test: tell ChatGPT one simple preference, such as “I prefer short answers with bullet points” or “I am vegetarian.” Then open your AI Passport inbox and check whether that detail arrived as a proposal waiting for review.
This test teaches you the most important habit in the whole system: nothing moves between assistants automatically. A detail you tell ChatGPT stays in ChatGPT until you approve it in your inbox. That is the entire point of the product.
Step 4: Connect Your Everyday Apps
AI assistants are only half the picture. The other half is the everyday apps where your life actually happens. AI Passport supports connections to Gmail, Google Calendar, Notion, Slack, Spotify, and Strava, among hundreds of others.
Connect apps in this order of usefulness for most beginners:
- Google Calendar — your schedule is the context assistants need most. With calendar access, an assistant can stop suggesting meetings during your gym hour or plan around your travel dates.
- Gmail — email holds confirmations, bookings, and threads that assistants can use to answer questions about your plans without you retyping them.
- Notion — if you keep notes, projects, or a reading list in Notion, connecting it means your assistants can work with your actual documents instead of guessing.
- Spotify and Strava — these are optional but fun. Music taste and fitness activity help assistants make better recommendations, from workout playlists to running routes.
For each app, read the permission screen before you approve it. AI Passport describes each app’s access as limited to what it needs, for a stated purpose and time. If an app asks for more than you are comfortable sharing, skip it — you can always connect it later. A small business owner who wants help with this kind of setup can also talk to a digital agency such as D365A, which helps teams put AI tools to work without losing control of their data.
Step 5: Review Your Inbox — Approve, Keep or Delete
The inbox is the heart of AI Passport, and it is where you will spend most of your time. Every time a connected app learns something new about you, a proposal lands in your inbox. Nothing is shared onward until you act on it.
For each item in your inbox, you have three choices:
- Approve — share this detail with your other connected apps. Your food preference, your travel dates, or your working hours can now be used by Claude, Gemini, and the rest.
- Keep it local — leave the detail only in the app where it started. The information exists, but no other assistant can see it.
- Delete — remove it entirely. According to the company, deleting data does not just remove files — the system shreds the encryption keys, which makes the data unrecoverable.
Build a simple weekly habit: open your Egoist AI Passport inbox once a week, approve the useful items, delete the ones you do not want traveling, and leave the rest local. Five minutes a week is enough to keep your passport accurate. This review step is what makes AI Passport different from the invisible memory features inside individual chatbots, where you often cannot see what the assistant remembers or when it learned it.
Step 6: Set Default Permissions and Protect Sensitive Details
Reviewing every item by hand is great for control, but it gets tiring. That is why Egoist AI Passport lets you set defaults for how apps may request information.
- Open your permissions settings and choose a default response for routine requests: approve automatically, ask every time, or deny by default. Most beginners should start with “ask every time” and only switch to automatic approvals for categories they fully trust.
- Remember the hard rule: sensitive information such as your date of birth is never shared without your explicit permission, no matter what your defaults say. The company built this as a floor you cannot accidentally remove.
- Review your defaults once a month. Your comfort level will change as you learn which assistants you trust and which requests feel unnecessary.
This permission model is also the reason privacy-conscious users are paying attention to AI Passport. Instead of each chatbot quietly building its own profile of you, one dashboard shows what is shared, with whom, and when. If you follow news about AI agents and how they handle personal data, sites like Agentic Affairs track this space closely, and the permission-first approach is quickly becoming the standard people expect.
Step 7: Let Your Context Travel Between Assistants
Once your Egoist AI Passport is connected and your inbox is reviewed, the real benefit appears: you stop repeating yourself.
Here is a simple example. You tell ChatGPT that you are planning a trip to Istanbul in December and that you prefer morning flights. You approve that detail in your AI Passport inbox. The next day you ask Claude to draft a packing list — and Claude already knows the destination, the month, and your flight preference. You never typed it twice.
A few more ways beginners use this every day:
- Tell Gemini your weekly schedule once, and let Perplexity use it when it suggests the best times for deep work.
- Share a dietary preference once, and every assistant that helps you plan meals respects it.
- Keep your project notes in Notion, and let any connected assistant reference them when you ask for a status summary.
The key is to approve only the details that genuinely help. A passport full of approved trivia is not better than a small, accurate one. Approve the preferences that save you retyping; keep the rest local.
Step 8: Revoke Access and Delete Data Anytime
Control means nothing if you cannot take it back. AI Passport lets you revoke access whenever you choose, and the company says revoking a category cuts off data immediately at the next request.
- Stop an app from seeing a category of information by opening your permissions, finding the app, and revoking that category. The app keeps working — it simply loses access to that slice of your context.
- Remove an app completely by disconnecting it from your passport. Its previous requests stop, and no new context flows to it.
- Erase something for good by deleting the item from your inbox or your passport. The company says deletion shreds the encryption keys protecting that data, so it cannot be recovered.
Try this once on purpose with a test detail, so you trust the controls before you rely on them. Share a harmless preference, approve it, then revoke it and confirm the other assistants lose access. A five-minute drill now saves a panicked search later.
Step 9: Use Memory Lock and Passkeys for Extra Security
AI Passport stores your context in LodeDB, an open-source embedded vector database, with each user getting an isolated data store protected by cryptographic access controls. Sessions are sealed with AES-256-GCM encryption. You do not need to understand those terms to use the product, but two features are worth turning on.
- Memory Lock — this feature can further protect your data store using keys derived from your passkeys. Turn it on if it is offered on your account, because it ties access to a key only you hold.
- Passkeys — where the service offers passkey sign-in, use it instead of a password. Passkeys resist phishing in a way passwords cannot, which matters for an account that holds your personal context.
Also remember the company’s stated limits: it says its access to Google data is read-only and on-demand, health and fitness information requires explicit consent and stays out of training pipelines, and your memories are never sold or used to train models. Those are company claims rather than independently tested findings, so treat them as the product’s promise — and keep your own weekly inbox review as the real enforcement.
Step 10: Try Three Real Beginner Workflows
Theory is fine, but Egoist AI Passport earns its place by saving you time. Try these three workflows in your first week.
Trip planning without repeating yourself. Plan the trip in ChatGPT, approve the dates, destination, and preferences in your inbox, then ask Claude or Gemini to build the packing list, the daily itinerary, or a budget estimate. Each assistant starts with the same facts.
A morning briefing that knows your day. With Google Calendar and Gmail connected, ask your assistant for a morning briefing: today’s meetings, unread confirmations, and anything that needs a reply. Because the context is approved in your passport, the briefing works in any connected assistant, not just the one you set it up in.
A job search that remembers your criteria. Tell one assistant your target role, salary range, and preferred cities. Approve those details, then use a different assistant to draft cover letters or compare job posts. Your criteria travel with you, and you can revoke them the moment the search ends.
If any workflow feels wrong — an assistant using a detail you did not approve, or a suggestion based on stale information — open the inbox, find the item, and delete or revoke it. Then tell the assistant the corrected fact once, approve it, and move on.
AI Passport vs the Alternatives
| Approach | How your context moves | Who controls sharing | Best for |
|---|---|---|---|
| Egoist AI Passport | Inbox review, then approved sharing across apps | You, per item and per category | Beginners who want control without effort |
| Starting fresh in every assistant | It does not move — you retype everything | Nobody, because nothing is shared | People who use one assistant only |
| Built-in chatbot memory | Each assistant remembers silently on its own | The assistant, mostly invisible to you | Convenience, if you trust one provider |
| A shared memory layer | Every connected tool reads one common memory | You, through one account, no approval queue | Power users running scheduled agents |
The table makes the trade-off clear. AI Passport is the middle path: more portable than starting fresh, more transparent than silent chatbot memory, and more careful than a shared memory layer that skips approvals entirely. For a beginner, that middle path is usually the right one.
Frequently Asked Questions
Is Egoist AI Passport really free?
Yes. AI Passport launched on October 7, 2026 as a free service, available at ego.ist and as an iOS app. The company raised a $3 million seed round, and it has not disclosed a paid tier or any paying-customer numbers. The free service is the whole product today.
Which AI assistants work with AI Passport?
The company lists ChatGPT, Claude, Gemini, Perplexity, and Muse among its supported AI assistants, plus productivity apps such as Notion, Gmail, Google Calendar, Slack, Spotify, and Strava. In total it claims connectors for over 800 apps, with more added regularly.
Does AI Passport share my data automatically?
No. Egoist AI Passport does not share your data automatically. Details sync to your inbox first, and nothing moves onward until you approve it. Apps can request information, and you can set defaults for routine requests, but sensitive details such as your date of birth always require your explicit permission.
Can I delete my data from AI Passport?
Yes. You can delete individual items from your inbox or passport, revoke an app’s access to a category, or disconnect an app entirely. The company says deleting data shreds the encryption keys, making it unrecoverable, and that revoking access cuts off data at the next request.
Is my information safe inside AI Passport?
The company says each user gets an isolated data store protected by cryptographic access controls, sessions are sealed with AES-256-GCM encryption, and an optional Memory Lock ties protection to keys derived from your passkeys. It also pledges never to sell memories or use them to train models. These are the company’s own claims; your weekly inbox review is the practical way to stay in control.
Do I still need to repeat myself to AI assistants?
Much less, but not zero. Once you approve a detail in your inbox, connected assistants can use it. But a new preference still starts in one app, waits in your inbox, and only travels after you approve it. That short delay is the price of control — and for most people, it is worth paying.
Final Thoughts
Egoist AI Passport solves a problem most people feel but cannot name: every AI assistant knows a little about you, none of them share, and you have no idea what any of them remembers. The passport flips that around. One dashboard, one inbox, one set of permissions — and your context travels only when you say so.
Start small. Create your free Egoist AI Passport, connect the two or three assistants you actually use, approve one or two details, and try the trip-planning workflow. Review your inbox once a week. Turn on Memory Lock. Within a month you will notice the difference: fewer repeated introductions, better answers, and — most importantly — a clear view of what your AI tools know about you.
The age of telling every chatbot the same thing is ending. With a free passport and five minutes of setup, you can make your AI assistants remember what matters and forget what does not — on your terms.
Explore More Free AI Tools
Want to keep exploring free AI tools? Try the AI Title Generator, Meta Description Generator, AI Rewriter, and Keyword Density Checker at https://aitoolsteps.com/ — free tools that help you write better content in minutes.