

Here is a frustration every designer and developer knows well, and it is the reason this Crossfade AI for beginners guide exists: you describe a screen to your coding agent, it writes beautiful code for it, and then you still have to rebuild the whole thing by hand in Figma. The design and the code live in two different worlds, and you are the bridge between them, copying spacing, colors, and layouts from one to the other.
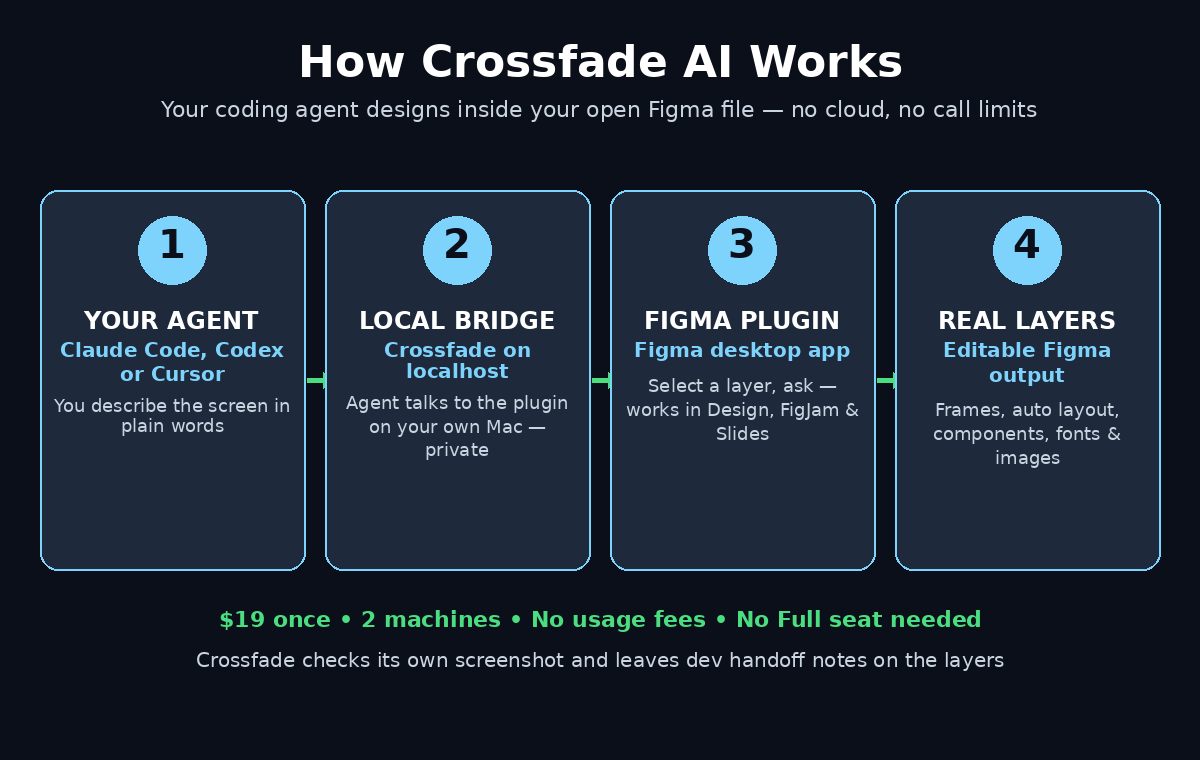
Crossfade AI closes that gap. Launched on Product Hunt on November 11, 2026, Crossfade is a Figma plugin for Mac that connects your coding agent — Claude Code, Codex, or Cursor — directly to the Figma file you already have open. You select a layer, ask for what you want in plain words, and the agent builds real, editable Figma layers: frames, auto layout, components, your own fonts, and your own images. There are no screenshots pasted into a chat, no rebuilding by hand, and no call limits cutting you off halfway through a task.
The best part for beginners: the whole thing runs on your own machine over localhost, so your design files never leave your computer, and there are no usage fees — Crossfade costs $19 once, and one license covers two machines. This Crossfade AI for beginners guide walks you through the setup step by step, from installing the plugin to shipping your first agent-built screen.
Step 1: Understand What Crossfade AI Actually Does
Before you install anything, it helps to understand the idea in one sentence — and this Crossfade AI for beginners guide keeps it simple: Crossfade lets your coding agent design inside your open Figma file, the same way it writes code in your editor.
Here is the flow. You open a Figma file on your Mac. You open the Crossfade plugin. Your coding agent — Claude Code is the one it was built and tested on, but Codex and Cursor connect the same way — talks to the plugin over localhost, which is just your own computer talking to itself. You select a layer, type a request like “turn this wireframe into a polished pricing page using our design system,” and the agent builds the design as real Figma layers you can click, edit, and hand off to a developer.
Why Crossfade AI for Beginners Works So Well
Three ideas make Crossfade different from asking an AI chatbot to “make a design”:
- It builds real layers, not pictures. The agent creates frames, auto layout, and components — the same objects you would build by hand. You can change the text, swap a color, or resize a frame afterwards.
- It works in your file, with your system. It uses your components and design system, your fonts, and your images, instead of inventing a generic look from scratch.
- It checks its own work. After building, Crossfade takes a screenshot of what it made, checks it, and fixes what looks wrong — before you ever see it.
Why does this matter now? Because design tools are turning into agent workbenches. Figma itself announced on November 8, 2026 that it is integrating AI coding agents into its platform, and it shipped code layers and Specs in October 2026. Crossfade is the indie answer to the same shift: instead of waiting for a platform feature, it gives your agent a direct, private line into the canvas you already use. If you follow agentic AI news, you will recognize the pattern — agents are moving from chat windows into the tools where real work happens, and design is next in line.
Step 2: Check What You Need Before You Start
Crossfade is a small, focused tool, so the requirements are short — but one of them catches beginners out, so check all four before you pay anything.
- A Mac. Crossfade runs on macOS. The plugin talks to your agent over localhost on your own machine, which is how it stays private and unlimited.
- The Figma desktop app. Crossfade needs the Figma desktop app open with your file loaded. It does not work in a browser tab, because the plugin bridge runs locally on your Mac.
- A coding agent. Claude Code is the agent Crossfade was built and tested on, and it is the smoothest first choice. Codex and Cursor connect the same way if that is what you already use.
- A Crossfade license — $19 once. There is no subscription and no usage fee. One license covers two machines, so your laptop and your desktop are both covered. Be honest with yourself here: this is not a free tool, but $19 once is less than a single month of a Figma seat, and there is nothing to pay afterwards.
One more thing worth knowing before you start: you do not need a Figma Full seat to write with Crossfade. That matters if you are a developer, a founder, or a freelancer who reviews designs but never paid for a full design seat. If you already pay for Figma, nothing changes — Crossfade sits alongside it. And if you work with a digital agency that hands you Figma files, Crossfade lets you make real edits to those files with an agent, even on a viewer-style seat.
Step 3: Install Crossfade and Open the Plugin in Figma
For a Crossfade AI for beginners first run, installation takes a few minutes, and the setup guide at crossfade.company/setup walks through it screen by screen. Here is the short version so you know what to expect.
- Buy your license from the Crossfade website. Keep the license key somewhere safe — you will need it on each machine you use.
- Install the Crossfade plugin in Figma from the plugin page, then open the Figma desktop app on your Mac.
- Open the Figma file you want to work in — an existing project is better than a blank file for your first try, because the agent can see your real components and styles.
- Run the Crossfade plugin from the Figma plugins menu. The plugin panel opens and starts its local bridge, ready for your agent to connect.
- Follow the setup guide to point your coding agent at the bridge. The guide covers Claude Code, Codex, and Cursor, so pick the one you use and follow its section only.
Do not skip the setup guide on your first run. The connection is simple once it is done, but the guide shows you exactly where each setting lives, and a wrong port or a missed step is the most common reason a first connection fails. If you get stuck, the FAQs at crossfade.company/#faq answer the common setup questions.
Step 4: Connect Claude Code to Your Open Figma File
With the plugin running, the next step in this Crossfade AI for beginners workflow is telling your agent where Figma is. This is the part that feels new if you have only ever used AI in a chat window, so take it slowly.
- Make sure the Figma desktop app is open, your file is loaded, and the Crossfade plugin panel is running. The bridge only answers while the plugin is open.
- Open Claude Code in your terminal (or open Cursor or Codex, if that is your agent). Point it at the Crossfade bridge using the connection details from the setup guide.
- Ask the agent a small test question, such as “What frames are in the open Figma file?” If it answers with your real frame names, the connection works.
- If the agent says it cannot see the file, check three things in order: the Figma desktop app is open (not the browser), the Crossfade plugin panel is running, and the agent is pointed at the right local address. Nine times out of ten, one of those three is the fix.
Notice what is happening here: nothing is uploaded to a Crossfade server, because there is no Crossfade server. The bridge answers only your agent, on your own machine. Your design file stays private by design, which is a real difference from cloud AI design tools that send your file to their servers before they do anything with it.
Step 5: Select a Layer and Ask for Your First Design
Now the fun part — and the moment this Crossfade AI for beginners guide gets hands-on. Crossfade’s workflow is built around selection: you select a layer, and you ask. That is the whole interface, and it is what keeps the agent’s work focused instead of wandering across your file.
- In Figma, click the frame or layer you want the agent to work on. A wireframe, an empty frame, or a rough draft all work — the rougher the starting point, the more impressive the result feels.
- In your agent, describe what you want in plain words. Be specific about the outcome, not the clicks: “Turn this wireframe into a finished landing page hero, using our primary button component and the headline style from the brand frame.”
- Name the pieces that matter: which component to use, which colors, what the headline should say, and what the call-to-action button should do. The more concrete the brief, the fewer corrections you will need.
- Let the agent work. It builds the layers one by one in your file, and you can watch the canvas change in real time.
Keep your first request small on purpose. A single hero section or a single pricing card teaches you the flow faster than a whole ten-screen app, and you can reuse the same steps for the bigger job later. A good first test is a screen you already have as a rough wireframe, because you will instantly see the difference between “before” and “after” — and you will learn how much detail your prompts need.
Step 6: Review the Real Editable Layers It Builds
When the agent finishes, the Crossfade AI for beginners review habit starts: do not just look at the result — click into it. This is the step that separates Crossfade from image generators, and it is where beginners should spend their time.
- Click through the layers the agent created. You should see proper frames, auto layout, and components — not one flat image pretending to be a design.
- Try editing something: change a headline, swap a button color, resize a frame. If it behaves like a normal Figma file, the agent did its job.
- Check the spacing and alignment. Auto layout should hold the design together when you change text length, and components should stay linked to your library.
- If something looks off, tell the agent exactly what to fix, with the layer selected: “Tighten the spacing between the headline and the subtext in this frame, and center the button.”
This review habit is the skill that makes agent design useful. The agent is fast, but you are the designer: your eye decides what ships. Treat the first pass as a strong draft, not a finished design, and you will get better results than someone who accepts everything the agent produces without looking.
Step 7: Work with Auto Layout, Components, Fonts, and Images
Crossfade’s biggest practical advantage is that it respects the way professional Figma files are built. Here is how each piece works in a Crossfade AI for beginners workflow.
- Auto layout: Ask the agent to build with auto layout, and your frames will resize and adjust properly when text changes. Say so in your prompt — “use auto layout for this card” — instead of assuming it.
- Components: Tell the agent to use your existing components by name. “Use our Primary Button component for the call to action” keeps the design inside your design system instead of inventing a one-off button.
- Fonts: The fonts installed on your Mac just work. If your brand font is on your machine, the agent can use it — there is no font upload step and no substitution surprise.
- Images: Images are placed in the same run as the rest of the design. If your brief needs a product photo or a hero image, include it in the request instead of adding it by hand afterwards.
One practical tip: keep a small “brand” frame in your file with your colors, text styles, and key components, and point the agent at it in your first prompt. That single habit does more for consistent results than any prompt trick, because the agent can see your system instead of guessing it.
Step 8: Let Crossfade Check Its Own Screenshot
After building, the Crossfade AI for beginners safety net kicks in: Crossfade takes a screenshot of what it made and checks it — and this self-check is one of its most useful features, because it catches the mistakes you might miss.
The agent looks at the rendered design the way a person would: is the text overlapping anything? Is a button cut off at the edge of a frame? Does the spacing look uneven? When it finds a problem, it fixes the layers and checks again. You do not have to ask for this — it is part of how Crossfade works.
Your job is to do the same check with human eyes afterwards, because an agent can miss what a designer would catch: a headline that technically fits but reads awkwardly, a color combination that is low-contrast, or a layout that is correct but boring. Zoom out, look at the whole screen at once, and ask yourself one question: would I show this to a client as it is? If the answer is no, tell the agent what to change, with the layer selected, and let it iterate.
Step 9: Add Developer Handoff Notes and Prepare for Developers
A design is only finished when a developer can build it, and the Crossfade AI for beginners handoff step covers exactly that: Crossfade helps here too, leaving developer handoff notes on the layers it creates, so the intent travels with the file.
- Ask the agent to add handoff notes for anything a developer needs to know: “Add a note on the pricing card explaining that the middle tier is highlighted and the button links to checkout.”
- Check the notes in Figma’s Dev Mode, the way your developer will see them. Make sure the important behaviors are written down, not just the colors.
- Name your frames clearly before you share the file. “Pricing — Desktop” is useful; “Frame 47” is not.
- Share the file link with your developer or your team, and walk them through the agent-built sections once, so they know which parts are new.
This is where Crossfade quietly saves real time for small teams. A solo founder or a small digital agency team can go from a wireframe to a developer-ready file in one sitting, without hiring a designer for every screen — and the developer gets notes instead of having to guess what each element is supposed to do.
Step 10: Fix Common Problems and Know When to Use Figma’s Own MCP
Most Crossfade AI for beginners problems have boring causes, so work through this list before you assume the tool is broken.
- The agent cannot see the file: The Figma desktop app must be open, the file loaded, and the Crossfade plugin panel running. The browser version of Figma will not work.
- The agent hits a limit halfway through: That is exactly the problem Crossfade solves. Figma’s own MCP server has read limits that stop an agent part-way through a task; Crossfade runs over localhost, so nothing is counted and there are no call limits on any plan.
- Fonts look wrong: The agent can only use fonts installed on your Mac. If a font is missing, install it on your machine first, then ask the agent to rebuild that text layer.
- The design ignores your components: Name the component in your prompt. The agent uses what you point at — if you do not mention your design system, it will invent its own.
- You need Code Connect: Figma’s own MCP server does things Crossfade does not, like Code Connect, which links designs to code components. The maker is honest about this: keep both. Use Crossfade for unlimited agent design work, and Figma’s MCP when you need Code Connect.
Crossfade AI for Beginners: Crossfade or Figma’s MCP?
That last point is worth repeating, because it is the honest answer to “should I use Crossfade or Figma’s MCP?” The answer is both. Crossfade is the tool for fast, unlimited, private design work with your agent. Figma’s official MCP is the tool for the platform features only Figma can offer. They do not compete — they cover different parts of the same workflow.
Crossfade vs Figma’s MCP vs Designing by Hand
Here is the honest comparison, so you can decide where Crossfade fits in your own workflow.
| Feature | Crossfade | Figma’s own MCP server | Designing by hand |
|---|---|---|---|
| Who designs | Your coding agent (Claude Code, Codex, Cursor) | Your coding agent via Figma’s server | You, layer by layer |
| Call limits | None — localhost, nothing counted | Read limits that can stop a task halfway | No limits, but slow |
| Seat needed to write | No Full seat needed | Depends on your Figma plan | Full seat needed |
| Real editable layers | Yes — frames, auto layout, components | Yes | Yes |
| Your fonts and images | Yes — Mac fonts just work, images in the same run | Yes, with limits | Yes |
| Self-checks its work | Yes — screenshot check | No built-in visual check | You check it yourself |
| Code Connect | No | Yes | Manual setup |
| Privacy | Private — no Crossfade server, local only | Goes through Figma’s cloud | Fully private |
| Price | $19 once, two machines | Included in Figma plans | Your time |
The trade-off is clear: Crossfade costs $19 once and gives you unlimited, private agent design, but it cannot do Code Connect. If your workflow needs Code Connect, keep Figma’s MCP alongside it. For everyone else — especially beginners and small teams — Crossfade removes the two things that slow agent design down: the read limits and the seat requirement.
Frequently Asked Questions About Crossfade AI for Beginners
Is Crossfade AI free?
No — Crossfade costs $19 once, and one license covers two machines. There is no subscription and no usage fee, so you pay once and use it as much as you want. Compared with a Figma seat, which costs $15 or more every month, it pays for itself quickly if you design with an agent regularly.
Does Crossfade AI work on Windows?
No. Crossfade is a Figma plugin for Mac, and the local bridge runs on macOS. You need a Mac and the Figma desktop app open for it to work. Windows users should use Figma’s own MCP server instead, which is cloud-based and works on any platform.
Which AI agent works best with Crossfade?
Claude Code is the agent Crossfade was built and tested on, so it is the smoothest first choice for beginners. Codex and Cursor connect the same way, so if you already pay for one of those, use the one you know — the workflow is the same.
Can Crossfade replace Figma’s own MCP server?
Not completely. Crossfade is better for unlimited design work — no call limits, no Full seat needed — but Figma’s MCP server does things Crossfade does not, like Code Connect. The maker recommends keeping both and using each where it is strongest.
Is my Figma file private when I use Crossfade?
Yes. Crossfade runs over localhost on your own Mac, and there is no Crossfade server. The bridge answers only your agent, so your design file never leaves your computer. That is one of the main reasons teams with sensitive client work choose it over cloud-based AI design tools.
Does Crossfade work in FigJam and Figma Slides too?
Yes. It works in Figma Design, FigJam, and Slides, as long as the Figma desktop app is open. That makes it useful beyond app screens — you can ask your agent to help with brainstorm boards and slide decks in the same way.
Final Thoughts
Crossfade AI is a small tool with a big idea: your coding agent should be able to design where you design, not just write code where you code. For $19 once, it removes the two obstacles that made agent design frustrating — Figma’s MCP read limits and the Full seat requirement — and it does it privately, on your own Mac, with real editable layers you can hand to a developer.
Start small: one wireframe, one hero section, one pricing card. Check the layers, name your components in the prompt, and let the screenshot check catch the mistakes. Within an hour you will know whether agent-assisted design belongs in your workflow — and if it does, you will wonder why you ever rebuilt screens by hand. If you want to go further into the agent side of this workflow, read our guide to Clayzo AI, which lets your coding agent build motion graphics the same way Crossfade lets it build Figma designs.
Explore More Free AI Tools
Want to keep building your AI toolkit? Try our free tools on AIToolSteps.com: the AI Title Generator for headlines that get clicks, the Meta Description Generator for search snippets that earn the click, the AI Rewriter to sharpen any draft, and the Keyword Density Checker to keep your pages on-topic. They are free, they run in your browser, and they pair well with everything in this guide.