

Introduction
Every new app idea starts the same way: four tools open at once. A whiteboard to brainstorm, a diagram tool for the user flow, a design tool for the screens, and a prototyping tool to click through it all. Nothing is connected, and the AI tools that promise help usually hand you a flat picture you cannot actually edit — which is the exact problem Builderii AI was built to solve.
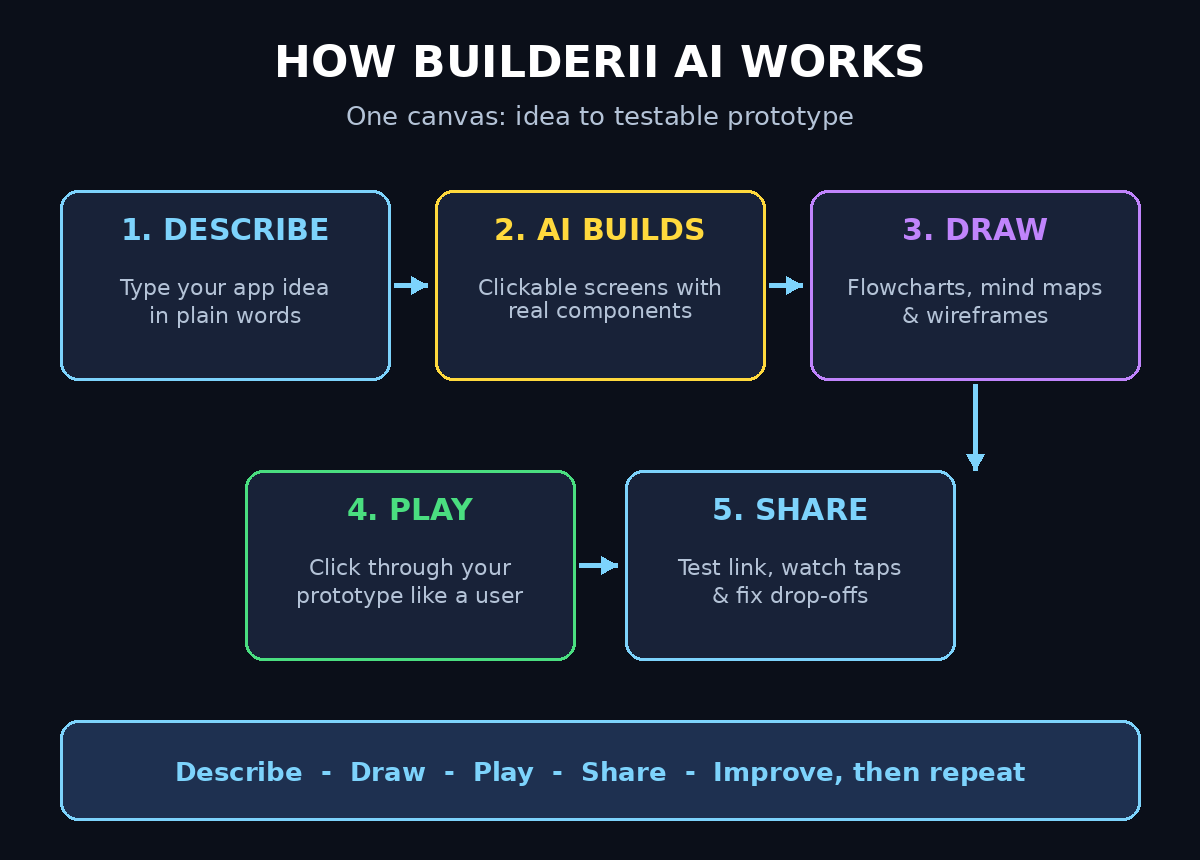
Builderii AI was built to end that juggling act. Launched on Product Hunt on November 1, 2026, Builderii is one infinite canvas where you draw flowcharts, mind maps, wireframes and clickable prototypes — and an AI builds alongside you, live, on the same board. You describe an app in plain words and get linked, clickable screens made of real editable components, not an image. You can draw a flowchart right next to those screens, press Play to click through the prototype, and share a test link with people who do not even need an account.
This beginner-friendly guide walks you through everything: creating your free account, finding your way around the canvas, letting the AI build your first screens, drawing flowcharts and mind maps, designing wireframes, testing your prototype, and sharing it with your team. In addition, you do not need design experience, and you do not need to write any code to use Builderii AI.
Step 1: What Is Builderii AI?
Builderii AI is an AI canvas for flowcharts, mind maps, wireframes and clickable prototypes. The idea is simple: instead of switching between a whiteboard, a diagram tool and a design tool, you do all of it on one board that never runs out of space.
Here is what makes it different from the tools you may already know:
- One canvas, everything connected. Your brainstorm, your user flow, your screens and your prototype live side by side, so nothing gets lost between tools.
- AI that builds real things. Describe an app and Builderii generates linked screens in device frames, made of real editable components — buttons, inputs, cards and text you can select, move and change.
- Diagrams next to designs. Flowcharts, mind maps, sequence diagrams, sitemaps, roadmaps and database diagrams sit right next to your screens, on the same board.
- A real prototype, not a picture. Press Play and click through your screens exactly the way a user would, then share a test link and see where people tap and where they drop off.
- Live collaboration. Teammates join the same board with live cursors, comments and @mentions, and you can even sketch on the whiteboard from your phone.
- Your own AI, on the board. Connect Claude or ChatGPT and have them draw on your boards for you. The AI decides what goes on the board, and Builderii’s own layout engines decide where it goes, so everything comes out tidy and stays editable.
The Product Hunt launch lists the price as $0, so you can start free and try the full canvas workflow before deciding whether it earns a place in your daily toolkit.
Step 2: Create Your Free Builderii Account
Getting started takes only a few minutes. You do not need a credit card, and you do not need to install anything — Builderii runs entirely in your browser.
- Find Builderii. Search for Builderii on Product Hunt and follow the launch page link to the site, or open the Builderii website directly from your browser.
- Sign up free. Create your account with your email address or a Google sign-in. The Product Hunt listing shows a price of $0, so the free start costs nothing.
- Confirm your email. Check your inbox for the confirmation message and click the link. If it does not arrive in a minute or two, check your spam folder.
- Name your first workspace. Builderii will ask you to name a workspace — this is just a folder for your boards. A simple name like “My Ideas” or your project name works fine.
- Start your first board. Click to create a new board and you land on a blank infinite canvas, ready for your first idea.
Take a minute to save the site to your bookmarks. You will come back to this canvas every time a new idea needs shaping, and a bookmark saves you a search later.
Step 3: Tour the Infinite Canvas
A blank infinite canvas can feel intimidating, so let us walk through it before you draw anything.
- The canvas itself. This is your board. It has no edges — scroll and zoom in any direction and there is always more room. Think of it as a wall that grows with your idea.
- The toolbar. On the side or top of the screen you will find the drawing tools: shapes, arrows, text, sticky notes, frames and the AI prompt box. Hover over each icon once and read its label.
- The AI prompt box. This is where you describe what you want. Type a plain sentence — “a food delivery app with a home screen, menu screen and checkout” — and the AI builds the first version for you.
- Frames and device frames. Frames group related content. A device frame is a phone or desktop outline that holds your app screens, so your wireframes look like a real app from the start.
- Zoom and pan controls. Zoom out to see the whole board at a glance, zoom in to edit a single button. Hold the spacebar (or use the pan tool) and drag to move around.
- The share button. When your board is ready for other eyes, this is where you invite teammates or create a test link.
Spend five minutes clicking around Builderii AI before your first real project. Draw a shape, add a sticky note, zoom in and out. As a result, a short practice run now saves you ten confused minutes later.
Step 4: Describe Your App and Let AI Build the First Screens
This is the moment Builderii feels like magic. You do not start from a blank screen — you start from a sentence.
- Write a clear prompt. Be specific about what the app does and who uses it. “A habit tracker app for students: home screen with today’s habits, a stats screen with a weekly chart, and a settings screen” beats “a habit app” every time.
- Name the screens you need. List them in your prompt — home, menu, checkout, profile — so the AI builds the full journey instead of one lonely screen.
- Let the AI place the layout. The AI decides what goes on each screen, and Builderii’s layout engines decide where everything goes. The result is tidy by default, and every element stays editable.
- Check the first draft. Look at each screen and ask: does the flow make sense? Is anything missing? The first board the AI makes is a starting point, not a finished product.
- Edit anything directly. Click any button, text block or card and change it. These are real components, not a generated image, so you can move, resize, recolour and rewrite anything.
- Ask for a second version. If a screen feels wrong, describe the change in plain words — “make the home screen show a search bar at the top” — and let the AI redraw that part.
However, a good rule for beginners is to spend your first prompt on the user journey, not the colours. Get the screens and the flow right first; polish comes later, and it comes fast once the structure is solid.
Step 5: Draw a Flowchart the Fast Way
A flowchart shows how a user moves through your app, step by step. In Builderii AI you draw it on the same board as your screens, so the flow and the design never drift apart.
- Pick a starting point. Drop a rounded rectangle on the canvas and label it with the first thing a user does, like “Open the app”.
- Add decision diamonds. A diamond asks a question with two exits — “Logged in?” leads one way to “Show home screen” and the other way to “Show login screen”.
- Connect with arrows. Drag an arrow from one shape to the next. Label the arrow when the path needs explaining, such as “Yes” and “No” out of a decision diamond.
- Keep one flow per area. Give each user journey its own space on the canvas. A login flow in one corner and a checkout flow in another is far easier to read than one giant tangle.
- Let the AI draw it. Describe the flow in words — “a user signs up, verifies email, picks a plan, then sees the dashboard” — and let the AI place the shapes and arrows for you.
- Link shapes to screens. Place your flowchart next to the matching device frames, so anyone reading the board can see the flow and the screens it describes in one glance.
For example, if you already plan projects with the help of a digital agency, this is the same kind of flow mapping they use before a single screen is designed — except now you can build it yourself in minutes with Builderii AI, and the flowchart sits right next to the prototype it describes.
Step 6: Build a Mind Map for Your Idea
Before screens and flows, most ideas start as a messy pile of thoughts. A mind map turns that pile into something you can actually work with.
- Start with one central node. Write the core idea in the middle of the canvas — “Fitness app”, “Online bakery”, “Study planner”.
- Branch out the big themes. Draw branches for the main parts: features, users, money, marketing, content. Keep each branch to two or three words.
- Add smaller twigs. Under “Features”, add the actual features. Under “Users”, add who they are and what they need. Stop when a branch has enough detail to act on.
- Use colour to group ideas. One colour per theme makes the map readable at a glance, even from across the room.
- Ask the AI to expand a branch. Select a node and ask the AI for ideas — “suggest five features for a study planner” — then keep the ones you like and delete the rest.
- Turn branches into tasks. When a branch is clear enough, it becomes a flowchart or a screen. Drag it to a fresh area of the canvas and start building from there.
In addition, mind maps are the fastest way to explain an idea to someone else. Share the board, and a teammate can read your whole idea in thirty seconds without a meeting — and Builderii AI keeps that map right next to the screens it inspires.
Step 7: Design Wireframes with Real Components
A wireframe is a simple sketch of a screen — boxes where the content goes, before colours and photos arrive. Builderii AI’s wireframes are different because they are built from real components.
- Start from the AI screens or a blank frame. Use the screens the AI generated in Step 4, or drop a fresh device frame on the canvas and build by hand.
- Place real components. Add buttons, text fields, images, cards and navigation bars from the component list. Each one behaves like the real thing — a button looks and acts like a button.
- Keep it simple. A wireframe is not the final design. Grey boxes, simple labels and clear spacing are exactly right. If it looks finished, you have probably spent too long on it.
- Copy what works. Finished one good screen? Duplicate the frame and change the content instead of rebuilding from zero. Consistent spacing and navigation make an app feel professional.
- Check the hierarchy. The most important thing on each screen should be the biggest and easiest to find. However, if your eye lands on a minor button first, move things around.
- Ask the AI for variants. “Make a simpler version of this screen” or “try a version with the menu at the bottom” gives you options in seconds instead of an afternoon of redrawing.
Wireframes in Builderii AI are where most beginners save the most time. An hour on the canvas now can save a week of rebuilding later, because you find the confusing screens before anyone writes code.
Step 8: Press Play and Test Your Clickable Prototype
A prototype is your app pretending to be real. Builderii AI turns your screens into one with a single click, and testing it is the fastest way to find what is broken.
- Link your screens. Connect each button to the screen it should open. The login button goes to the home screen, the cart icon goes to the checkout screen, and so on.
- Press Play. This starts the prototype. Your canvas disappears and you see the app the way a user would, inside a phone frame.
- Click through the whole journey. Do everything a real user would do: sign up, browse, add something, check out. Note every place where you hesitate — that hesitation is a design problem.
- Test the unhappy paths too. What happens when a form is empty? When a search finds nothing? A good prototype answers these questions before real users hit them.
- Fix and replay. Go back to the canvas, fix the confusing screen, and press Play again. Each round takes minutes, and every round makes the app clearer.
- Try it on your phone. Open the prototype on your own phone if you can. Tapping with a thumb finds problems that clicking with a mouse never will.
However, never skip this step. A prototype that nobody has clicked through is a guess, and Builderii AI makes testing so quick that guessing is never worth it.
Step 9: Share a Test Link and Watch Where People Tap
Your own clicks only tell you so much. The real test is watching other people use your prototype — and Builderii AI makes that easy.
- Create a test link. From the share menu, generate a test link for your prototype. Testers do not need a Builderii account, which removes the biggest reason people skip testing.
- Send it to five people. For example, five testers find most of the problems in a prototype. Friends, family, coworkers or your target users — anyone who is not you will see things you cannot.
- Give them one task. “Order a coffee” or “find the cheapest plan” is better than “look at this and tell me what you think”. A task shows you how people actually behave.
- Watch where they tap. Builderii shows you where testers tap and where they drop off. A screen where everyone stalls is a screen that needs redesigning.
- Ask what confused them. After the test, ask one question: “Where did you get stuck?” The answer is usually one specific screen, and that is your next fix.
- Iterate in the open. Fix the problem, share the updated link, and test again. The loop is short, and each round makes the prototype harder to break.
If you run a small business, this kind of quick user testing is the same discipline that professional teams use — and the pattern scales: the AI automation services that route real customer journeys through an app start from exactly this kind of tested flow, built one tap at a time.
Step 10: Connect Claude or ChatGPT to Draw on Your Board
Builderii AI has its own built-in AI, but you can also bring the AI you already use. Connecting Claude or ChatGPT lets them draw directly on your boards.
- Open the AI connection settings. Look for the integrations or AI settings in your Builderii workspace and choose Claude or ChatGPT.
- Connect your account. Follow the sign-in prompts to link the AI service you already pay for or use for free. You only do this once.
- Ask it to draw. With the connection live, prompt the AI in plain words — “draw a sitemap for a five-page portfolio site” — and watch it place the shapes on your board.
- Use it for content too. Ask the AI to write realistic button labels, sample headlines or placeholder text, so your wireframes read like a real product instead of a grey sketch.
- Keep the human in charge. The AI decides what goes on the board, but you decide what stays. Delete what does not fit, move what is almost right, and keep the layout engines’ tidy spacing.
- Combine both AIs. Use Builderii’s built-in AI for screens and layouts, and your connected Claude or ChatGPT for brainstorming, content and diagrams. Each one is best at a different part of the job.
In addition, this is a good moment to remember the bigger picture: tools like Builderii AI are one piece of a modern workflow, and many teams pair a visual canvas like this with the kind of AI automation services a specialist agency sets up — the canvas plans the experience, and automation carries it into the real world.
Step 11: Collaborate Live with Your Team
Builderii boards are built for more than one person. Live collaboration turns a lonely canvas into a shared workspace.
- Invite teammates to the board. Share the board link or invite people by email. They join with live cursors, so you can see exactly where everyone is working.
- Comment on anything. Leave a comment on a screen, a shape or a sticky note. Comments keep feedback attached to the exact thing it is about, instead of lost in a chat thread.
- Use @mentions. Tag a teammate in a comment when you need their eyes on something specific. They get notified and can reply right on the board.
- Sketch from your phone. The whiteboard works from a phone too, so you can sketch an idea during a call and watch it appear on the shared board.
- Work in the same space, live. Two people can edit different parts of the same board at the same time — one refining the flowchart while the other polishes the screens.
- Keep a tidy board. Agree on a simple layout with your team: ideas on the left, flows in the middle, screens on the right. A shared layout stops a shared board from becoming a shared mess.
As a result, live boards in Builderii AI replace a surprising number of meetings. When the idea, the flow and the screens are all visible in one place, most questions answer themselves.
Step 12: Export, Share and Keep Your Boards Organized
A Builderii AI board is only useful if you can find it again and share it in the right format. A little organization now saves a lot of searching later.
- Name every board clearly. “Coffee shop app — v2” beats “Untitled board 14” every single time. Add the date when a board has versions.
- Use one workspace per project. Keep all the boards for one app or client in the same workspace, so nothing from another project gets mixed in.
- Duplicate before big changes. Before a major redesign, duplicate the board. You keep the old version safe and you can compare the two side by side.
- Export what you need. Export diagrams and screens as images for documents, slides and client updates. A clean PNG of your flowchart is often all a stakeholder needs.
- Share the right link. A view link lets people look, a test link lets them click the prototype, and an edit link lets teammates change things. Send the smallest permission that does the job.
- Archive finished boards. When a project ships, archive its boards instead of deleting them. Old flows and wireframes are a goldmine the next time a similar project starts.
In short, a tidy workspace is a quiet superpower. The best builders are not the ones with the most boards — they are the ones who can find the right board in ten seconds.
Builderii AI vs Other Tools
| Feature | Builderii AI | Separate whiteboard + diagram tools | Traditional design tools |
|---|---|---|---|
| Price to start | Free ($0 on Product Hunt) | Free tiers, but several tools | Free tier, then paid |
| Flowcharts, mind maps and wireframes | All on one infinite canvas | Split across two or three apps | Wireframes only, diagrams need plugins |
| AI-generated screens | Yes, real editable components | No, or static images | Limited AI, often paid |
| Clickable prototype | Yes, with Play mode and test links | No | Yes, but setup takes longer |
| See where testers tap | Yes, built-in tap and drop-off tracking | No | Needs a separate testing tool |
| Live collaboration | Yes, cursors, comments, @mentions | Yes, but only for one tool at a time | Yes, usually on paid plans |
| Connect Claude or ChatGPT | Yes, they draw on your board | No | No |
| Best for | Beginners planning an app end to end | Quick single diagrams | Polished final designs |
Frequently Asked Questions
Is Builderii AI really free?
The Product Hunt launch lists Builderii at $0, and you can start without a credit card. Like most new tools, free limits and paid plans can change as the product grows, so check the pricing page inside your account before you build a workflow that depends on heavy use.
Do I need design experience to use Builderii AI?
No. That is the whole point. You describe what you want in plain words, the AI builds the first screens, and the layout engines keep everything tidy. If you can write a sentence and drag a shape, you can use Builderii.
Can I use Builderii AI without coding?
Yes. Everything in this guide — flowcharts, mind maps, wireframes, prototypes and test links — needs zero code. Builderii is a planning and design canvas, not a coding tool.
What can I build with Builderii AI?
Flowcharts, mind maps, sequence diagrams, sitemaps, roadmaps, database diagrams, wireframes and clickable prototypes for apps and websites. It is best for planning and testing an idea before anyone writes code.
Do testers need a Builderii account to try my prototype?
No. You share a test link, and testers open it in their browser without signing up. Builderii also shows you where they tap and where they drop off, so you get real feedback instead of polite guesses.
Can Builderii AI replace Figma or Miro?
Not completely, and it does not try to. Figma is still the tool for polished final designs, and Miro is still a giant whiteboard. Builderii’s strength is doing the whole early journey — idea, flow, wireframe and testable prototype — on one canvas with AI help. Many people will use Builderii first, then move the winning design into Figma for final polish.
Final Thoughts
Builderii AI solves a problem every beginner feels but few can name: the idea is ready, but the tools are scattered. One canvas for the mind map, the flowchart, the wireframes and the prototype — with an AI that builds the first version and layout engines that keep it tidy — turns a weekend of tool-switching into an afternoon of actual building.
For example, start small today with Builderii AI. Open a blank board, describe one app idea in a single sentence, and let the AI build the first screens. Draw the flow next to them, press Play, click through it once, and share the test link with one friend. That single loop — describe, draw, test, share — is the whole Builderii workflow, and it is the fastest way to find out whether your idea works before you invest weeks in it.
The best time to plan an app is before you build it. Builderii AI makes that planning feel less like homework and more like play — and a plan you enjoy making is a plan you will actually finish.
Explore More Free AI Tools
Want more free AI tools like Builderii AI? AIToolSteps has free guides for dozens of beginner-friendly tools, and our free online tools are ready to use right now. Try the AI Title Generator, Meta Description Generator, AI Rewriter, and Keyword Density Checker at https://aitoolsteps.com/ — free, no sign-up needed, and built for creators who want results fast.