

Most people who own a 3D printer have had the same frustrating moment. You need a small, simple part — a bracket to hold a cable, a replacement knob for a drawer, a phone stand that actually fits your phone — and you know exactly what it should look like. But turning that idea into a CAD file means opening a professional design program, learning sketches, constraints, extrusions and fillets, and spending a weekend on tutorials before you draw a single line. Learning how to use LexiCAD AI removes that wall completely: you describe the part in plain language, and an AI agent designs a real, parametric CAD model for you.
LexiCAD launched on Product Hunt on November 15, 2026, built by founder Lincoln, who got his first 3D printer when he was 11 and spent dozens of hours — and many failed designs — learning CAD the hard way. LexiCAD is the tool he wished he had back then. You type or speak a description, add a photo or a few measurements if you have them, and the AI asks you what it needs to know. Then it builds a genuine parametric CAD model, measures the result against your request, and fixes anything that is off before you ever see it. From there you can change dimensions yourself without going back to the AI, export STEP, STL, 3MF or DXF files, slice the model for your printer, or send it out for laser cutting. In this beginner-friendly guide, you will learn how to use LexiCAD AI step by step — from your first description to a finished, printable file. No CAD experience is needed at all.
Step 1: Understand What LexiCAD AI Actually Is
LexiCAD is not a text-to-3D toy that spits out a rough mesh you cannot edit. It is an AI agent that produces real parametric CAD — the same kind of model a professional engineer builds in a program like Fusion 360 or SolidWorks. Parametric means the model is built from rules and dimensions, not from a frozen lump of triangles. If a hole needs to be 6 mm instead of 5 mm, you change one number and the whole model updates cleanly. That difference is what makes LexiCAD useful for real parts instead of only decorative trinkets.
The workflow has four parts. First, you describe the part in everyday words, by typing or by talking. Second, the agent asks clarifying questions when your description leaves something open — the size, the thickness, the number of holes. Third, it builds the model and then measures it against what you asked for, fixing mistakes on its own before showing you the result. Fourth, you take over: adjust any dimension directly, then export the file in the format your printer, laser cutter or workshop needs.
Think of it the way agentic AI works in other fields: a language model plus tools plus a checking step, carrying a job from a plain-language request to a finished result. If you want a broader view of how these multi-step agents are changing everyday work, the writing at Agentic Affairs follows the same shift — AI that does the work, not just answers questions. LexiCAD applies that idea to CAD, and for a beginner that is the whole point: the agent handles the CAD skill, and you handle the idea.
Step 2: Check Who LexiCAD AI Is For (and Who Should Skip It)
LexiCAD fits best when you know what you want to make but you do not know CAD. That covers a surprisingly large group: 3D printer owners who are tired of downloading other people’s models, hobbyists who need a custom bracket, mount or adapter, teachers who want a classroom demo part, and small-business owners who need a quick prototype before ordering a production run. If your need is “a small part that does a specific job”, this tool is aimed directly at you.
It is also a strong fit for anyone who has bounced off traditional CAD. If you opened a professional CAD program once, stared at the toolbar for twenty minutes and closed it again, you are exactly the person LexiCAD was built for. The same goes for makers who can picture a part clearly — its shape, its holes, its thickness — but cannot translate that picture into sketches and constraints.
Who should skip it for now? If you already design in Fusion 360 or SolidWorks every day and your parts involve complex surfacing, assemblies with dozens of moving pieces, or strict engineering tolerances for a regulated industry, LexiCAD will not replace your professional tools yet. It is a beginner-to-intermediate design agent, not a full engineering suite. Likewise, if you only ever print decorative models downloaded from the internet, you do not need a design tool at all. The honest test is simple: if you have ever said “I wish I could just design this myself”, keep reading.
Step 3: Open LexiCAD and Start Your First Project
Getting started takes minutes. Open the LexiCAD website and create your account with an email address, then open a new project. You will see a simple starting point: a prompt box where you describe your part, with options to attach a photo or speak your description instead of typing it. There is no toolbar maze to learn first, which is deliberate — the whole product is built around the idea that the description is the design.
Before you type anything, have your idea ready in your head. What is the part for? What does it need to hold, connect or support? Roughly how big should it be? You do not need exact engineering drawings, but the clearer your picture, the better the first model will be. A phone stand is a good first project: it is simple, it has obvious dimensions, and you can test the result on your desk within an hour of starting.
One practical tip: keep your first project small and useful. Beginners who start with a dream project — a full drone frame, a robot arm — usually get a confusing first result and blame the tool. Start with a bracket, a hook, a stand or a knob. Learn the loop of describe, check, adjust and export on something simple, and the bigger projects will go far better afterwards.
Step 4: Describe Your Part in Plain Language
This is the core skill of LexiCAD, and it is the opposite of CAD training: you write the way you would explain the part to a helpful friend. Instead of drawing, you say what the part is, what it does, and how big it is. A good first description answers four questions: what is it, what is it for, what are its rough dimensions, and what features does it need?
Here is an example of a strong description: “A wall-mounted headphone hook for a desk. A flat rectangular back plate, 80 mm wide and 120 mm tall, with two screw holes near the top and bottom. A curved arm sticks out 60 mm from the plate to hold the headphones, and the arm is 15 mm thick.” That gives the agent a shape, a purpose, real numbers and the key features. Compare that with a weak description — “make me a headphone holder” — which leaves every decision to the AI and guarantees a round of corrections.
You can also add a photo or a few measurements to sharpen the request. A photo of the object your part must fit — a drawer handle, a pipe, a phone — helps the agent understand the real-world size and shape it has to match. And if you know one critical number, say it early: “the hole must fit a 10 mm bolt” is worth more than a paragraph of adjectives. The agent will use your numbers as hard requirements and check the model against them before showing it to you.
Step 5: Answer the AI’s Clarifying Questions
After your description, LexiCAD does something most AI tools skip: it asks you what it needs to know. If you said “a bracket” but never said how thick it should be, it will ask. If you mentioned a hole but not its diameter, it will ask. This is not the tool being slow — it is the tool refusing to guess about the details that decide whether your part actually works.
Answer these questions in the same plain language, with numbers wherever you can. “About 4 mm thick” is a perfectly good answer. “Strong enough to hold a 500-gram camera” is also useful, because it tells the agent about the load the part must carry. If you genuinely do not know an answer, say so — the agent will pick a sensible default and tell you what it chose, so you can change it later in the dimension editor.
Do not rush this step. Every question you answer now is a correction you will not have to make later. Beginners who answer carefully usually get a usable model on the first attempt; beginners who wave the questions away usually spend three rounds fixing the same misunderstandings. Two minutes of answers saves twenty minutes of rework.
Step 6: Review the Parametric Model It Builds
Once the questions are answered, LexiCAD builds your model — and, importantly, it checks its own work before you see it. The agent measures the finished model against your description, looks for dimensions that drifted, features that are missing, and shapes that would not print or cut properly, and it fixes problems itself. What you receive is a real parametric CAD model, not a screenshot: you can rotate it, zoom in, and inspect every face and hole.
When you review it, check three things in order. First, the overall shape: does it look like the part you imagined? Second, the features: are the holes, slots and arms in the right places, and in the right numbers? Third, the sizes: hold a ruler to the key dimensions on screen and compare them with your numbers. A model can look perfect and still be the wrong size, so check the numbers, not just the picture.
If something is wrong, say so in plain language — “the arm is too short, make it 90 mm” — and the agent will rebuild the model with the change. This is a conversation, not a one-shot render, and the best results come from one clear correction at a time instead of five changes in a single message.
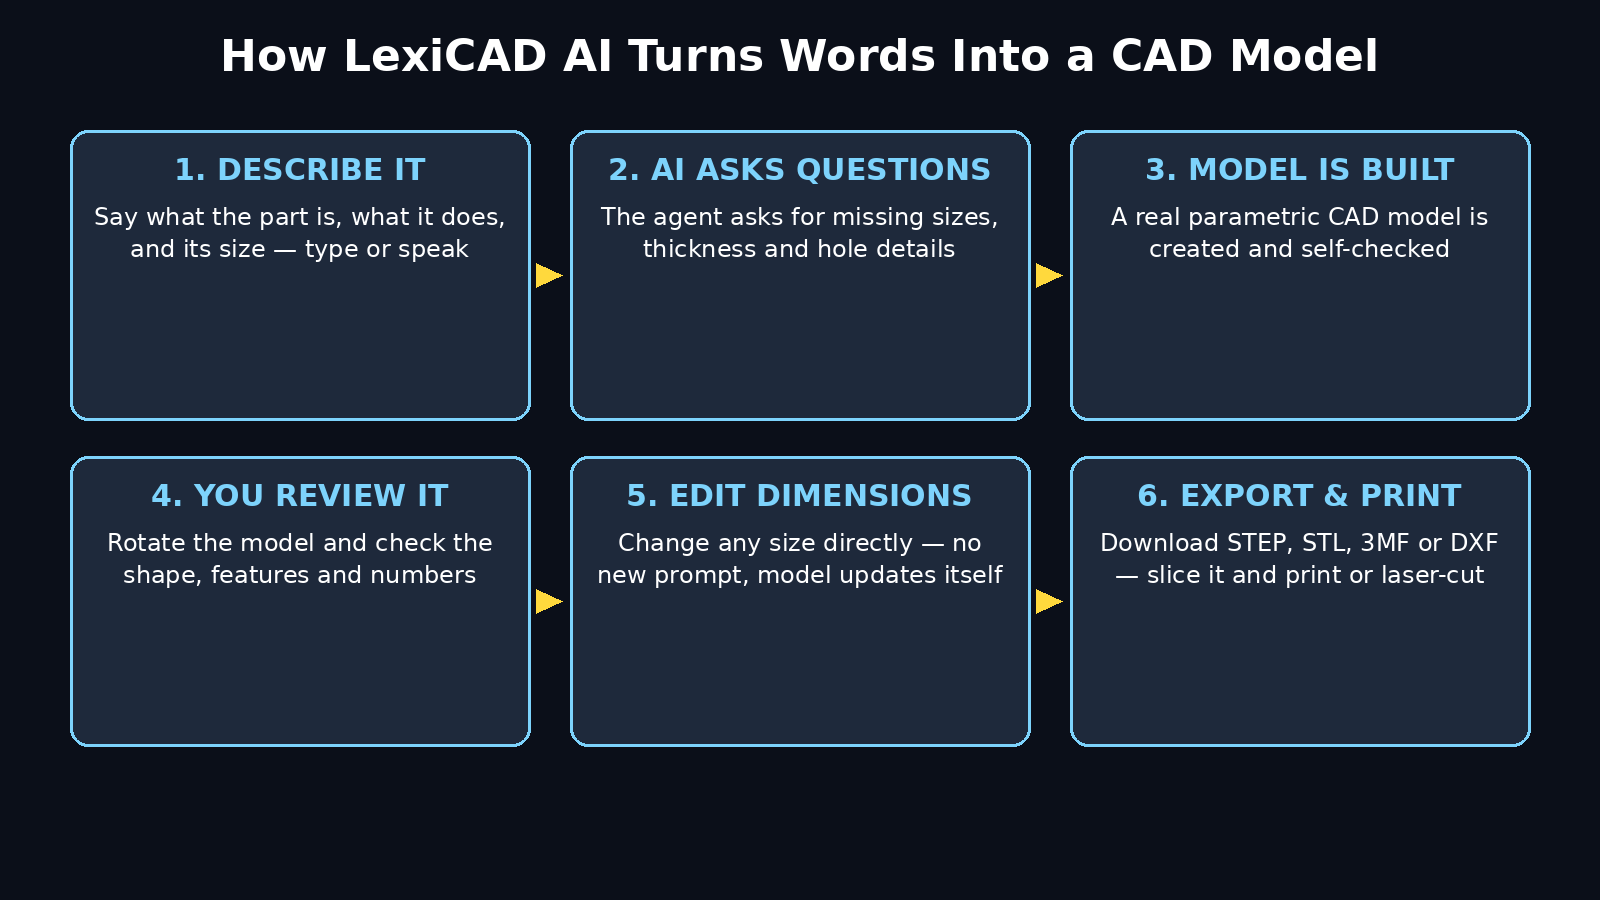
Step 7: Edit Dimensions Directly, Without Going Back to the AI
Here is the feature that separates LexiCAD from a text-to-3D generator: because the model is parametric, you can change dimensions yourself. If a hole needs to be 6 mm instead of 5 mm, or the back plate needs to be 10 mm taller, you edit the number directly in the model — no new prompt, no rebuild, no waiting for the AI. The rest of the model updates around your change, so a taller plate keeps its screw holes in the right places instead of breaking.
For a beginner, this is where real confidence comes from. You do not need to understand CAD to change one number and watch the model update. Start with the dimension that matters most to you — usually the one that decides whether the part fits — and change it in small steps. If the result looks wrong, change it back; the editor is forgiving, and nothing is final until you export.
This direct editing is also the fastest way to adapt a design to a new job. A headphone hook built for one desk can become a hook for a different desk by changing two numbers. A bracket designed for a 20 mm pipe becomes a bracket for a 25 mm pipe the same way. Design once, adjust forever — that is the practical payoff of parametric CAD, and LexiCAD hands it to a beginner without the usual learning curve.
Step 8: Check the Model Against Your Requirements
Before you export anything, run your own final check — the agent checks its work, but you are the one who knows what the part must do. Read your original description again and tick off each requirement: the shape, the sizes, the holes, the thickness. Then think about the real world: will it print without supports falling over? Is any wall thinner than 2 mm, which gets fragile in most 3D prints? Will a screw head actually sit flat in the hole you asked for?
Pay special attention to fit. If the part must slide over something, clip onto something or hold something, the matching dimension is the one that must be right, and a small error here is the most common reason a first print fails. A useful rule for 3D printing: add about 0.2 to 0.4 mm of clearance on parts that must fit together, because printers lay down plastic slightly wider than the model. If a hole must fit a 10 mm bolt, a 10.4 mm hole will assemble far more happily than a mathematically perfect 10 mm one.
If the check finds a problem, fix it now — in the dimension editor for a number, or with a short message to the agent for a shape change. Exporting a model you have not checked is how you waste an hour of print time on a part that was never going to fit.
Step 9: Export STEP, STL, 3MF or DXF
When the model is right, export it in the format your next step needs. LexiCAD offers the four formats that cover almost every maker workflow, and picking the right one is simple:
- STL — the standard for 3D printing. Send this to your slicer. Simple, universal, and supported by every printer.
- 3MF — the newer 3D-printing format. Use it when your slicer supports it; it carries more information than STL, including units and colour.
- STEP — the standard for engineering and CAD exchange. Use it when you need to open the model in another CAD program, send it to a workshop, or keep a clean, editable master copy.
- DXF — the format for flat, 2D work. Use it when the part is going to a laser cutter, a CNC router or a vinyl cutter as flat sheets.
For most beginners, the rule is easy: STL for the printer, STEP for safekeeping and sharing with anyone who uses CAD, DXF for laser cutting. Always keep the STEP file even if you only need an STL today — it is the editable master, and it is the file you will be glad you kept when you want the same part in a different size six months from now. Download the files to a folder named after the project, with the date, so you can find them again.
Step 10: Slice It, Print It — or Send It for Laser Cutting
For 3D printing, open the STL or 3MF in your slicer — the software that turns the model into printer instructions — and check the preview layer by layer before you print. Look for overhangs that need supports, check the orientation so the strongest direction of the print matches the load the part will carry, and confirm the scale: a model that is accidentally ten times too big or small is a classic beginner mistake, and the slicer preview catches it in seconds. Then print, test the fit, and note what needs changing.
For laser cutting, send the DXF to your cutter or cutting service with the material and thickness noted. Because LexiCAD gives you real flat profiles, the cut parts should match the design exactly — measure the first cut piece against your numbers before cutting a full batch. Small businesses that prototype this way often pair the speed of AI-designed parts with professional help for the rest of the launch: a digital agency can turn a working prototype into product photos, a store page and a marketing plan, while the design itself stays in your hands.
Whatever the first result, treat it as a test, not a verdict. Almost no part is perfect on the first print. Measure what came out, compare it with the model, and change one thing — one dimension, one thickness, one clearance — before the next print. That loop is the real skill, and LexiCAD makes it fast: describe, check, adjust, export, print. After two or three loops you will have a part that fits, and a workflow you can reuse for the next idea the moment it arrives.
LexiCAD vs Traditional CAD Tools
| Feature | LexiCAD AI | Fusion 360 | Tinkercad | FreeCAD |
|---|---|---|---|---|
| How you design | Plain-language description + AI agent | Manual sketches and features | Drag-and-drop shapes | Manual sketches and features |
| CAD experience needed | None | Weeks of learning | Very little | Weeks of learning |
| Model type | Real parametric CAD | Parametric CAD | Simple mesh shapes | Parametric CAD |
| Edit dimensions directly | Yes | Yes | Limited | Yes |
| Export formats | STEP, STL, 3MF, DXF | STEP, STL, 3MF, DXF | STL, OBJ, SVG | STEP, STL, DXF |
| Best for | Beginners who need real parts fast | Professional engineering | Kids and first-time makers | Free, open-source CAD work |
| Cost to start | Free to try | Free for personal use, paid for business | Free | Free, open source |
Frequently Asked Questions
Is LexiCAD AI free?
LexiCAD is free to try, so you can describe a part, get a model and export it without paying first. As with most new AI tools, advanced features and higher usage limits are likely to sit on paid plans as the product grows, so check the current pricing on the official LexiCAD website before planning a big project around it. For learning and for one-off parts, the free start is enough.
Do I need any CAD experience to use LexiCAD?
No. That is the whole point of the tool. You describe the part in everyday words, answer the agent’s questions, and edit dimensions by changing numbers. If you can explain what you want to a friend, you can use LexiCAD. People who do know CAD will still find it fast for simple parts, but it is built for people who do not.
What file formats can I export from LexiCAD?
You can export STEP, STL, 3MF and DXF. Use STL or 3MF for 3D printing, STEP when you need to open or edit the model in another CAD program, and DXF for laser cutting or other flat, 2D fabrication.
Can I change the model after the AI builds it?
Yes — and this is what makes LexiCAD different from text-to-3D generators. The model is parametric, so you can edit dimensions directly without asking the AI again. Change a hole size, a thickness or a height, and the rest of the model updates around your change.
Does LexiCAD work for laser cutting as well as 3D printing?
Yes. Export a DXF of the flat profile and send it to a laser cutter or cutting service with your material and thickness. Flat parts like brackets, panels, stencils and enclosures are a natural fit, and the dimensions come straight from the same parametric model.
What should I make first with LexiCAD?
Start with something small, useful and easy to measure: a phone stand, a cable hook, a replacement knob, or a simple bracket. Pick a part you can test within an hour of designing it, so the loop of describe, check, adjust and print teaches you the workflow before you attempt anything bigger.
Final Thoughts
LexiCAD does not try to turn you into a CAD engineer. It does something more useful for most people: it removes the CAD skill from the path between an idea and a finished part. You describe what you need, the agent asks smart questions, builds a real parametric model, checks it against your requirements, and hands you files your printer or laser cutter can use — and you can still change any dimension yourself afterwards. For a 3D printer owner who has been downloading other people’s models for years, that is the moment the printer becomes truly yours.
Start small, measure twice, and let the first print teach you the loop. Your second part will be better than your first, and by your fifth you will be designing things you would never have attempted in a traditional CAD program. That is the real promise of learning how to use LexiCAD AI: not a shortcut around design, but a way in.
Explore More Free AI Tools
Want more free tools like LexiCAD? Try the free tools on AI Tool Steps: the AI Title Generator writes click-worthy headlines in seconds, the Meta Description Generator drafts search-ready descriptions, the AI Rewriter polishes rough drafts into clean copy, and the Keyword Density Checker keeps your content SEO-friendly. They are free, beginner-friendly, and built for the same kind of everyday work as the guide you just read.