

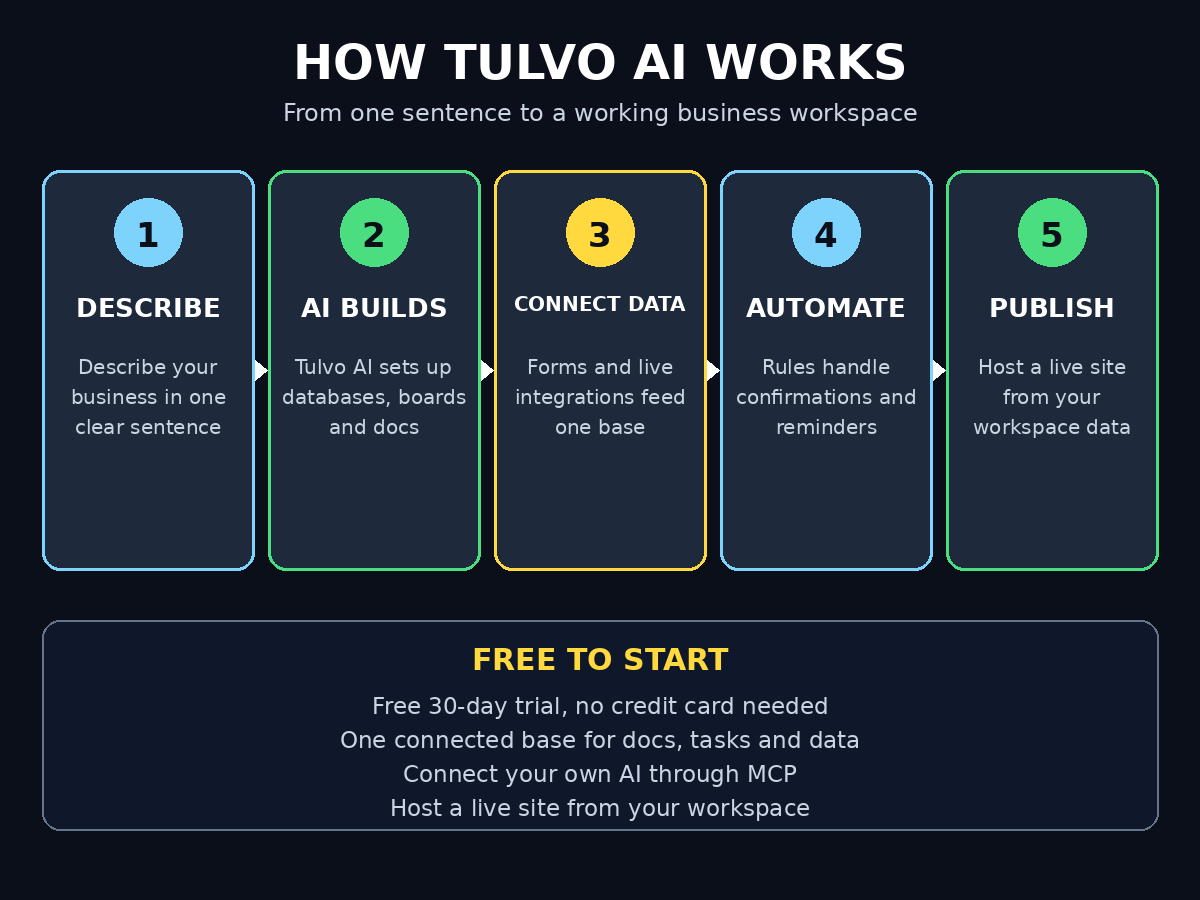
Most small businesses run on ten or more apps that never share data. Your docs live in one place, your tasks in another, and your customer list in a spreadsheet. Tulvo AI fixes that mess. It puts your docs, tasks, customers, forms, and website on one set of connected data.
Tulvo AI launched on Product Hunt on November 15, 2026. It earned the number two spot as Product of the Day, with 120 upvotes and a perfect 5.00 review score. You describe your business in one sentence, and Tulvo AI builds your databases, boards, docs, and reports for you. You can try it free for 30 days.
This beginner guide shows you how to use Tulvo AI from your first sentence to a working workspace. You will set up your business, connect your data, build boards, automate boring work, and even host a live site. No coding is needed. No setup experience is needed either.
Step 1: Open Tulvo AI and Start Your Free Trial
The fastest way to learn the tool is to open it and start the free trial. The trial lasts 30 days, and you do not need a credit card to begin.
- Go to the Tulvo website in your browser and click the free trial button.
- Create your account with your email address and a password you can remember.
- Pick a name for your workspace. A good name is your business name, because your team will see it every day.
- The app then asks you one simple question about your business. Do not skip this step, because your answer shapes the whole workspace.
First, take a minute to think about what your business does before you type. For example, a bakery, a marketing studio, and a repair shop each need a very different workspace. The clearer your sentence, the better your starting workspace will be.
Step 2: Describe Your Business in One Sentence
This is the step that makes Tulvo AI different from every other workspace tool. You do not build databases by hand. You describe your business, and the AI builds them for you.
- Write one clear sentence about what your business does. For example, “We are a small bakery that takes custom cake orders online and delivers them in the city.”
- Add one detail about how you work. For example, “We track orders, ingredients, and delivery dates every week.”
- Click the button to build your workspace, then wait a few seconds while Tulvo AI works.
- You will see databases, boards, docs, and reports appear. Each one is already linked to the others.
However, do not expect a perfect workspace on the first try. The AI gives you a strong starting point, not a finished system. In addition, you can rename, move, or delete anything it creates. As a result, the setup takes minutes instead of the hours a normal tool would need.
Step 3: Review the Workspace Tulvo AI Builds for You
Before you add any data, look around the workspace it made for you. A quick tour now saves confusion later, because you will know where everything lives.
- Open each database and check its fields. A customer database should hold names, emails, and order history.
- Open each board and see how the columns are set up. A task board usually moves work from “To do” to “Doing” to “Done.”
- Open the docs and check the templates. Tulvo AI often creates a welcome doc and a simple guide for your team.
- Open the reports and see what numbers they track. A good report shows open orders, revenue, and overdue tasks at a glance.
If something looks wrong, fix it now while the workspace is still empty. For example, rename a field that uses a word your team does not use. Delete a database you will never need, because a clean workspace is easier to trust. Finally, save a note of what you changed, so your team knows why the workspace looks the way it does.
Step 4: Connect Your Data with Forms and Live Integrations
A workspace is only useful when real data flows into it. Tulvo AI lets you bring data in from forms and live integrations, so you stop copying numbers by hand.
- Create a form for the data you collect most. For example, an order form can ask for the customer name, the product, and the delivery date.
- Link each form field to a database field. When someone fills in the form, a new record appears in the right database.
- Connect the tools you already use through live integrations. Your form answers, your emails, and your sales can all feed the same connected data.
- Test the flow with one fake entry before you share the form. Check that the record lands in the right place with the right values.
Because all your data shares one connected base, a change in one place shows up everywhere. For example, update a customer phone number once, and every board, doc, and report shows the new number. In addition, this single source of truth removes a classic small business problem. You no longer have five spreadsheets with five different answers.
Step 5: Organise Work with Boards in Tulvo AI
Boards turn your databases into a visual workflow. They are the best place to see what is happening today and what is stuck.
- Open a board view of your main database. Each card on the board is one record, such as one order or one project.
- Drag a card from one column to the next as work moves forward. The database updates itself, so no one has to retype a status.
- Add a due date and an owner to every card. A card with no owner is a task no one will do.
- Use filters to build views for different jobs. For example, a “Today” view shows only cards due today. A “Stuck” view shows cards with no update for a week.
The boards stay linked to your data, so a board is never a separate copy. However, you can still change how a board looks without touching the data behind it. As a result, your sales view and your delivery view can show the same orders in different ways. Finally, review your boards each morning, because a five minute check keeps small delays from turning into missed deadlines.
Step 6: Create Docs and Reports That Stay in Sync
Docs and reports in Tulvo AI are not static files. They read from the same connected data as your boards, so they stay fresh without extra work.
- Open a doc and type your notes as normal. You can add headings, checklists, tables, images, and highlight boxes.
- Pull live numbers into a doc with a simple reference. For example, a weekly doc can show the count of open orders without you typing it.
- Build a report from any database. Pick the fields you care about, then choose a table, a chart, or a simple summary.
- Share a report link with your team or a client. The numbers update themselves, so the link never goes out of date.
For example, a bakery owner can keep one report for the week. It shows orders due, ingredients to buy, and total revenue. The report reads live data, so it is right every time you open it. In addition, you can print or export a report when you need a paper copy for a meeting. Because the doc and the data are connected, you never have to wonder which version is correct.
Step 7: Automate Repetitive Work in Tulvo AI
Automation is where the tool starts to feel like a team member. You set a rule once, and the workspace does the boring work for you every time.
- Pick one task you repeat every day. Good first choices are order confirmations, reminder emails, and status updates.
- Build a simple rule: when something happens, do something. For example, when a new order arrives, send the customer a confirmation message.
- Add a second rule for overdue work. For example, when a card stays in “Doing” for three days, tag the owner and ask for an update.
- Turn the rule on and watch it run for a week before you add more. One working rule beats ten rules you never test.
However, keep your automations simple at the start. A rule with too many steps is hard to fix when it breaks. In addition, write down what each rule does, because future you will forget. As a result, your workspace gets faster every week without getting harder to manage. Finally, remove any rule that fires too often, because noisy automation is worse than no automation.
Step 8: Connect Your Own AI Through MCP
Tulvo AI works with the AI tools you already use. Through MCP, your own AI assistant can read and write your workspace with your permission.
- Open the settings and find the MCP connection page. Tulvo AI gives you a connection address and a key.
- Paste that connection into your AI tool of choice, such as Claude or another MCP client.
- Start with read-only access. Let the AI answer questions about your data before you let it change anything.
- Ask a simple question first. For example, “How many orders are due this week?” is a safe test.
- Add write access later, once you trust the setup. Then your AI can create tasks, update records, and draft reports for you.
This connection turns Tulvo AI into a workspace your AI tools can actually use. Teams that run AI automation services will feel at home here. The same agent that drafts your emails can now check your real order list. Because the AI reads live data, its answers are based on facts, not guesses. For example, it can spot that three deliveries are late and draft the apology messages for you.
Step 9: Host a Live Site from Your Workspace
Tulvo AI can also host a live site built from your workspace data. This is a simple way to publish a price list, a menu, a catalog, or a booking page without a separate website tool.
- Pick the database you want to show. For example, a product database can become a public catalog page.
- Choose which fields are public and which stay private. Prices and product names can be public, while supplier costs stay hidden.
- Pick a simple layout and preview the page. Check it on a phone as well as a computer, because most visitors will use a phone.
- Publish the site and share the link. When you update the database, the live site updates too.
A small business can run its whole public face from Tulvo AI this way. However, a bigger site with custom design still needs a proper website builder. A digital agency can build it well. For example, a bakery with twenty products can publish a clean menu in an afternoon. In addition, the live site never goes stale, because it reads the same data your team already updates.
Step 10: Invite Your Team and Set Permissions
A workspace only works when the whole team uses it. The last setup step is to invite people and give each person the right level of access.
- Invite your team by email from the workspace settings. Each person gets their own login.
- Give owners full access and give helpers limited access. For example, a delivery driver needs to see orders, not your supplier prices.
- Show each person the one view they will use most. A short five minute demo beats a long manual nobody reads.
- Set one simple rule for the team: if it is not in Tulvo AI, it did not happen. This rule keeps the data honest.
First, start with two or three people and fix the rough edges together. Then invite the rest of the team once the workspace feels smooth. Because everyone works from the same connected data, handoffs get faster and mistakes get rarer. Finally, hold a short weekly review inside Tulvo AI itself. The workspace then becomes the place where work is planned, not just recorded.
Tulvo AI vs Notion vs Airtable
Tulvo AI is not the only workspace tool, so it helps to see how it compares. Notion is a flexible docs tool, and Airtable is a strong database tool. Tulvo AI tries to combine both, with AI setup on top.
| Feature | Tulvo AI | Notion | Airtable |
|---|---|---|---|
| AI builds your workspace from one sentence | Yes | No | No |
| Connected databases, boards, docs, and reports | Yes | Partly | Partly |
| Free trial | 30 days free | Free plan | Free plan |
| Forms that feed your database | Yes | Yes, with add-ons | Yes |
| Live site hosting from your data | Yes | No | No |
| Connect your own AI through MCP | Yes | No | No |
| Best for | Small businesses that want one connected workspace | Notes and docs teams | Data-heavy teams |
Tulvo AI wins for small teams that want setup done for them. Notion wins if you mostly write long docs. Airtable wins if you mostly manage large tables of data. However, if you want one tool that covers docs, tasks, customers, and a public page, Tulvo AI is the simplest choice.
Frequently Asked Questions About Tulvo AI
Is Tulvo AI free?
Tulvo AI offers a free 30-day trial. You can build a full workspace and test it with real data before you pay. The launch also includes a 50 percent discount during Black Friday. Check the pricing page inside the app for the current plans after your trial ends.
Do I need to know how to code to use Tulvo AI?
No, you do not need to code at all. You describe your business in plain words, and Tulvo AI builds the databases, boards, docs, and reports for you. Every later change is point and click, with no formulas or scripts required.
Can Tulvo AI replace Notion and Airtable?
It can replace both for many small businesses, because it covers docs, databases, boards, and reports in one place. However, if your team already lives in Notion or Airtable and loves it, you may prefer to keep that tool. You can use Tulvo AI for a new project first.
Is my data safe in Tulvo AI?
Your data lives in your own workspace, and you control who can see it through permissions. Start with read-only MCP access, and only give AI tools write access when you trust the setup. As with any cloud tool, keep a regular export of your most important data.
Can I use Tulvo AI on my phone?
Yes, Tulvo AI works in a mobile browser. You can check boards, update tasks, and read reports from your phone. The desktop view is better for building databases and automations, but daily checks work fine on a small screen.
Final Thoughts
Tulvo AI is a strong pick for any small business tired of juggling ten apps. You describe your business in one sentence, and you get a connected workspace with databases, boards, docs, and reports. Forms, automations, MCP, and live site hosting then grow that workspace into a real system.
Start with the free 30-day trial. Describe your business clearly, review what the AI builds, connect one form, and invite two people. That is enough to feel the difference in a single afternoon. Finally, keep the workspace simple, because a simple workspace your team actually uses beats a perfect system nobody opens.
Explore More Free AI Tools
Want more free AI tools to grow your business? Try the free tools at AI Tool Steps: the AI Title Generator writes catchy headlines in seconds, the Meta Description Generator creates search-ready descriptions, the AI Rewriter polishes your rough drafts, and the Keyword Density Checker keeps your SEO on track. All four are free, and they pair well with the workspace you just built in Tulvo AI.