

Code review is the slowest part of shipping software. A small fix can sit in a queue for two days while senior engineers work through a pile of pull requests. Most of those pull requests are safe, boring changes that never needed a human in the first place. LiveReview AI flips that queue around. It scores every pull request for risk, automatically approves the safest 30 to 50 percent, and sends only the risky ones to a human reviewer.
LiveReview AI is a free, risk-aware AI code review tool built by Hexmos. It launched on Product Hunt on November 7, 2026. There it earned 252 upvotes and reached number two Product of the Day. This guide shows you exactly how to use LiveReview AI for beginners. You will learn how to connect a repository, read the risk score, set an auto-approve policy you can trust, and roll it out to your team — starting on the free plan that covers 30,000 reviewed lines of code every month.
What Is LiveReview AI?
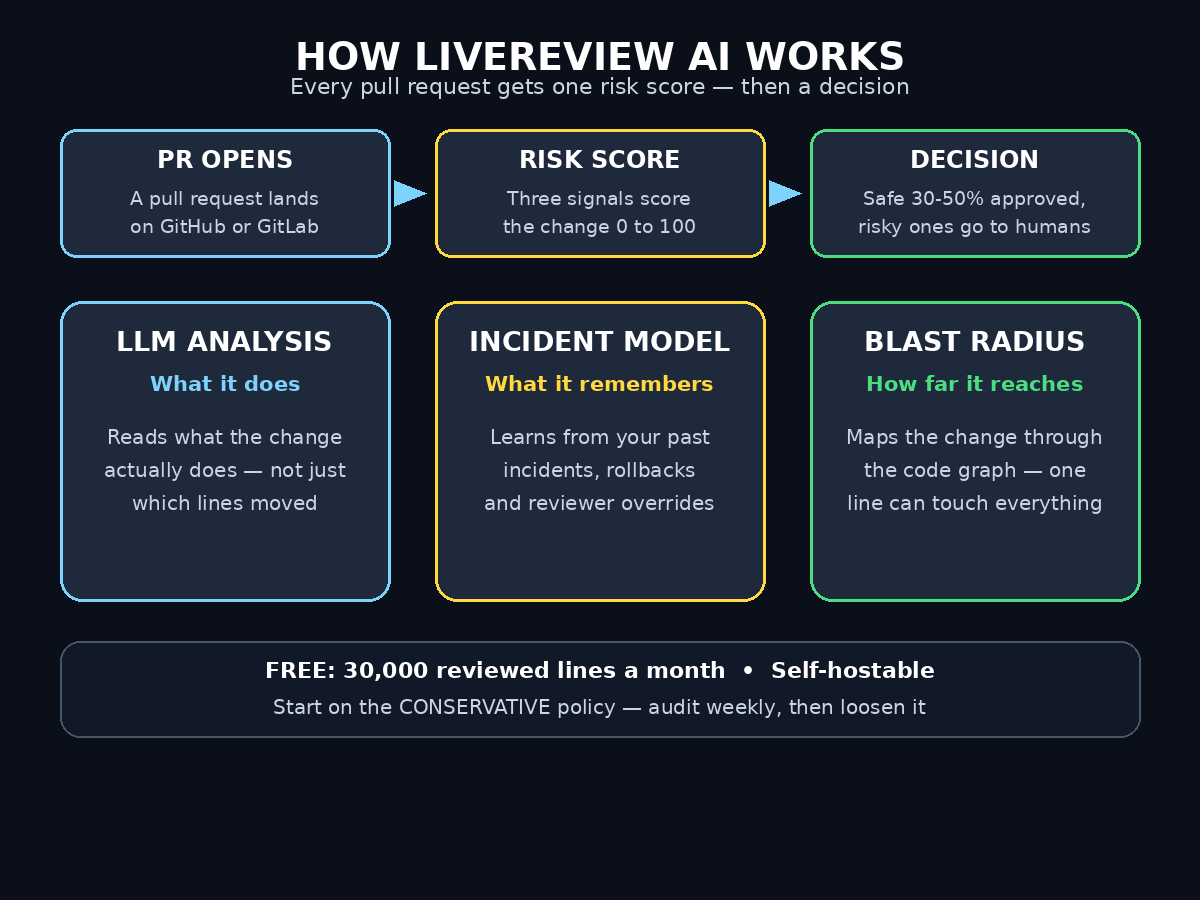
LiveReview AI is a code review system that judges pull requests by risk instead of treating every change the same way. Most AI review tools only add comments to your pull requests. They leave the approve-or-wait decision to a human. LiveReview goes one step further: it gives every pull request a risk score, then approves the lowest-risk changes automatically under a policy your team controls.
The risk score comes from three signals working together:
- Semantic LLM analysis reads what the change actually does, not just which lines changed. A renamed variable and a rewritten payment flow get very different scores.
- An incident-trained machine learning model learns from your own history: past incidents, rollbacks and reviewer overrides. The scoring improves as your team uses it.
- Code-graph analysis (AST blast radius) maps how far a change reaches through your codebase. A one-line edit that touches a critical shared function scores higher than a one-line edit in an isolated test file.
The idea follows Meta’s RADAR approach to risk-aware review. Meta reported that its internal system was associated with 50 times fewer production incidents and 3 times fewer rollbacks. Reviews were also 35 percent faster. Those are Meta’s figures, cited by LiveReview as inspiration — not LiveReview’s own measured results. They explain why the approach matters: the goal is fewer incidents and faster shipping, not just more comments.
LiveReview AI works with GitHub, GitLab, Bitbucket, Gitea and Azure DevOps, and it is free to start and self-hostable. If your team is drowning in AI-written pull requests — and in 2026, most teams are — this is the tool that keeps the safe half moving. Humans can then focus on the changes that could actually break production.
Step 1: Create Your Free LiveReview AI Account
Start at the official LiveReview site (hexmos.com/livereview) and create an account. The Individual plan is free and covers 30,000 reviewed lines of code per month. It comes with your own AI keys and unlimited projects. There are no seats to pay for on the free plan, and paid plans start at 32 dollars per month for 100,000 lines with unlimited members.
- Sign up with your work email or your GitHub account so the repository connection in the next step is smooth.
- Choose the free Individual plan. You can upgrade later; the free allowance is enough to review a small team’s real pull requests for a month.
- Confirm your email and open the dashboard. You will see an empty project list and a short setup checklist — that is normal, because no repository is connected yet.
Before you connect anything, decide one thing with your team: which repository you will test first. Pick an active but low-risk repository — a documentation site, an internal tool, or a service with good test coverage. You want real pull requests flowing through LiveReview from day one. But you do not want your first experiment to sit on your payment system.
Step 2: Connect Your First Repository to LiveReview AI
Connecting a repository takes a few minutes, and LiveReview supports the platforms most teams already use.
- In the LiveReview dashboard, click Add Repository and pick your platform: GitHub, GitLab, Bitbucket, Gitea or Azure DevOps.
- Authorize the LiveReview app or integration for the organization that owns the repository. Give it access only to the repository you chose for the test — you can add more later.
- Select the repository and the branches you want reviewed. Most teams start with the default branch’s pull requests. They leave long-lived release branches out until they trust the setup.
- Confirm the webhook or app installation. LiveReview AI needs to hear about new pull requests as they open, so the platform must be able to send it events.
Once the connection is live, LiveReview starts watching the repository. It does not rewrite your code, merge anything, or change your branch protection rules on its own. It only reads pull requests, scores them, and acts within the policy you set in Step 5.
If you work at a company that is careful about code leaving its own servers, this is the point where the self-hosted option matters most. Decide it now. LiveReview AI is source-available and self-hostable, so you can run it on your own infrastructure instead of the hosted service. The setup is the same, but the code never leaves your network. Teams that handle customer data or regulated workloads usually pick this route. It is worth deciding now rather than migrating later.
Step 3: Add Your Own AI Keys (Optional but Recommended)
The free plan uses your own AI keys. That keeps the cost predictable and lets you choose which model does the reviewing.
- Open Settings and find the AI provider section. Add an API key from your preferred provider.
- Pick a model that is strong at reading code. The default recommendation is a good starting point; you can change it after you see the first few reviews.
- Set a monthly spending limit on the provider side. LiveReview charges by reviewed lines of code, but the model provider bills by tokens. A cap protects you from a surprise bill if a huge pull request lands.
Using your own keys also means your review quality is not tied to a shared pool. If your team already pays for an AI plan, this is usually the cheapest way to run LiveReview AI. The 30,000 free lines per month on the Individual plan cover a surprising amount of real review work.
Step 4: Understand the Risk Score
Every pull request LiveReview AI sees gets one risk score. Understanding that score is the whole skill of using the tool well.
- Low risk means the change is small, well tested, and far from critical paths. Think of a typo fix, a dependency bump with passing tests, or a change to a single isolated component.
- Medium risk means a human should glance at it. The change touches shared code, changes behavior in a visible way, or comes with weak test coverage.
- High risk means stop and read carefully. The change reaches payment code, authentication, database migrations, or a core library that everything else depends on.
Open a scored pull request and read the breakdown. LiveReview AI shows which of the three signals pushed the score up or down: what the language model thought the change does, what the incident-trained model remembered about similar changes, and how wide the blast radius is. The blast radius view is the most useful part for beginners. It shows you the files and functions that a change can actually affect — something a plain diff never shows.
Spend your first week just reading scores without auto-approving anything. Compare LiveReview’s score with your own judgment on each pull request. When you disagree, note why. Those disagreements are exactly the data that makes the incident-trained model smarter in Step 8.
Step 5: Set Your LiveReview AI Auto-Approve Policy
The auto-approve policy is the rule that decides which pull requests LiveReview may approve on its own. LiveReview offers three built-in policy levels: conservative, balanced and aggressive.
- Conservative approves only the very safest changes — tiny diffs, strong tests, no critical paths. Start here. It approves the smallest share of pull requests, but it earns your team’s trust fastest.
- Balanced approves a wider band of low-risk changes once the conservative setting has run cleanly for a couple of weeks.
- Aggressive approves up to half of all pull requests. It is meant for mature teams with strong tests and a history of clean overrides.
Set the policy in the project settings, and set it per repository, not per team. Your documentation site can run balanced while your payment service stays conservative — that is the point of the policy system.
Two settings deserve special attention. First, the maximum diff size for auto-approval: a 500-line change should never auto-approve, no matter how safe it looks. Second, the protected paths list. Add your authentication code, payment logic, database migrations and secrets handling to the list of paths that can never be auto-approved. A digital agency shipping client work on a deadline benefits from this discipline as much as any product team, because one bad auto-approval in a billing flow costs far more than the hours the policy saves.
Step 6: Open Your First Pull Request and Watch LiveReview AI Work
Now make a real pull request in your test repository and watch LiveReview handle it.
- Create a small, safe change: fix a typo, update a comment, or refactor a single function without changing its behavior.
- Open the pull request as usual. Within moments, LiveReview AI posts its risk score and a short review summary as a check on the pull request.
- Read the summary before you read the diff. It should describe what the change does in plain language and name the files it touches.
- If the score is low and your policy allows it, LiveReview AI approves the pull request automatically. The approval appears as a normal review approval, so your existing merge rules still apply — LiveReview does not bypass branch protection, it satisfies it.
If the pull request is not auto-approved, read the reason. LiveReview explains what pushed the score up, and that explanation is usually correct. A missing test, a touched shared module, or a large diff are the common reasons, and each one is something you can fix in the pull request itself.
Step 7: Review What LiveReview Approved (and What It Flagged)
Auto-approval is not the end of the job — it is the start of a weekly habit that keeps the system honest.
- Once a week, open the LiveReview dashboard and look at the list of auto-approved pull requests. Pick three at random and read the diffs yourself.
- Ask one question about each: would I have approved this? If the answer is yes three times out of three, the policy is working. If the answer is no even once, find out why the score was low and tighten the policy or the protected paths.
- Look at the pull requests LiveReview AI flagged as risky. Read the highest-risk one in full. If the risk was real, the tool just earned its keep. If the risk was a false alarm, note what confused it — that note becomes training data.
This weekly check takes about fifteen minutes and it is the difference between a team that trusts its automation and a team that quietly stops using it. The same review habit applies to any AI automation service your team adopts: automation you never audit becomes a risk you cannot see.
Step 8: Teach It From Your Incidents and Overrides
LiveReview AI’s incident-trained model is what separates it from a generic AI reviewer, but it only learns if you feed it.
- When a production incident happens, link it to the pull request that caused it. LiveReview AI uses that link to raise the risk of similar changes in future.
- When a reviewer overrides LiveReview — approving something it flagged, or requesting changes on something it approved — that override is recorded as a training signal. Do not override silently; leave a short comment explaining why.
- When a rollback happens, mark the pull request that was rolled back. Rollbacks are the strongest negative signal the model gets, and a handful of them will noticeably sharpen its scoring.
After a month of real overrides and incident links, the scores on your repository will reflect your codebase, not a generic model of all codebases. That is when teams usually move from the conservative policy to balanced, because the scores have earned it.
Step 9: Roll LiveReview AI Out to the Whole Team
Once one repository has run cleanly for two to four weeks, expand in stages.
- Add the next repository, starting it on the conservative policy even if the first repository has moved to balanced. Every codebase has different risk patterns.
- Announce the rollout to the team and explain what changed: safe pull requests now merge faster, risky ones still get a human, and the weekly audit keeps everyone honest.
- Set a team rule for overrides: anyone can override LiveReview, but they must leave a reason. The reason is what trains the model.
- Watch the review queue time, not just the approval count. The metric that matters is how long a pull request waits for its first human review — that number should fall as the safe half of the queue clears itself.
If your team uses AI coding tools to write pull requests, this step matters even more. AI-generated code arrives faster than humans can review it, and a risk-aware reviewer is the only way the queue keeps up. LiveReview AI was built for exactly that flood: it takes the same idea to any team and any git provider, self-hosted and free to start.
Step 10: Self-Host LiveReview AI (Optional)
If your code cannot leave your own servers, self-hosting is the route to take.
- Check the open repository for the latest deployment instructions and system requirements.
- Deploy LiveReview on your own infrastructure — your own server or your own cloud account — and point it at your git platform.
- Connect your own AI keys, as in Step 3, so the review models run under your account and your data stays inside your boundary.
- Keep the same policy discipline: start conservative, audit weekly, and let incident links and overrides train the model.
Self-hosting adds maintenance work — updates, backups, monitoring — so do not choose it by default. Choose it when your security or compliance rules require it, and choose the hosted service when they do not. Either way, the workflow for developers stays the same: open a pull request, read the risk score, and let the safe ones through.
LiveReview AI vs the Alternatives
| Tool | What it does | Auto-approve safe PRs | Free plan | Best for |
|---|---|---|---|---|
| LiveReview AI | Risk-scored review with auto-approval | Yes — lowest-risk 30–50% | 30k lines/month, self-hostable | Teams drowning in AI-written PRs |
| CodeRabbit | AI comments and review summaries | No — comments only | Free tier for open source | Teams that want detailed PR comments |
| GitHub Copilot code review | AI review inside GitHub | No — suggests, does not approve | Included in Copilot plans | Teams already on GitHub Copilot |
| Manual review only | Humans read every diff | No | Free (your time is the cost) | Tiny repos with few PRs |
| Linters + CI checks | Style and test gates | No — they block, never approve | Free and open source | Catching mechanical errors early |
The honest answer for most teams is to combine them: keep your linters and CI checks for mechanical errors, use LiveReview to clear the safe half of the queue, and keep human reviewers focused on the risky changes where judgment actually matters.
Frequently Asked Questions
Is LiveReview AI free?
Yes. The Individual plan is free and covers 30,000 reviewed lines of code per month. It comes with your own AI keys and unlimited projects. Paid plans start at 32 dollars per month for 100,000 lines, with unlimited members, custom prompts, dashboards and API access. Pricing is per reviewed line of code, not per seat.
Which git platforms does LiveReview work with?
LiveReview AI works with GitHub, GitLab, Bitbucket, Gitea and Azure DevOps. It is also self-hostable, so teams that need code to stay on their own infrastructure can run it themselves.
Can LiveReview really auto-approve pull requests safely?
It auto-approves only the lowest-risk 30 to 50 percent of pull requests, under a policy your team sets, and it never bypasses your branch protection rules. Start on the conservative policy, audit the auto-approved pull requests weekly, and only move to balanced or aggressive once the scores have earned your trust.
What makes LiveReview different from CodeRabbit or Copilot review?
Most AI reviewers only add comments. LiveReview scores every pull request for risk using three signals — language model analysis, an incident-trained model, and code-graph blast radius — and then approves the safest changes automatically. The risk score and the auto-approval are the difference.
Do I need to know how to code to use LiveReview?
You need to be comfortable with pull requests and your git platform, but you do not need to write code to set it up. Connecting a repository, reading a risk score and choosing a policy are all done in the dashboard. Developers on the team will read the scores, and anyone can learn to do that in a day.
Is my code safe with LiveReview?
LiveReview is source-available and self-hostable, so if your code cannot leave your own servers you can run it on your own infrastructure. On the hosted service, check the current privacy and data handling terms before connecting a private repository, and use the protected paths list to keep sensitive areas out of auto-approval.
Final Thoughts
LiveReview AI solves the problem every team feels in 2026: pull requests arrive faster than humans can review them, and the review queue becomes the bottleneck for the whole team. Scoring every pull request for risk and auto-approving the safe half is a simple idea, and it works because the policy stays in your hands — conservative to start, audited weekly, and trained on your own incidents and overrides.
Start with one low-risk repository, run it on the free plan, and spend the first week just reading the scores. If the scores match your judgment, let it approve the safe changes and give your reviewers their time back. The risky pull requests will still be there waiting for a human — and that is exactly where human attention belongs.
Explore More Free AI Tools
Want to keep building your free AI toolkit? Try the AI Title Generator to write better headlines, the Meta Description Generator to craft search-friendly descriptions, the AI Rewriter to polish your drafts, and the Keyword Density Checker to keep your SEO on track — all free on AIToolSteps.