

Most AI tools answer you with paragraphs. You ask a question, you get a wall of text, and then your code has to guess what the answer actually means. The Google Gemini Decisions API, launched on 11 November 2026, flips that around. It does not generate text at all. You send it one input: text, an image, audio, video or a PDF. Add up to 1,000 closed questions, and it returns a calibrated probability for every possible answer. Your code can branch on those numbers directly, with no parsing and no guessing.
The model behind it is called gemini-decision-1, and it runs on its own endpoint, POST /v1beta/decisions, inside the Gemini Developer API. There is a genuinely free tier: 200 requests per minute, 50,000 tokens per minute and 10,000 requests per day, with no credit card and no billing account. This beginner guide walks you through the whole thing. You will go from your first free API key to your first working decision, plus the confidence and cost habits that keep you safe in production.
Step 1: Understand What the Google Gemini Decisions API Actually Is
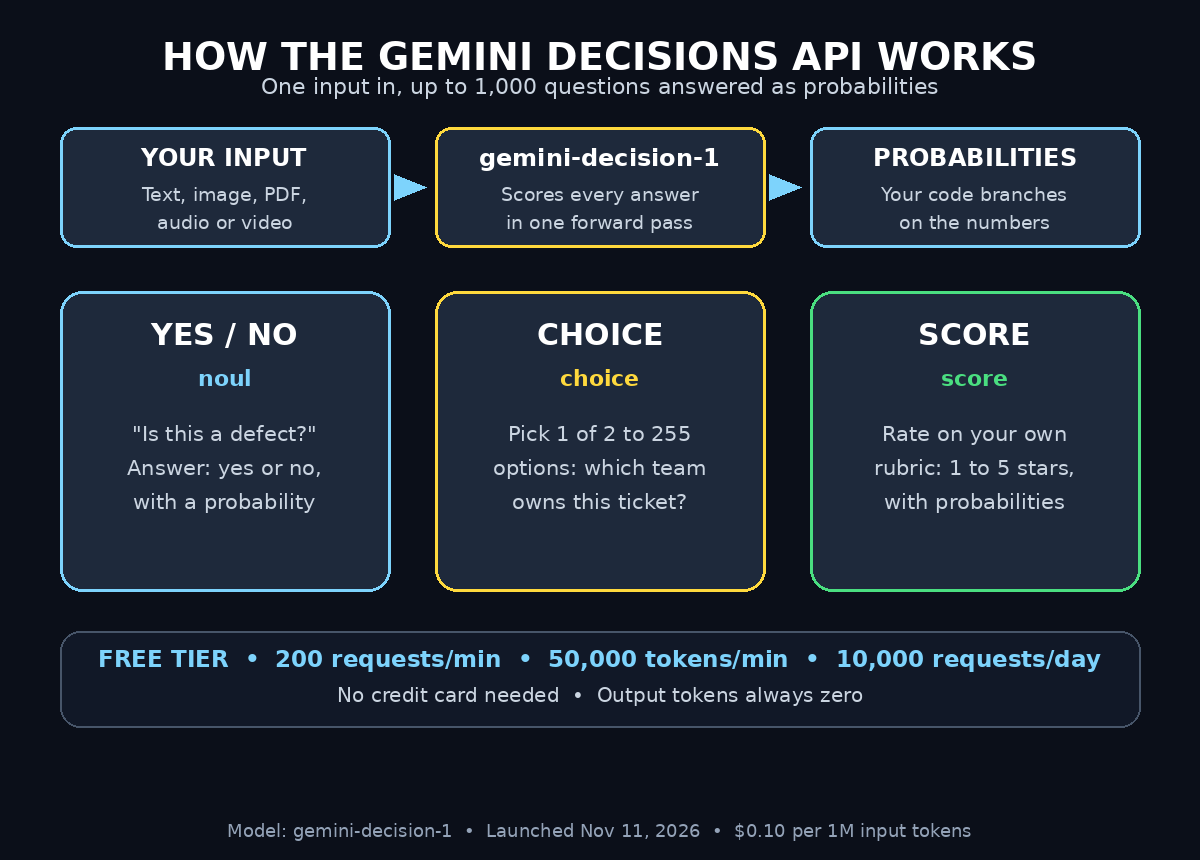
Before you write any code, get the mental model right, because this API is not a chatbot. A normal Gemini model takes a prompt and generates text. The Google Gemini Decisions API takes one shared input and a set of closed questions, scores every candidate answer in a single forward pass, and returns probabilities. Nothing is generated, so output tokens are always zero.
There are exactly three question types, and almost everything you build uses one of them. A noul question is a yes/no question, such as “Is this a product defect?” A choice question asks the model to pick one option from a list of 2 to 255 options. A good example is deciding which support queue should take a ticket. A score question rates the input on an ordered rubric you define, such as rating a review from one to five stars. Each question is independent, so one request can mix all three types.
The practical difference is speed and cost. Google reports a median of 150 to 250 milliseconds end to end. You pay only for input tokens at 0.10 dollars per million. The shared input is billed once per request, no matter how many questions you ask. That makes it cheap enough to run on every ticket, every upload and every form submission, which is exactly the kind of work a busy digital agency automates for clients all day.
Step 2: Get Your Free API Key in Google AI Studio
You need a Google account and about five minutes. Open Google AI Studio in your browser and sign in. Click Create API key, and a new Google Cloud project starts on the free tier automatically. No billing account is needed for the free tier, and no card is asked for at this stage.
Two things are worth doing right now. First, restrict the key to the Gemini API only, so it cannot call anything else in the project if it ever leaks. In the Google Cloud console, go to APIs and Services, then Credentials. Open your key and set the API restriction to the Gemini API. Its service name is generativelanguage.googleapis.com. Second, copy the key into a safe place and treat it like a password. Never paste it into a public chat, a screenshot or a shared document.
One honest warning about the free tier: Google’s terms say free-tier content may be used to improve its products. Do not send customer personal data, contracts or medical images through a free key. Use test data while you learn, and move to the paid tier when real customer data is involved.
Step 3: Install the SDK and Set Up Your First Project
Decisions support arrived in version 3.2.0 of the Google GenAI SDK, so install a current version. For Python you need Python 3.11 or later, and the install command is pip install -U google-genai. For JavaScript, run npm install @google/genai@latest. Older SDK versions do not have the decisions method at all, so if your code says the client has no decisions attribute, upgrading the SDK is the first fix to try.
Set your key as an environment variable so it never ends up in your source code. On Mac or Linux, run export GEMINI_API_KEY="your-key-here" in your terminal. On Windows, set it through the environment variables panel or with setx. The SDK picks the variable up automatically, which keeps the key out of your code and out of version control.
Create a small test folder with one Python file for your experiments. You are going to run short scripts from this folder for the rest of the guide, so keep it tidy from the start. If you plan to put this into a real product later, add a .env file and a .gitignore entry now, while the project is still small and the habit is cheap to form.
Step 4: Ask Your First Yes/No Question with the Google Gemini Decisions API
The simplest possible decision is a yes/no question, and it is the best place to start because it teaches you the whole request shape. A noul question has one job. It answers yes or no about your input, and returns a probability for each side. The Decisions Playground inside Google AI Studio lets you try this without any code, and it exports runnable code you can copy into your own project.
Here is the Python shape for your first Google Gemini Decisions API call. You pass the model name, one shared input, and a map of questions. Put the whole question in the instructions field, because the model does not see the question key, only the instructions text.
from google import genai

client = genai.Client(api_key="YOUR_API_KEY")

result = client.decisions.create(
    model="gemini-decision-1",
    input="The customer says the screen flickers after the update.",
    questions={
        "is_defect": {
            "noul": {"instructions": "Is this message reporting a product defect?"}
        }
    },
)
print(result)
The response gives you a probability for yes and a probability for no, plus a confidence value. A result like yes at 0.93 means the model is fairly sure, while yes at 0.54 means it is barely leaning that way, and your code should treat those two very differently. Run this exact example first. Then change the input text to one of your own messages and watch how the probability moves. That single experiment teaches you more about calibrated probabilities than any documentation page.
Step 5: Offer Choices with the Choice Question Type
Yes/no questions are useful, but most real routing problems are choices between several options. That is what the choice question type is for. You give it a list of 2 to 255 options, and the model returns a probability for each one. Your code then picks the highest, or routes to a human when the top two are close together.
A support inbox is the classic example. Instead of asking “is this urgent?”, ask which team should own the ticket: billing, technical support, sales or account management. One request answers that question for the whole message, and the returned probabilities tell you how sure the model is. If billing scores 0.91, route it automatically. If billing scores 0.48 and technical support scores 0.44, send it to a human triage queue instead. The model is effectively telling you it does not know.
Write your options as short, distinct labels with no overlap between them. “Billing problem” and “payment failed” will confuse the model because they describe almost the same thing, and the probability will split between them. Use one label per idea and keep the wording plain. Test with ten real examples before you trust the routing. Ten minutes of testing here saves hours of misrouted tickets later.
Step 6: Score Things with a Rubric
The score question type rates your input on an ordered scale you define, which turns vague judgment calls into numbers your code can sort, filter and alert on. Think of it as a rubric: you describe what each level means, and the model places the input on that scale with a probability for every level.
A product review is a good first rubric. Define a five-point scale from very negative to very positive, and ask the API to score each new review as it arrives. A customer feedback form can use a three-point scale for urgency, and a content moderation queue can use a four-point scale for severity. Because the result is a number with a probability distribution, you can build simple rules on top of it. Anything scoring four or five on severity goes to a human immediately. Anything scoring one is auto-approved, and the middle scores get a second look.
The rubric wording matters more than anything else in this step. Write each level as a full sentence that a new team member could apply, not as a bare number. “1: the message is spam or nonsense” is a rubric. “1” on its own is not. Good rubrics are the difference between scores you can trust and scores that drift from day to day. Spend real time on the words.
Step 7: Ask Up to 1,000 Questions in One Google Gemini Decisions API Request
This is the feature that makes the Google Gemini Decisions API genuinely different from a chatbot, and it is easy to miss. One request can carry up to 1,000 independent questions about the same input, and the shared input is billed only once. Instead of calling the API ten times for ten questions about one document, you ask all ten at once and pay for the document once.
Imagine a job application. One request can ask whether the candidate meets the degree requirement. It can ask which department fits best, how strong the communication skills look, and whether the location matches. Dozens more questions can follow, all scored against the same CV. Or take a product listing: is the title clear, is the price competitive, does the description mention the warranty, which category fits best, and what is the quality score? All of that comes back in one response, in about the same time as a single question.
Batching also keeps your code simpler. One request means one error to handle, one retry to write, and one log line per document instead of ten. Start by grouping questions that belong to the same decision, and only split them across requests when you genuinely need different inputs for different questions.
Step 8: Use Confidence Scores to Route Decisions Safely
Every answer comes with a probability and a confidence value, and the biggest beginner mistake is ignoring them. A probability of 0.97 and a probability of 0.52 are not the same answer. They differ even when they point at the same option. The first one is safe to automate. The second one is a coin flip wearing a confident label.
Set thresholds before you automate anything. A common pattern is to auto-act above 0.90, send to a human review queue between 0.70 and 0.90, and treat anything below 0.70 as “I don’t know” rather than a decision. Write these thresholds into your code as named constants, not magic numbers buried in an if statement. That way you can tune them later without hunting through the file.
Then measure. Log the probability alongside every automated decision for a week, and check a sample of the low-confidence ones by hand. You will quickly see where your threshold should sit for your data, which is always more useful than a number copied from a tutorial. Teams running agentic AI services for clients treat this step as non-negotiable, because a wrong automated decision costs far more than a slow human one.
Step 9: Send Images, PDFs, Audio and Video as Input
The input is not limited to text. The same three question types work on images, audio, video and PDFs, which opens up decisions that a text-only tool cannot touch. A photo can be asked whether it shows damage. It can also be asked which product is in the frame, or how severe a defect looks. A PDF invoice can be asked whether the totals match, which vendor it belongs to, or whether a signature is present. A short audio clip can be asked whether it contains a complaint, and a video can be scored for quality.
The Google Gemini Decisions API setup is the same as the text version: one shared input, a map of typed questions, and probabilities back. The only difference is how you attach the media, and the SDK and the Decisions Playground both accept file uploads directly. Keep files reasonably sized, and remember that input tokens are what you pay for, so a long video costs more than a short one even though the price per million tokens is the same.
Start with images, because they are the easiest to test and the fastest to judge by eye. Photograph five real examples of whatever you want to classify, ask the same question about each, and compare the probabilities with your own judgment. When the model agrees with you on all five, you have a working classifier. When it disagrees, the rubric or the options usually need better wording, not a bigger model.
Step 10: Stay Inside the Google Gemini Decisions API Free Tier and Avoid Surprise Bills
The Google Gemini Decisions API free tier is generous, but it has hard limits, so build your habits around them from day one. The free tier allows 200 requests per minute, 50,000 tokens per minute and 10,000 requests per day per project, and the daily cap resets at midnight Pacific time. If you stay under those numbers, you pay nothing. If you cross them, requests fail with a rate-limit error rather than silently charging you, which is a safety net, not a license to ignore the limits.
Three habits keep you inside the free tier. First, batch your questions, because one request with fifty questions costs one request against the daily cap, while fifty separate requests cost fifty. Second, keep inputs short: send the paragraph that matters, not the whole document, because tokens per minute is usually the first limit you hit. Third, cache decisions. If you already scored a file, store the result and reuse it instead of scoring the same file again.
If you outgrow the free tier, the paid tier costs 0.10 dollars per million input tokens. It allows 1,500 requests per minute, and output is still zero tokens. That is cheap enough that most small projects never need to think about it, but set a budget alert in Google Cloud anyway. A runaway loop that calls the API thousands of times is the classic beginner bill, and an alert catches it in minutes instead of at the end of the month.
Google Gemini Decisions API vs the Alternatives
| Approach | Output | Speed | Cost model | Best for |
|---|---|---|---|---|
| Gemini Decisions API | Probabilities per answer | 150–250 ms median | Input only, 0.10 dollars per 1M tokens, free tier | Routing, triage, scoring, classification |
| Normal Gemini generateContent | Free text | Seconds | Input + output tokens | Writing, summarizing, open questions |
| Manual rules and keywords | Fixed labels | Instant | Free, your time | Simple, unchanging cases |
| Chatbot with JSON prompting | JSON text to parse | Seconds | Input + output tokens | Prototypes, one-off analysis |
| Hiring a human reviewer | Judgment + nuance | Minutes to hours | Per hour | High-stakes, ambiguous cases |
The honest summary is that the Decisions API wins when the answer is a closed set and the volume is high. A normal Gemini call wins when the answer needs explanation or creativity. Manual rules win when the cases never change. And a human still wins when a wrong answer is expensive. Most real systems use two of these together. The API handles the easy 90 percent, and a person handles the uncertain 10 percent that the confidence scores flag.
Frequently Asked Questions
Is the Google Gemini Decisions API really free?
Yes, on the free tier. Google charges nothing for input on the free tier. It bills zero output tokens because the model generates no text. The free tier allows 200 requests per minute, 50,000 tokens per minute and 10,000 requests per day per project, with no billing account needed. The catch is that free-tier content may be used by Google to improve its products, so do not send sensitive data through a free key.
What is gemini-decision-1?
It is the model that powers the Decisions API, launched on 11 November 2026. Unlike normal Gemini models it does not generate text. It scores closed questions about your input in a single forward pass and returns calibrated probabilities for each possible answer, with zero output tokens.
How is this different from asking Gemini a yes/no question in chat?
A chat answer is text your code must parse, and parsing breaks. The Google Gemini Decisions API returns numbers your code can branch on directly, answers up to 1,000 questions in one request, and bills only the shared input once. It is also much faster, with a median of 150 to 250 milliseconds end to end.
Can I use the Decisions API without writing code?
Yes. The Decisions Playground in Google AI Studio lets you try yes/no, choice and score questions on your own text and media with no code, and it exports runnable code when you are ready to automate. You still need a free API key from AI Studio for real use.
Does the Decisions API work on Vertex AI?
Not yet. The Google Gemini Decisions API runs on the Gemini Developer API in v1beta with an API key from Google AI Studio, and Google lists Vertex AI support as coming soon. If your company only allows Vertex AI, you will need to wait or use the Developer API for testing.
What should I do when the confidence is low?
Treat a low-confidence result as “I don’t know”, not as a decision. Route it to a human, ask a follow-up question, or collect more input. Set a threshold in your code, such as auto-acting only above 0.90, and log the low-confidence cases so you can improve your questions and rubrics over time.
Final Thoughts
The Google Gemini Decisions API is a small idea with a large payoff: stop asking AI models to write you paragraphs, and start asking them to make decisions your code can use. The setup takes less than an hour, the free tier covers serious volume, and the three question types cover most of the classification and routing work that small teams do by hand today. Start with one real problem, such as triaging support messages or scoring product reviews. Test it against ten real examples, and let the confidence scores tell you when it is ready to automate. The tools that turn AI answers into actions are the ones that save real time, and this one is free to try right now.
Explore More Free AI Tools
Want more beginner-friendly AI guides? Try our AI Title Generator, Meta Description Generator, AI Rewriter and Keyword Density Checker on AIToolSteps, and explore the full collection of free AI tools on aitoolsteps.com.