
Imagine typing one sentence — “a golden retriever puppy running through autumn leaves at sunset” — and getting back a realistic 30-second video with natural motion, matching sound, and even dialogue, without touching a camera or an editing timeline. That is what Kling 4.0 AI does. It is the newest flagship video model from Kuaishou, the company behind the short-video app Kwai, and it is the biggest upgrade the tool has ever had: clips up to 30 seconds long, native stereo audio in the same pass, up to 4K resolution, and controls that let you pin characters, objects, and camera moves across the whole scene.
Kling 4.0 became available to everyone on October 15, 2026, after a limited Flash early access in late September, and it is launching on Product Hunt today, November 4, 2026. It has also rolled out to partner platforms such as Runway, Google Flow, Genspark, SeaArt, and Miora in the last two weeks, so you may already have access to it through a tool you use today. The best part for beginners is the price: Kling gives you free credits when you sign in, so you can test the flagship model properly before you spend anything.
In this beginner-friendly guide, you will learn exactly how to use Kling 4.0 AI: what it is, what changed from Kling 3.0, how to create a free account, how free credits work, how to make your first text-to-video and image-to-video clips, how to steer a scene with keyframes and Omni references, how to get synced dialogue and sound, and how to export and share your video the right way. You do not need any video editing experience, and you do not need a credit card to start.
Step 1: Understand What Kling 4.0 AI Actually Is
Kling 4.0 AI is a text-to-video and image-to-video generation model. You describe a scene in words, or upload a photo, and it generates a moving video clip. It is not a video editor and it is not a stock footage library — it creates new footage from your prompt, frame by frame, with motion, lighting, and sound built in.
Here is what makes this version different from a normal AI video tool:
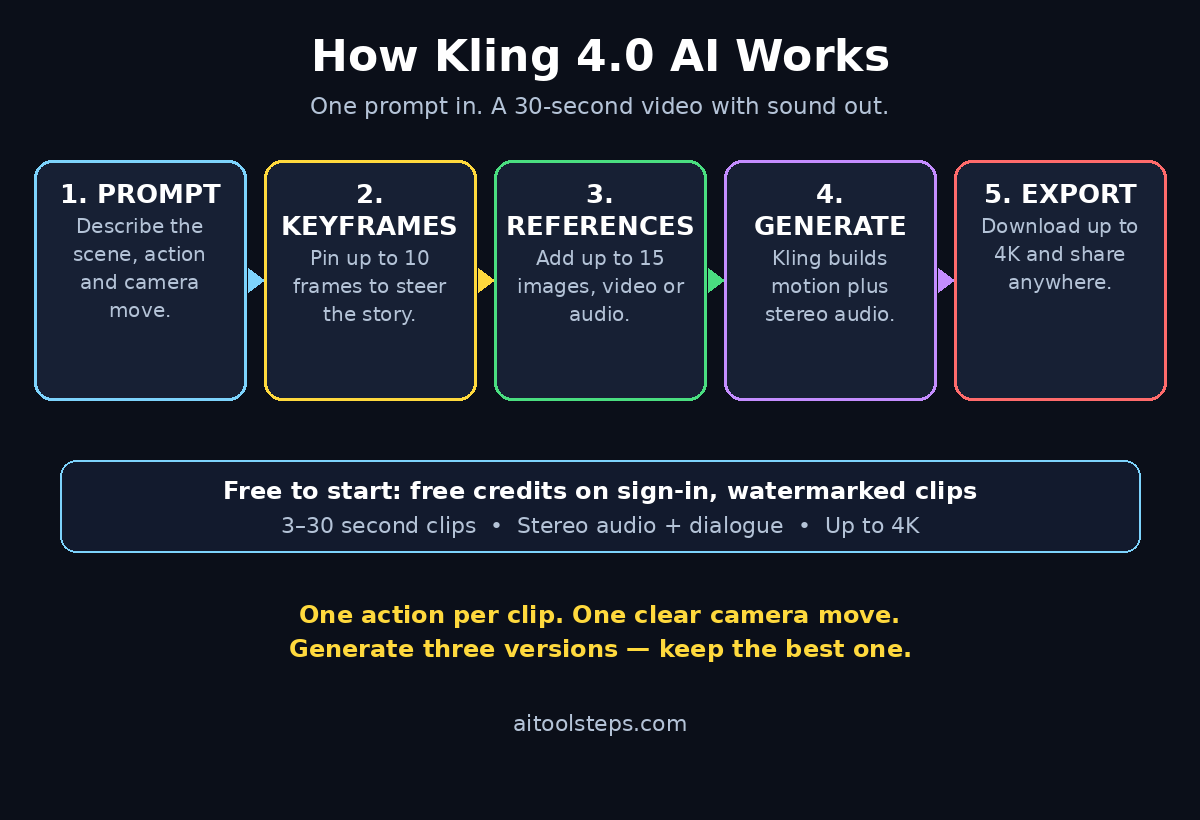
- Longer clips: Kling 4.0 generates clips from 3 to 30 seconds in one pass, double the 15-second limit of Kling 3.0. That is long enough for a full product shot, a short scene, or a complete social media hook.
- Native audio: Sound is generated together with the picture, not added afterwards. That means stereo audio, ambient sound, and dialogue with tighter lip sync arrive in the same generation.
- Higher quality: Up to 4K resolution with 10-bit HDR on 1080p and 4K outputs, plus a wide 21:9 cinematic frame option for film-style shots.
- More control: Up to 10 keyframes let you pin specific moments across a clip, and up to 15 multimodal references let you feed in images, videos, characters, and audio to shape the result.
- A real workspace: Kling 4.0 lives inside the Canvas workspace on klingai.com, alongside Image 3.0, which generates images natively at 4K for cinematic storytelling.
Think of Kling 4.0 as a small film crew that fits in a browser tab: you write the brief, and it handles the camera, the actors, the lighting, and the sound.
Step 2: See What Changed from Kling 3.0 to Kling 4.0
If you tried an older version of Kling, the jump to 4.0 is easy to feel. The motion is steadier, human movement looks more natural, and the camera moves like a real camera instead of sliding around randomly.
Here are the upgrades that matter most for beginners:
- Clip length doubled: 15 seconds in Kling 3.0, up to 30 seconds in Kling 4.0. Longer scenes mean fewer awkward cuts when you stitch clips together.
- Audio built in: Kling 3.0 clips were mostly silent. Kling 4.0 generates stereo audio, ambient sound, and dialogue in the same pass, with better lip sync for talking characters.
- Keyframes added: You can now mark up to 10 keyframe images across one clip, pinning character poses, scene changes, and story beats so the video follows your plan instead of wandering.
- Omni references: Kling 4.0 Omni accepts up to 15 reference inputs — images, videos, characters, and audio — so you can keep the same character, product, or style consistent across many clips.
- Sharper picture: Native 4K output through Image 3.0, 10-bit HDR, and a 21:9 aspect ratio for wide cinematic shots.
- Smoother motion: More stable human and camera movement, which shows most clearly in walking shots, running, dancing, and slow camera pushes.
The honest caveat is that Kling 4.0 is brand new, so quality varies from clip to clip. A prompt that works beautifully once can wobble on the next try. Treat your first week as practice, and keep the generations that work.
Step 3: Create Your Free Kling Account
Getting started takes about two minutes, and there is no payment wall in front of you.
- Open the official site. Go to klingai.com in your browser. Always use the official site from a search result or the Product Hunt launch page, because copycat sites appear around every popular AI launch.
- Sign up. Create an account with your email address, or sign in with Google. There is no credit card step on the free plan.
- Confirm your email. Check your inbox for the verification message and click the link. Your free credits appear once your account is active.
- Open the Canvas. After signing in, look for the video generation workspace. This is where text-to-video, image-to-video, keyframes, and Omni references all live.
- Check your credit balance. Your remaining credits are shown in the workspace, usually near your profile icon. Note the number before you start, so you know how many test clips you can afford today.
If you already use Runway, Google Flow, Genspark, or SeaArt, check whether Kling 4.0 is listed in that tool’s model picker — it rolled out to those platforms between October 23 and October 30, 2026, and using it there can be cheaper or more convenient than opening a second account.
Step 4: Understand Free Credits and Paid Plans
Kling runs on credits, not on a flat per-minute price. Different actions cost different amounts: longer clips, higher resolution, and motion controls consume more credits, so your real cost per finished video depends heavily on what you generate.
- Free plan: Kling gives you free credits when you sign in, which is enough to seriously test the platform before paying. The catch is that free output is watermarked, limited to standard resolution, and licensed for personal use only — no commercial use and no watermark removal.
- Standard plan: Around $10 a month (often listed near $8.80 a month with a discount), with 660 monthly credits, native 1080p and 4K output, 5 to 10 second motion clips, a fast queue, and watermark-free commercial use.
- Pro and higher plans: Pro costs around $37 a month for 3,000 credits, with larger plans above that for heavy creators and teams.
- Partner pricing: On Runway, Kling 4.0 costs 25 percent fewer credits until November 30, 2026. On Genspark, a 50 percent credit discount on Kling 4.0 ran until November 4. Check the pricing page inside whichever platform you use, because launch-week offers change fast.
One practical rule: free credits are for learning, not for client work. If a video will earn you money, appear in an ad, or represent a brand, generate it on a paid plan so you have the commercial license and a clean, watermark-free file.
Step 5: Make Your First Text-to-Video Clip
Your first clip should be simple. A short, clear prompt beats a long, complicated one while you are learning how the model thinks.
- Open text-to-video. In the Canvas, choose the text-to-video mode and make sure Kling 4.0 is selected as the model.
- Write one clear scene. Describe the subject, the action, the setting, and the camera in one or two sentences. Example: “A golden retriever puppy runs through autumn leaves in a sunny park, leaves swirling in the air, warm sunset light, slow cinematic camera following from the side.”
- Pick your length and size. Start with a 5-second clip at 720p or 1080p. Short and standard is cheaper, faster, and easier to judge.
- Choose the aspect ratio. Use 16:9 for YouTube, 9:16 for TikTok and Reels, or 21:9 if you want a film look.
- Generate and watch. Kling takes a minute or two. Watch the whole clip, not just the first frame: check the hands, the feet, the background, and whether the motion stays smooth to the end.
- Try a second version. Change one thing at a time — the camera move, the lighting, or one action word — and compare. Changing everything at once teaches you nothing about what worked.
A good beginner prompt formula is: subject plus action, plus setting, plus lighting, plus camera move. “A barista pours latte art in a cozy cafe, morning light through the window, close-up shot, slow push-in.” That one sentence gives the model everything it needs.
Step 6: Turn a Photo into Video with Image-to-Video
Image-to-video is where Kling 4.0 shines for beginners, because you start from a picture you already like instead of hoping the model invents one.
- Upload your image. Pick a sharp, well-lit photo or an AI image you generated. Portraits, product shots, and landscapes all work well.
- Describe the motion, not the picture. The model can already see the image, so your prompt should say what moves: “the woman smiles gently and turns her head toward the camera, hair moving softly in the breeze.”
- Use the first and last frame trick. Kling 4.0 supports first-frame and last-frame inputs. Upload a starting image and an ending image, and the model animates the change between them — perfect for before-and-after shots and product reveals.
- Keep the motion small. Gentle moves look real; big moves break. A slow head turn, a blinking eye, steam rising from coffee, or a curtain moving in the wind all read as natural. A full sprint from a still portrait usually does not.
- Generate at 5 seconds first. If the 5-second version looks right, extend it. If it wobbles, fix the prompt before spending credits on a longer clip.
Product sellers love this mode: upload a product photo, add a slow camera orbit and soft studio light, and you have a short ad clip without a studio shoot. If you run a small shop and want that kind of video at scale, a digital agency like D365A can help you turn a batch of product photos into a full set of short video ads.
Step 7: Control the Story with Keyframes
Keyframes are the biggest creative upgrade in Kling 4.0. Instead of one prompt for the whole clip, you pin up to 10 keyframe images across the timeline, and the model fills in the motion between them.
How to use them:
- Plan three beats, not ten. For your first keyframe video, use three frames: the opening shot, the middle moment, and the ending. A character standing, then reaching, then holding the product is a complete mini-story.
- Keep the character consistent. Use the same character image in every keyframe, or generate the keyframes from one reference. Changing the face between frames is the fastest way to get a morphing mess.
- Space them evenly. Roughly equal gaps between keyframes give the smoothest motion. Bunching them all at the start leaves the ending to drift.
- Write a short prompt per segment. Each gap between two keyframes gets its own motion note: “she walks toward the table”, “she picks up the cup”, “she smiles at the camera.”
- Check the joins. Watch the exact moment one keyframe hands over to the next. If a hand jumps or a face shifts, tighten that segment’s prompt or add an in-between keyframe.
Keyframes turn Kling from a clip generator into a storyboarding tool. A 30-second clip with four well-planned keyframes can carry a full product demo, a mini drama, or a travel montage.
Step 8: Use Omni References for Characters, Objects, and Audio
Kling 4.0 Omni is the reference system that sits on top of the base model. It accepts up to 15 reference inputs — images, videos, characters, and audio — and uses them to keep your video consistent.
Practical ways to use it:
- Same character, many scenes: Upload two or three clear photos of your character from different angles, then generate new scenes with that character. This is how creators make a series with one recognizable face.
- Same product, many angles: Feed in product photos and the model keeps the logo, color, and shape stable while the camera moves around it.
- Style reference: Upload a frame from a video whose look you like — warm film tones, neon night city, soft morning light — and ask Kling to match that style.
- Audio reference: Add an audio clip to guide the mood or the voice of the scene, so the generated sound matches the feeling you want.
One warning: references guide the model, they do not lock it. Check every clip for small changes in the face, the logo, or the product color. For anything that goes on a client page or an ad, verify the details frame by frame before you publish.
Step 9: Add Dialogue and Synced Sound
Kling 4.0 generates stereo audio together with the picture, which is a first for this tool. Here is how to get the best sound out of it:
- Write the dialogue in the prompt. Put the spoken line in quotes inside your prompt, with who says it: “A young chef looks at the camera and says, ‘This is the easiest pasta you will ever make.'”
- Keep lines short. One sentence per clip works far better than a paragraph. Long speeches drift out of sync and the lip movement falls apart.
- Match the voice to the face. A close or medium shot of the speaker gives the model the clearest lip shapes to animate. Wide shots hide the mouth and the sync looks worse.
- Ask for ambient sound. Add a line like “soft cafe ambience, cups clinking in the background” so the clip does not feel empty between the words.
- Listen with headphones. Check the audio on its own, without watching. If a word is garbled or the sound pops, regenerate that clip — bad audio is more noticeable than a small visual wobble.
If you plan to use the clip in a longer video, generate the dialogue clip separately from the silent b-roll clips, then cut them together in your editor. That way one bad line never ruins a good visual.
Step 10: Export, Watermark, and Sharing Rules
Finishing a clip properly matters as much as generating it. A good video shared the wrong way can still get you in trouble.
- Check the watermark. Free-plan clips carry a Kling watermark and are licensed for personal use only. Do not crop the watermark out and do not use a free clip in a paid ad, a client project, or a monetized video.
- Export at the right size. Download the highest resolution your plan allows, then compress a copy for each platform: 1080p for YouTube, 1080 by 1920 for TikTok and Reels, and a square version if you post to feeds.
- Keep your prompt and settings. Save the prompt, the model version, the keyframes, and the seed if the tool shows one. When a clip performs well, you will want to remake it in the same style next week.
- Name your files clearly. Something like “kling-4-puppy-park-5s-v2.mp4” is far easier to find later than “video-final-final-2.mp4”.
- Respect the people in your references. Only use photos of real people you have permission to animate, and never generate a video that makes a real person say or do something they did not agree to.
If you want to build a repeatable video workflow — prompts, references, and exports that run the same way every day — that is exactly the kind of system an AI automation service like Agentic Affairs designs for teams, so your creators spend their time on ideas instead of repetitive setup.
Step 11: Pro Tips for Better Kling 4.0 Results
Once you know how to use Kling 4.0 AI, these are the small habits that separate clean clips from strange ones:
- One action per clip. “She pours the coffee” works. “She pours the coffee, walks to the window, opens it, and waves” usually falls apart halfway through.
- Say what the camera does. “Static shot”, “slow push-in”, “gentle pan left”, and “drone shot rising” give you far more control than leaving the camera to chance.
- Avoid hands and text. AI video still struggles with fingers, small text, and logos. Keep hands out of close-ups and do not ask for readable words on signs or screens.
- Use negative prompts. If the tool offers a negative prompt box, add words like “blurry, distorted face, extra fingers, flickering, warping” to push the model away from common mistakes.
- Generate three, keep one. Budget your credits for three attempts per idea. The third version is often the keeper, and the first two teach you what to fix.
- Test on free credits first. Try every new idea on the free plan. Only spend paid credits once the prompt already works.
Kling 4.0 AI vs Other AI Video Tools
| Tool | Best For | Clip Length | Audio | Free Plan | Starting Price |
|---|---|---|---|---|---|
| Kling 4.0 AI | Realistic clips, ads, short films | 3–30 seconds | Stereo audio + dialogue | Free credits on sign-in, watermarked | ~$10/month |
| Runway | Production toolkit, editing controls | Up to 16 seconds | Audio on some models | 125 one-time credits | ~$15/month |
| Google Flow (Veo 3.1) | Generous free video | 8 seconds | Dialogue + music | 50 credits a day | Free with Google account |
| Seedance | Stylized and anime video | Up to 15 seconds | Synced audio | Free credits daily | ~$12/month |
| Luma Dream Machine | Fast idea drafts | 5–10 seconds | Limited audio | Free credits daily | ~$10/month |
Prices and free tiers change often, so check each tool’s own pricing page before you commit to a workflow that depends on it. If you only need short clips and you want the most generous free tier, Google Flow is hard to beat. If you want the longest realistic clips with the most control, Kling 4.0 is the strongest choice right now. For example, once you know how to use Kling 4.0 AI, you can pair it with Google Flow’s free tier for short clips.
Frequently Asked Questions About Kling 4.0 AI
Is Kling 4.0 AI free to use?
Yes, to start. Kling gives you free credits when you sign in, which is enough to test text-to-video, image-to-video, and keyframes properly. Free clips are watermarked, limited to standard resolution, and licensed for personal use only. Paid plans start around $10 a month and remove the watermark and add commercial use. In short, learning how to use Kling 4.0 AI costs nothing to start, and your free credits cover the first experiments.
What is new in Kling 4.0 compared to Kling 3.0?
Kling 4.0 doubles the clip length from 15 to 30 seconds, adds native stereo audio with dialogue and lip sync, supports up to 10 keyframes and up to 15 Omni references, and adds up to 4K output with 10-bit HDR and a 21:9 cinematic frame. Motion is also more stable, especially for people and camera moves.
How long can a Kling 4.0 video be?
One generation can be 3 to 30 seconds long. For longer videos, generate several clips and join them in an editor. Plan each clip as one scene or one action, and keep the character and style references the same across clips so the edit feels continuous.
Can I use Kling 4.0 videos commercially?
Only on a paid plan. Free-plan output is watermarked and licensed for personal use only, with no commercial rights. Standard and higher plans include watermark-free output and commercial use. Always check the license terms inside your own account, because they can change.
Where else can I use Kling 4.0 besides klingai.com?
Kling 4.0 rolled out to partner platforms in late October 2026, including Runway, Google Flow, Genspark, SeaArt, Miora, ArtArch, and AZ8. Pricing and credit costs differ on each platform — Runway, for example, charges 25 percent fewer credits for Kling 4.0 until November 30, 2026 — so compare before you generate.
Does Kling 4.0 keep the same character across clips?
Yes, with Omni references. Upload two or three clear photos of the character and use them as references in each generation. The face usually stays close, but small details can drift, so check every clip and keep your best reference images saved for the next session.
Final Thoughts
Kling 4.0 AI is the most capable version of Kling yet, and the upgrade is real: 30-second clips, sound and dialogue in the same pass, keyframes that let you plan a scene, and Omni references that keep a character consistent across a whole series. For a beginner, the smartest way in is the free plan — short clips, one action per prompt, gentle camera moves, and three attempts per idea.
For example, to learn how to use Kling 4.0 AI, start with a text-to-video clip today, then try image-to-video with a photo you already love, then add one keyframe experiment. By the end of the week you will know which prompts work for your style, and you will have a small library of clips ready to post. The tools will keep changing — prices, credit offers, and model versions move every month — but the skill of writing a clear visual prompt stays useful in every AI video tool you touch next.
Explore More Free AI Tools
Want to keep creating without spending money? Try these free tools on AI Tool Steps: the AI Title Generator for catchy headlines, the Meta Description Generator for search-ready descriptions, the AI Rewriter for fresh wording, and the Keyword Density Checker to keep your pages SEO-friendly. You can find them all at https://aitoolsteps.com/ — free to use, no sign-up needed.